Self-hosting Ghost in Home Network on a Synology NAS


Introduction
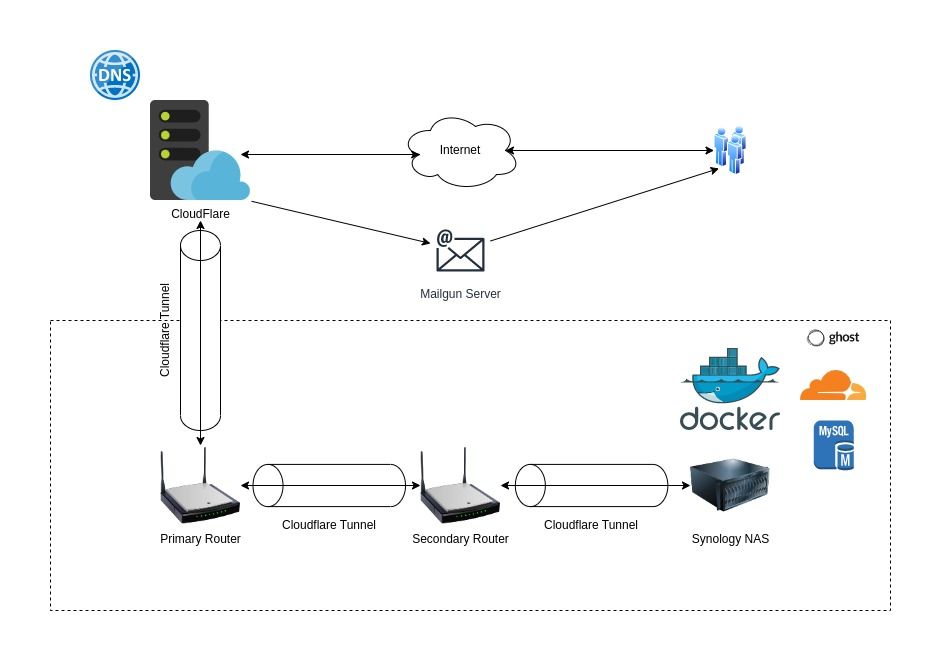
This article is about self-hosting a Ghost CMS in your home network on a Synology NAS. Ghost is an open source CMS platform that can be self-hosted for free. Alternatively, they also offer paid PaaS solutions for hosting content on their servers. This post deals with hosting Ghost at home on a Synology NAS running on DSM 7.2. Alternatively, it can also be hosted on Raspberry Pi, Portainer, or any Linux server. As my router sits behind a primary router which does not allow port forwarding, Cloudflare tunnel will be used to connect to the NAS as a reverse proxy. Alternatively, if your NAS is connected to a primary router, port forwarding can be used to connect via the Internet. However, opening up ports on a router should only be done if there are proper firewall rules in place.
Prerequisites
Ghost will be running as a Docker container on the NAS. In order to run Docker containers on DS 7.2, Container Manager needs to be installed. Additionally, Web Station needs to be installed to run web services. Note: Container Manager is available to install on Synology NAS running on DS7.2 or above. Systems running on older versions need to install Docker for container management. Also, we will be using Docker-compose to run Ghost and its dependencies. Systems running older versions do not support docker-compose to be run via the GUI. It needs to be manually installed and run via CLI. For this, it is necessary to open up port 22 in the NAS to allow ssh connections. Then you can install docker compose via the CLI and run docker compose via the CLI.
Domain registration
Domain registration can be done via Cloudflare or if you already have an existing domain name, it can either be transferred to Cloudflare or it can also be connected to the Cloudflare tunnel by adding CNAME or Alias records to your existing domain.
Cloudflare Zero-Trust tunnel
Cloudflare tunnels need to be configured to connect to the NAS via the internet. You can create a tunnel by navigating to Cloudflare's Zero trust dashboard and create a new tunnel under Access ⇾ Tunnels. You will then receive a token with which you can connect your client. Take a note of this token and keep this tab open until our client connector has been connected to the tunnel successfully.
Mailgun setup
Mailgun is used to send out Emails. Mailgun is the required setup for Ghost to send bulk emails. On its free plan it allows sending up to 5000 Emails per month. With Mailgun, you can register a subdomain on your registered domain name to send out emails (eg. mail.yourdomain.com). To create a new domain, navigate to Sending ⇾ Domains in Mailgun. To verify your domain name, you will need to add TXT, MX and CNAME records on your domain registrar. Once your domain is verified, you can create a new SMTP user to send out bulk emails (eg. [email protected]). Navigate to Sending ⇾ Overview ⇾ SMTP Credentials ⇾ New SMTP User. Once your user has been created, select Reset Password option and copy the new password. Take a note of this password.
Additionally, you will need Mailgun API key to send out transactional emails. This can be found in User Account ⇾ API Keys ⇾ Private API Key. Take a note of this key.
Docker-compose setup
In order to map volumes, create the following folder structure in your NAS filesystem.
volume1	/
├── docker/
│   ├── ghost/
│   │   ├── volumes/
│   │   │   ├── ghost-data/
│   │   │   └── mysql-data/
Then create a deployment.yaml file on your computer with the following config.
version: '3.1'
services:
  ghost:
    image: ghost:5-alpine
    restart: always
    depends_on:
      - db
    ports:
      - 8060:2368
    environment:
      database__client: mysql
      database__connection__host: db
      database__connection__user: root
      database__connection__password: mysql-password-defined-below
      database__connection__database: ghost
      mail__transport: SMTP
      mail__options__host: smtp.eu.mailgun.org (or smtp.us.mailgun.org)
      mail__options__port: 587
      mail__options__service: Mailgun
      mail__options__secure: false
      mail__options__requireTLS: true
      mail__options__secureConnection: false
      mail__options__auth__user: [email protected]
      mail__options__auth__pass: SMTP-password-noted-above
      url: https://yourdomain.com
    volumes:
      - /volume1/docker/ghost/volumes/ghost-data:/var/lib/ghost/content
  cloudflared:
    image: cloudflare/cloudflared:latest
    container_name: cloudflare-tunnel
    restart: always
    command: tunnel --no-autoupdate run
    environment:
      - TUNNEL_TOKEN=cloudflare-tunnel-token-noted-above
  db:
    image: mysql:8.0
    restart: always
    environment:
      MYSQL_ROOT_PASSWORD: define-mysql-password-here
    volumes:
      - /volume1/docker/ghost/volumes/mysql-data:/var/lib/mysql
To deploy this file, open Container Manager and create a new project. Enter a project name, select Project path as /docker/ghost. And upload this dempoyment.yml file. Then you will need to open up port 8060 (or any other free port) for HTTPS traffic using Web Station. Then configure Web station with name based routing, where the Hostname is yourdomain.com.
This should then deploy the MySQL database and configure Ghost via Cloudflare tunnel. Logs can be viewed in Container Manager. Note that Ghost keeps crashing until MySQL database has been fully setup. It will keep retrying automatically after a crash and when MySQL is ready to receive incoming connections, only then will Ghost start configuring itself.
Deploying the yaml file will also start up the Cloudflare tunnel. Navigate to Cloudflare tunnel page to see the status of the connector. Once the connection is established, you can configure where to route the traffic to. Select Public hostname as yourdomain.com and enter Service as http://192.168.1.<your NAS IP address>:8060.
After setup, navigate to https://yourdomain.com/ghost. Then open up Settings ⇾ Email Newsletter ⇾ Mailgun Configuration. Then enter your Mailgun Subdomain and Mailgun Private API key. This is used for transactional Emails from Ghost. Bulk Email is automatically configured in the deployment.yaml file.
You can now configure the Ghost interface as needed.
Happy Hacking!