Dismantling the Git Time Machine


Understanding Git’s internals is key to appreciating its true power and flexibility. At its core, Git is a content-addressable filesystem with a version control system layered on top. It means that at the core of Git is a simple key-value data store. In its early days, Git's user interface reflected this low-level design and was more complex to use. Over time, however, the interface has evolved to become much more user-friendly, abstracting away much of this complexity. However, as the law of leaky abstractions reminds us, no abstraction is perfect: sometimes, to solve problems effectively or understand unexpected behavior, you need to peek under the hood and grasp Git’s fundamental architecture. Fortunately, git has preserved and exposed it's powerful underlying architecture that sets it apart from other version control systems and enables users to peek behind the curtain when required. This “leak” in the abstraction reveals Git’s true power and flexibility, enabling users to harness its full potential beyond the surface.
This article dives into the internal mechanics of Git, explaining how it stores and manages data under the hood. We'll explore Git’s object model, how commits work, the structure of the .git directory, and how to use Git effectively for version control and seamless collaboration with other developers.
Map of Content
.
├── Version Control Systems (VCS)
│ ├── Local Version Control Systems
│ ├── Centralized Version Control Systems (CVCS)
│ └── Distributed Version Control Systems (DVCS)
├── Plumbing vs porcelain
├── Snapshots vs diffs
├── Inside the .git folder
│ ├── Git objects
│ │ ├── Blobs
│ │ ├── Trees
│ │ └── Commits
│ ├── Git refs
│ │ ├── HEAD
│ │ │ └── Detached HEAD
│ │ ├── Tags
│ │ └── Remotes
│ ├── Change in .git directory after performing git commands
│ ├── Packfiles
│ └── Areas in Git
│ ├── Tracked vs untracked files
│ ├── HEAD
│ ├── Index
│ ├── Working dir
│ └── The Git workflow
├── Git commands
│ ├── Git clone
│ ├── Git add
│ ├── Git diff
│ ├── Git commit
│ ├── Git rm
│ ├── Git mv
│ ├── Git log
│ │ └── Author vs committer
│ ├── Working with Git remotes
│ │ ├── Git remote - Showing your remotes
│ │ ├── Git remote add
│ │ ├── Git remote fetch & pull
│ │ ├── Git push remote
│ │ └── Git remote rename & remove
│ ├── Tagging
│ │ ├── Listing your tags
│ │ ├── Creating annotated tags
│ │ ├── Creating lightweight tags
│ │ ├── Tagging later
│ │ ├── Git push tag
│ │ ├── Deleting tags
│ │ └── Checking out tags
│ ├── Git branching
│ │ ├── Creating a new branch
│ │ ├── Changing a branch name
│ │ ├── Remote branches
│ │ ├── Tracking branches and upstream branches
│ │ ├── Git push
│ │ ├── Git pull
│ │ └── Deleting remote branches
│ ├── Ancestry References
│ │ ├── Caret
│ │ └── Tilde
│ ├── Git merge
│ │ ├── Merge strategies
│ │ │ ├── Fast forward merge
│ │ │ ├── Ort (default)
│ │ │ ├── Recursive merge
│ │ │ ├── Octopus merge
│ │ │ ├── Squash and merge
│ │ │ ├── Ours merge
│ │ │ └── Subtree merge
│ │ ├── Aborting a merge
│ │ └── Undoing merges
│ │ ├── Git reset --hard
│ │ └── Git revert
│ ├── Git config rerere
│ ├── Rewriting history
│ │ ├── Git restore - Unmodifying a modified file
│ │ ├── Git restore staged - Unstaging a staged file
│ │ ├── Git commit --amend
│ │ │ ├── Modify commit message
│ │ │ └── Modify commit content
│ │ ├── Git push --force-with-lease
│ │ ├── Git rebase
│ │ │ ├── Git rebase - Changing multiple commit messages
│ │ │ ├── Git rebase - Reordering commits
│ │ │ ├── Git rebase - Squashing commits
│ │ │ ├── Git rebase - Splitting a commit
│ │ │ ├── Git rebase - Deleting a commit
│ │ │ └── Git rebase abort
│ │ ├── Git reflog
│ │ ├── Git stash
│ │ ├── Git clean
│ │ ├── Git reset
│ │ │ ├── Git reset modes
│ │ │ ├── Reset with a path
│ │ │ └── Squashing commits with reset
│ │ └── Git checkout vs git reset
│ │ ├── Without Paths
│ │ └── With paths
│ ├── Git blame
│ ├── Git bisect
│ ├── Git cherry pick
│ ├── Git maintenance
│ └── Git config FSmonitor
└── Conclusion
Version Control Systems (VCS)
Version control systems are tools that track changes to files over time, allowing you to revisit or restore earlier versions when needed. There are several types of version control systems.
Local Version Control Systems
Local version control systems include a simple database that keeps track of files across revisions locally. They work well for solo developers but lack support for collaboration between multiple developers.
Centralized Version Control Systems (CVCS)
Centralized version control system enables collaboration between multiple users at the same time by using a single server to store all versioned files, enabling multiple users to work on a project simultaneously. This setup allows for coordinated collaboration as everyone knows to a certain degree what everyone else on the project is doing. Administrators can also have fine-grained control over who can do what, and it’s far easier to administer a centralized system than it is to deal with local databases on every client. However, the central server becomes a critical point of failure—if it goes down, no one can push or pull changes. Worse, if the server loses data, all history could be lost, leaving the clients with only their local snapshots.
Distributed Version Control Systems (DVCS)
This is where Distributed Version Control Systems step in. In a DVCS, every user has a complete copy of the repository, including the entire project history. This design offers built-in redundancy. Thus, if any server dies, any of the client repositories can be copied back up to the server to restore it. Every clone is really a full backup of all the data. Git is a decentralized version control system designed to efficiently handle projects of any scale.
Plumbing vs porcelain
Git was originally designed as a toolkit for building a version control system, rather than a fully polished VCS out of the box. As a result, it includes a wide range of subcommands—some aimed at low-level operations and others intended for everyday use. The low-level commands are known as plumbing commands, while the higher-level, user-friendly ones are called porcelain commands. Plumbing commands expose Git’s internal mechanisms and are primarily intended for use in scripts or as building blocks for more complex tools.
Snapshots vs diffs
Version control systems typically use one of two approaches to track changes: storing differences (diffs) between file versions, or capturing full snapshots of the project at each point in time. The former stores sets of files and the changes made to each over time, while the latter store snapshots of the repository itself, and not just the diffs that changed in each revision. While traditional systems often rely on diffs—recording only what changed in each file—Git takes a different approach, it works with diffs. Git saves a complete snapshot of the entire repository with every commit. This design offers several advantages: switching between versions (checkouts) is nearly instantaneous, as opposed to adding and subtracting diffs to files between the current revision and the revision you want to jump back/forward to. Moreover, because Git keeps the full history locally, it doesn’t need to contact a central server to access previous versions. This makes Git extremely fast, especially when comparing diffs across a large history, it can be done instantaneously, completely locally.
Inside the .git folder
When you run git init in a new or existing directory, Git creates the .git directory, which is where almost everything that Git stores and manipulates is located. If you want to back up or clone your repository, copying this single directory elsewhere gives you nearly everything you need.
Here’s what a newly-initialized .git directory typically looks like:
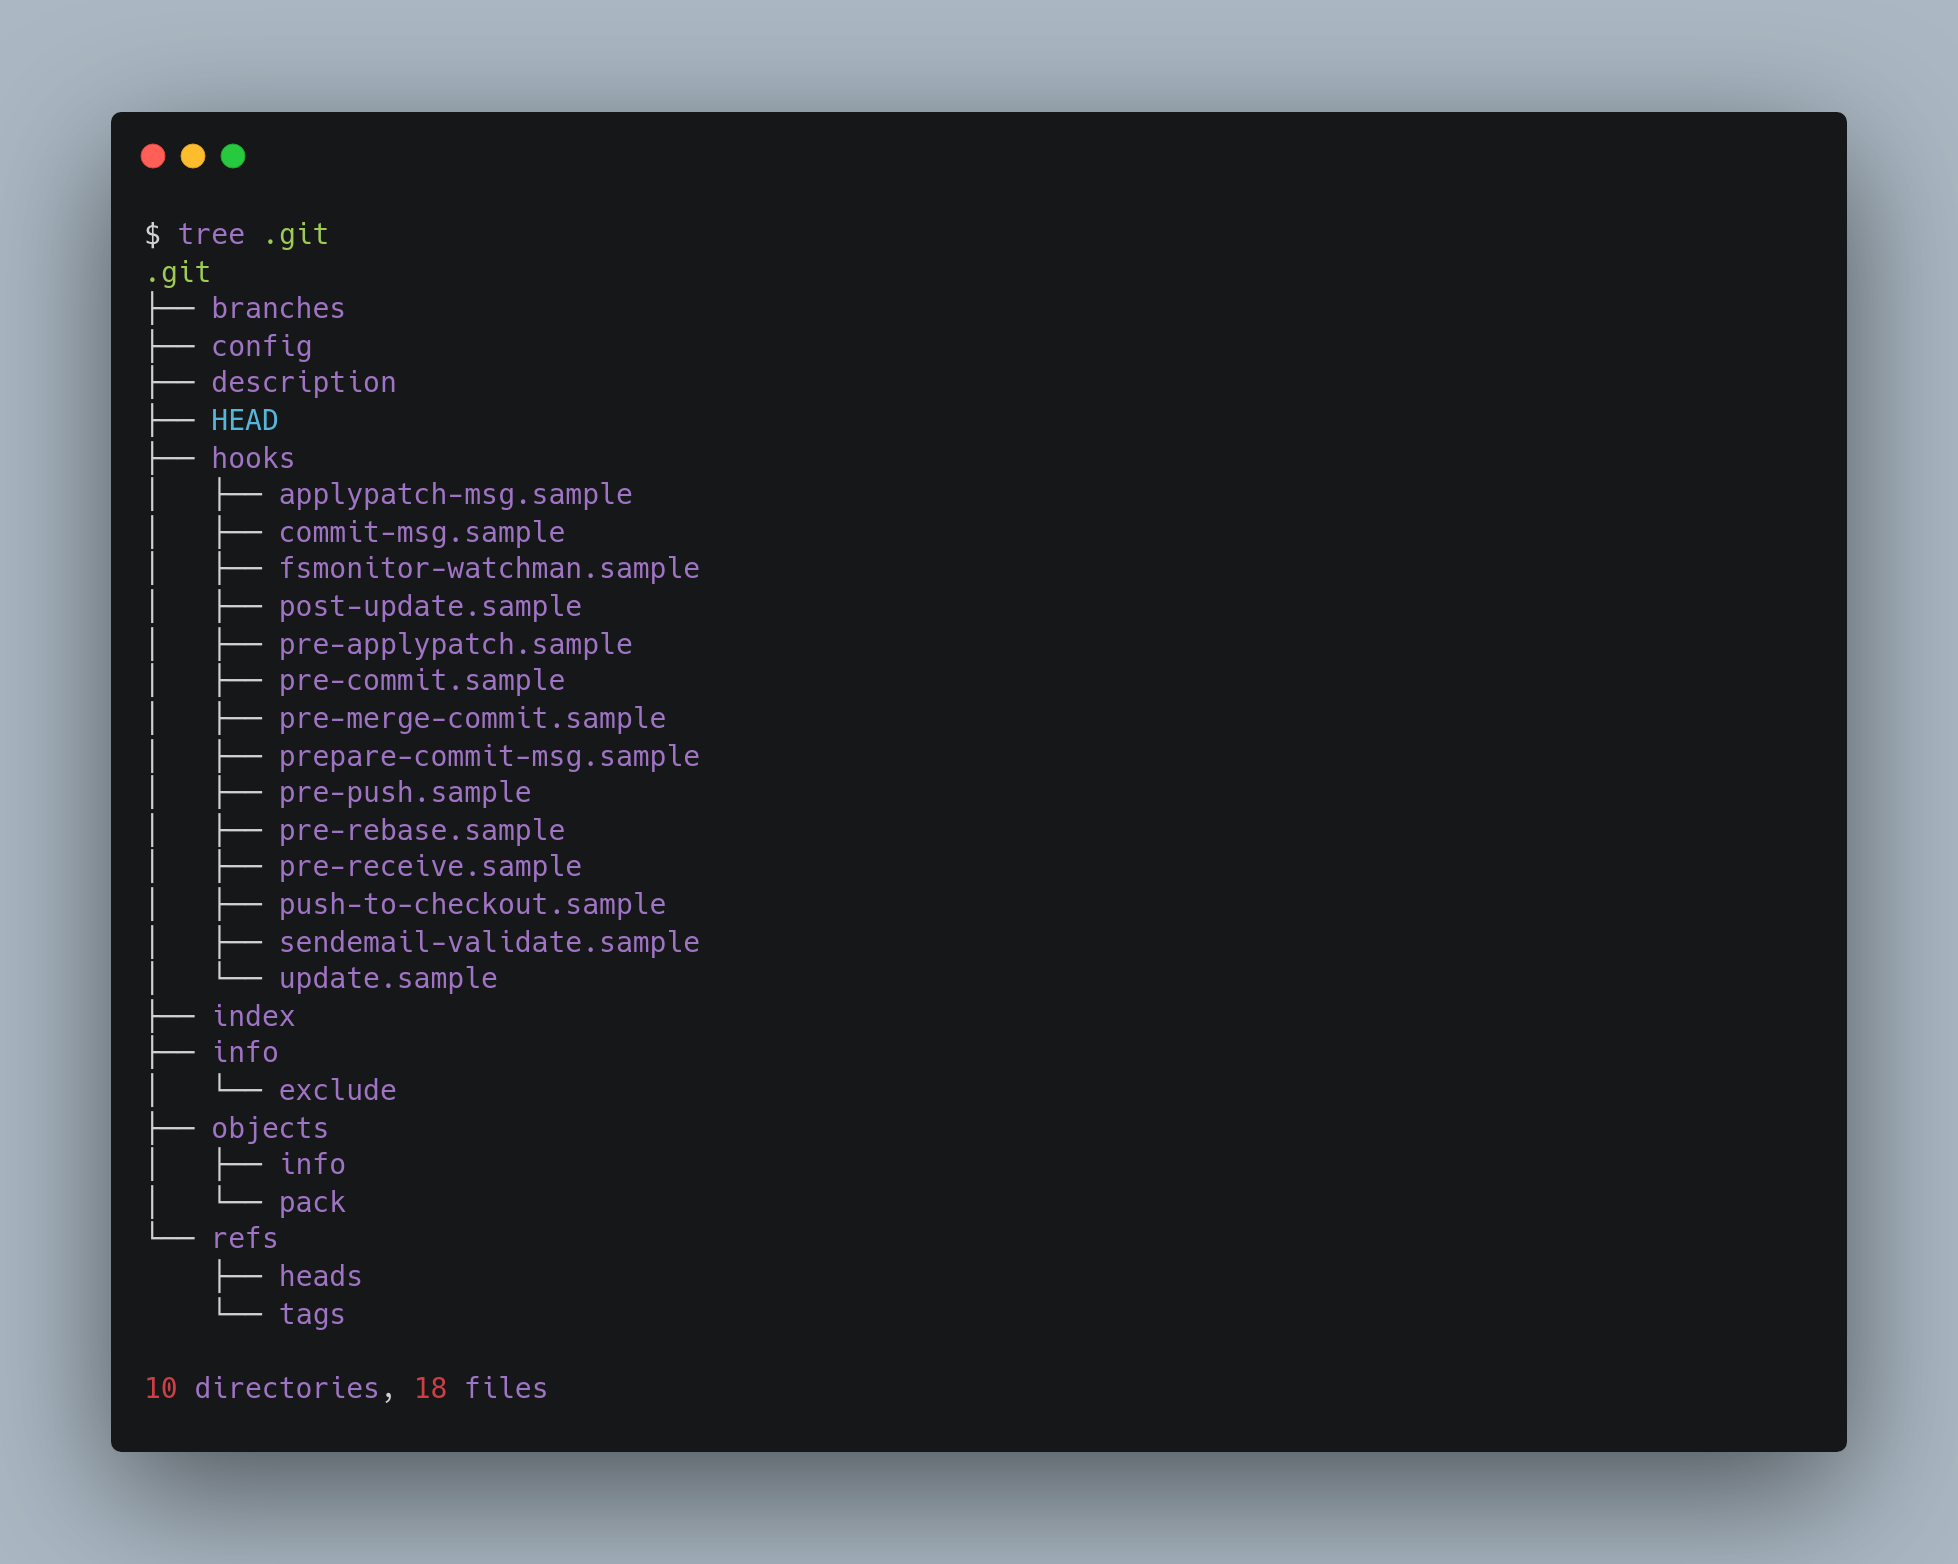
- The branches folder is a deprecated way to store shorthands to be used to specify a URL to
git fetch,git pullandgit push. This mechanism is legacy and not likely to be found in modern repositories. - The config file contains your project-specific configuration options.
- The description file is used only by the GitWebprogram.
- The hooks directory contains your client- or server-side hook scripts. All of them are disabled by default. The
.samplesuffix has to be removed from the filename by renaming to activate them. - The info directory keeps a global exclude file for ignored patterns that you don’t want
to track in a.gitignorefile.
This leaves four important entries: the HEAD, index, and the objects and refs directories. These are the core parts of Git.
- The objects directory stores all the content for your database.
- The refs directory stores pointers to commit objects (branches, tags, remotes and more).
- The HEAD file points to the branch you currently have checked out.
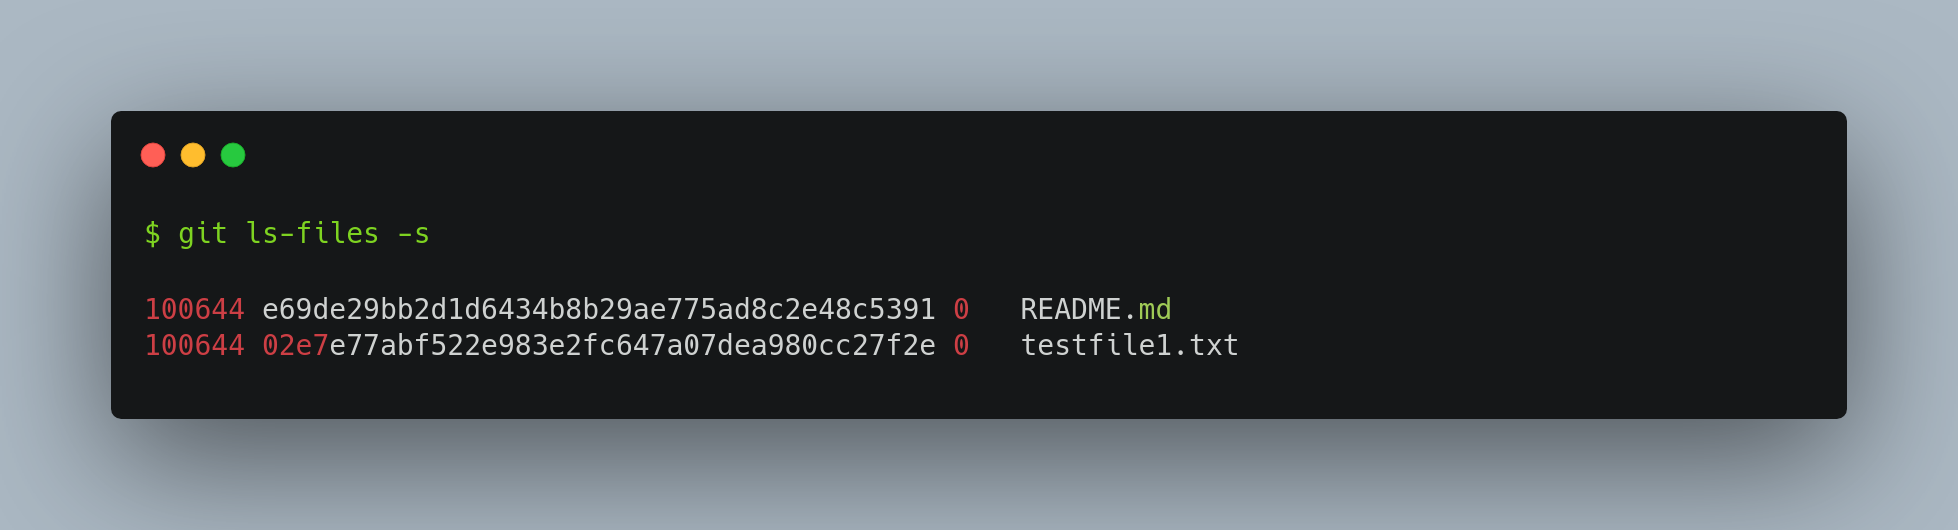
- The index file is a binary file where Git stores your staging area information including filename, blob hash and file permissions of all files during the time of staging.
Git Objects
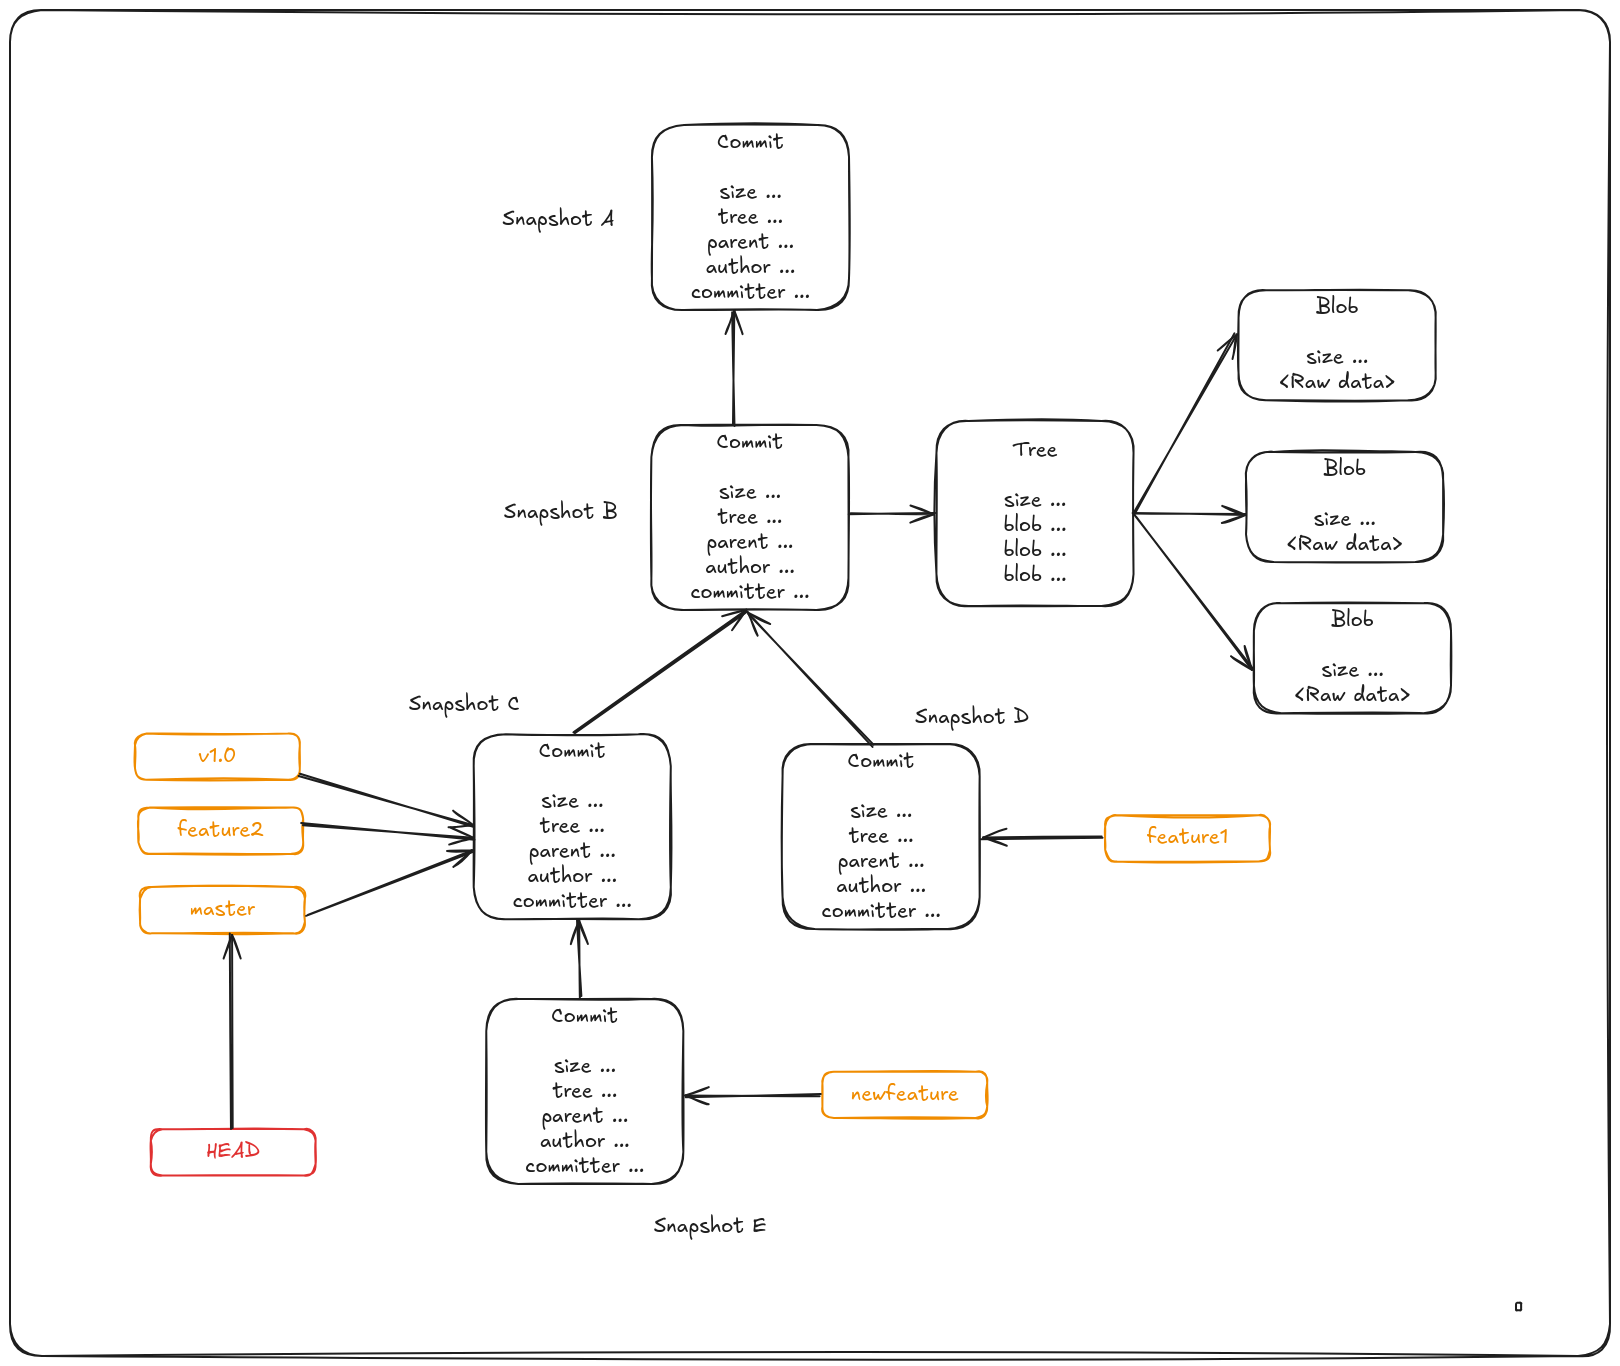
It is very useful to think about Git as maintaining a file system, and specifically — snapshots of that system in time. There are three main types of objects in Git: blob, tree, and commit.
Blobs
In git, the contents of files are stored in objects called blobs—short for binary large objects.
Unlike files in a traditional filesystem, blobs contain no metadata. They don’t store filenames, timestamps, or permissions—just the raw contents of a file.
Every blob in Git is identified by its SHA-1 hash. SHA-1 hashes consist of 20 bytes, usually represented by 40 characters in hexadecimal form. This hash is computed from the content of the file along with a small header. Git uses this hash to name and store the blob in the .git/objects directory.
To store a blob:
- Git runs the content and header through the SHA-1 hashing algorithm.
- It takes the first two characters of the resulting hash to create a subdirectory.
- The remaining 38 characters become the filename inside that directory.
- The actual file content is then stored in binary form.
Git as a content-addressable filesystem means that you can insert any kind of content into a Git repository, for which Git will hand you back a unique key you can use later to retrieve that content. If the same content appears in multiple files or versions, Git stores it only once. You can even use plumbing commands like git hash-object to manually add content to the object database and retrieve its unique hash—effectively turning Git into a key-value store for raw data.
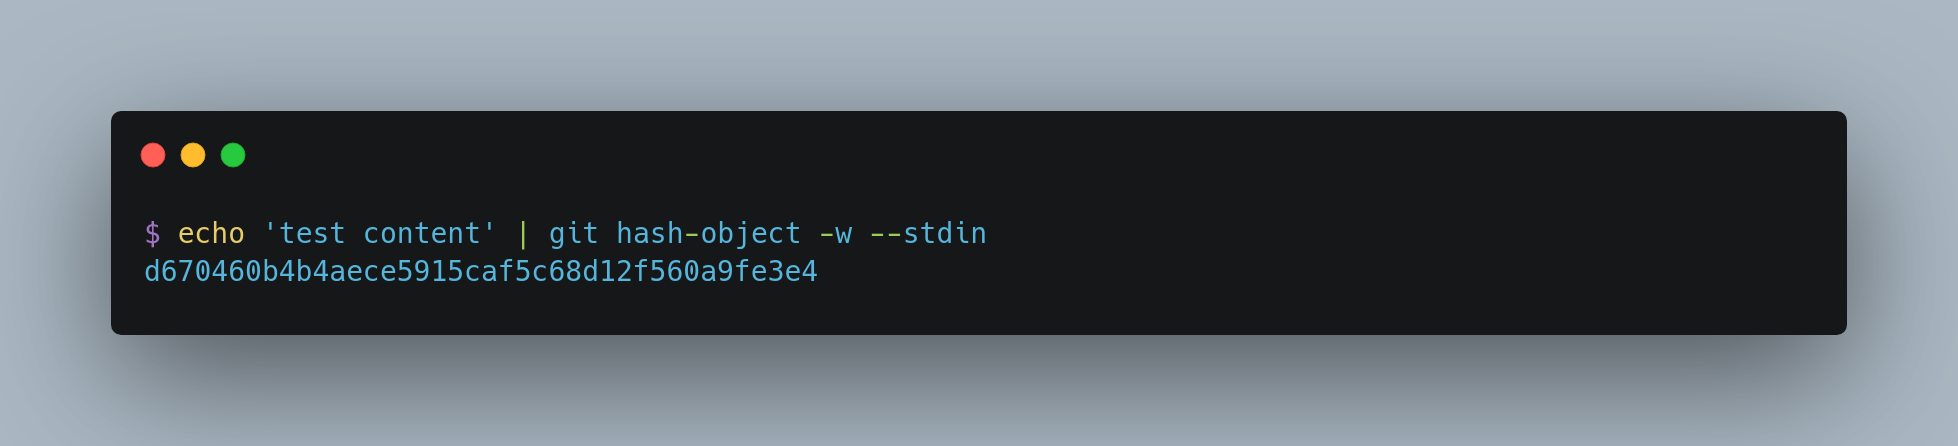
At its core, git hash-object is a plumbing command used to compute and optionally store the content as a Git object.
- By default, it takes the content you provide and returns a unique SHA-1 hash—the key Git would use to store that object.
- Adding the
-wflag tells Git to actually write the object into the.git/objectsdirectory. - Using the
--stdinflag directs Git to read the content from standard input instead of from a file.
The result is a 40-character SHA-1 checksum representing a combination of:
- A header (
blob <content-length>\0) - The raw file content
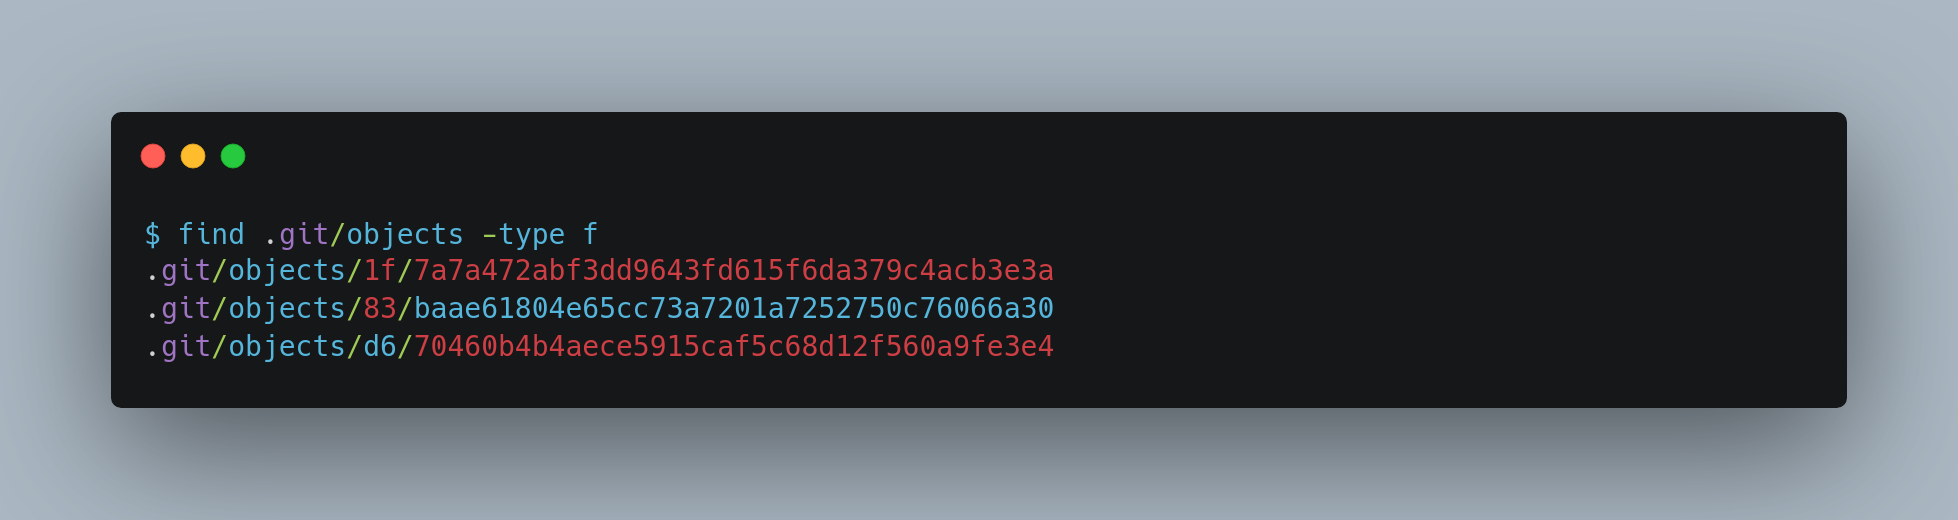
This checksum is then used as the filename under .git/objects, split into a subdirectory and file:
.git/objects/d6/70460b4b4aece5915caf5c68d12f560a9fe3e4
d6is the first 2 characters of the SHA-1 (subdirectory)- The remaining 38 characters form the filename
Once you have content in your object database, you can examine that content with the git cat-file command. Passing -p to cat-file instructs the command to first figure out the type of content, then display it appropriately
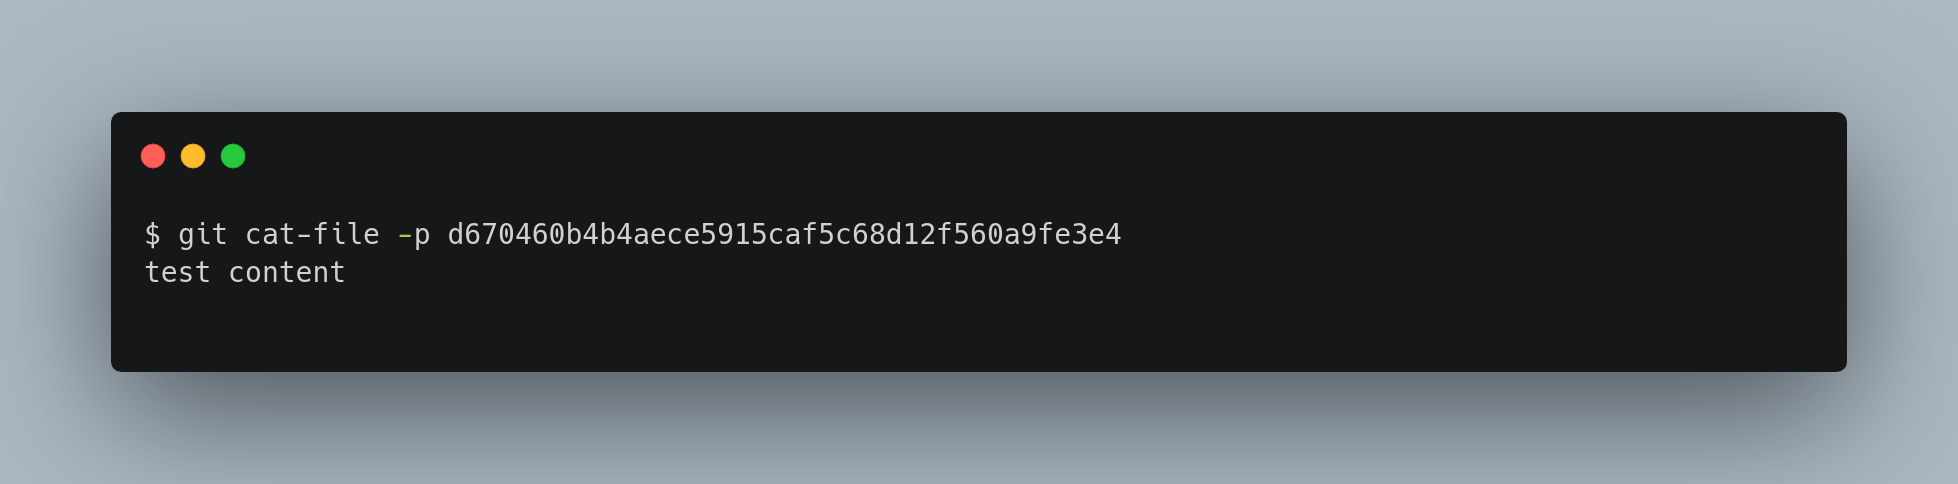
Now, you can add content to Git and pull it back out again. For example, you can do some simple version control on a file.

Then, write some new content to the file, and save it again
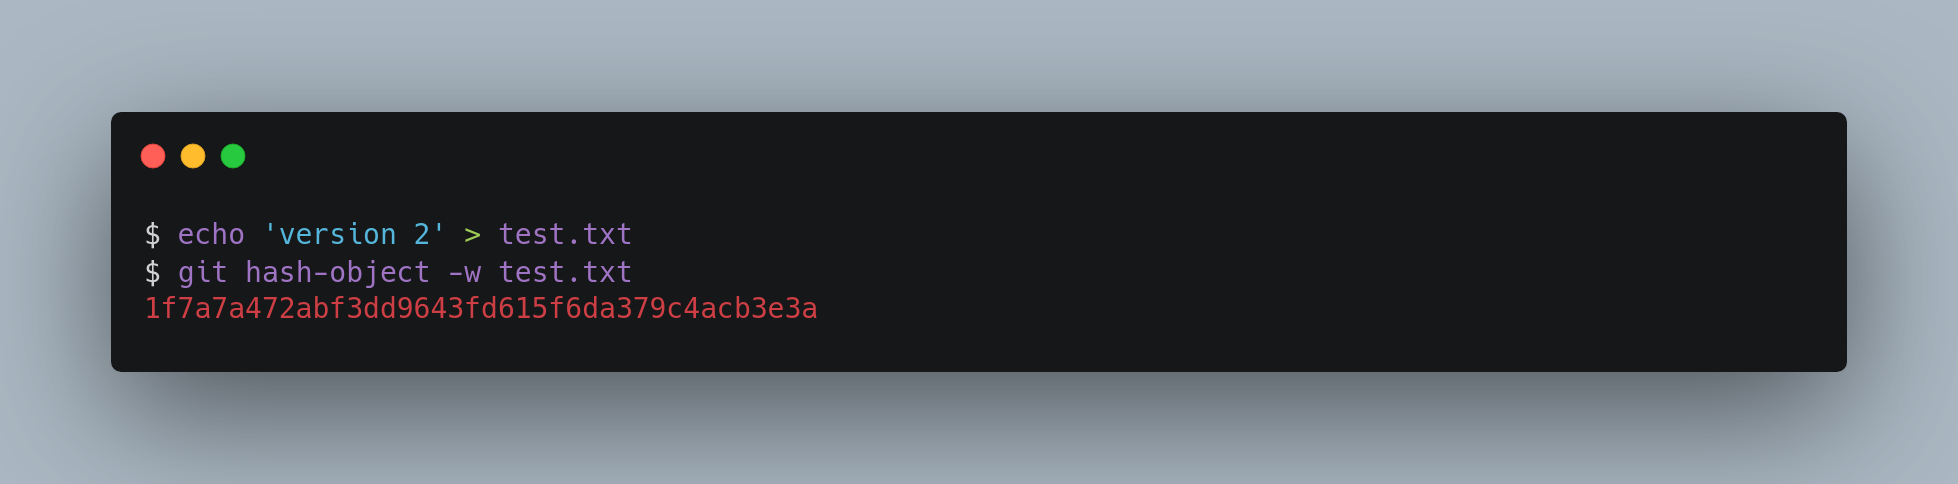
Your object database now contains both versions of this new file.
At this point, you can delete your local copy of that test.txt file, then use Git to retrieve, from the object database in the .git folder, either the first version you saved or the second version:
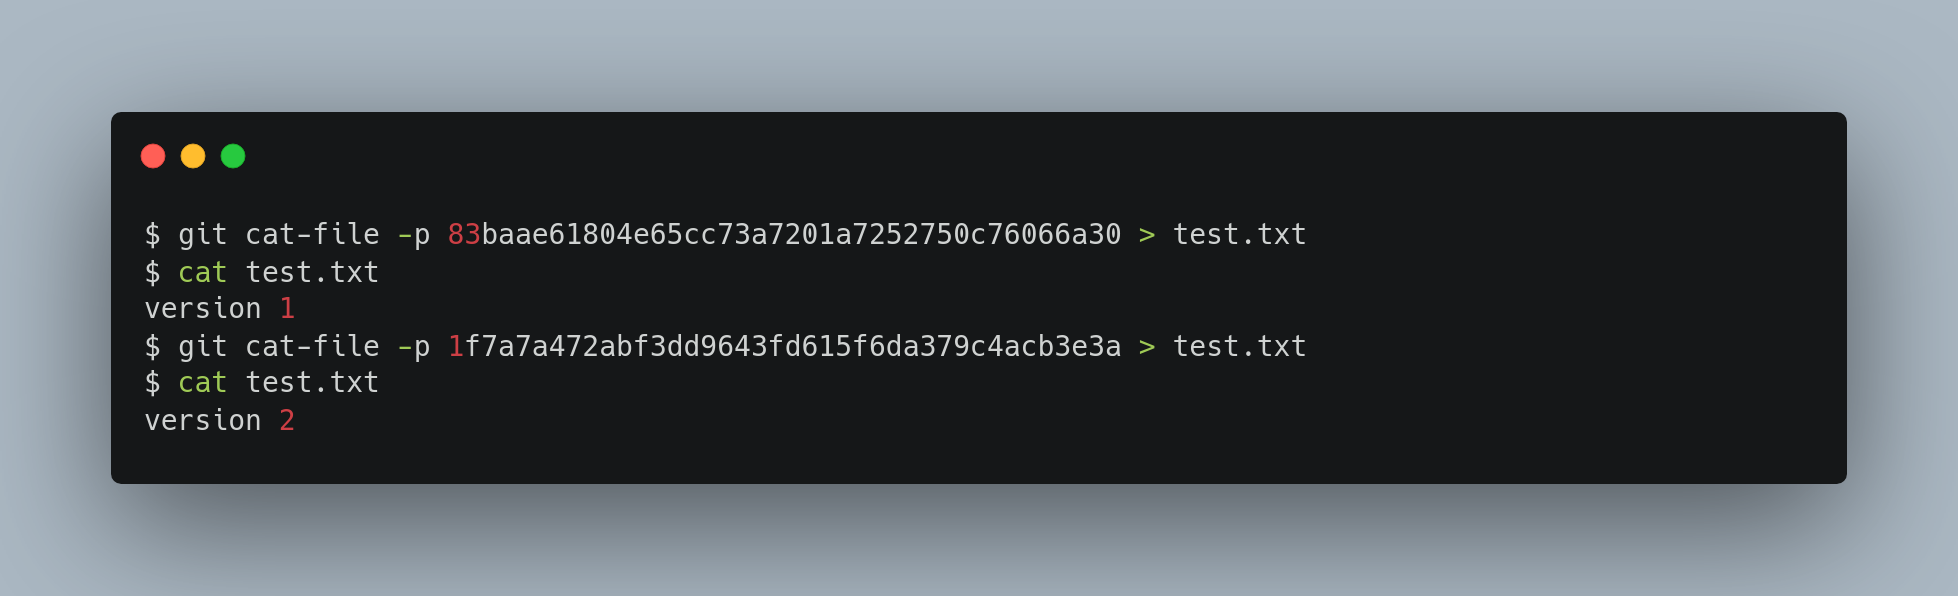
But remembering the SHA-1 key for each version of your file isn’t practical; plus, you aren’t storing the filename in your system — just the content. This object type is called a blob. Blobs are the foundation of Git’s data model, representing the immutable contents of files, independent of context like filenames or project structure.
Trees
In Git, a tree is the equivalent of a directory. It acts as a directory listing that references both blobs (files) and other trees (subdirectories). Like all Git objects, trees are identified by their SHA-1 hashes.
A tree object solves two key problems:
- Associating filenames with content – since blobs don’t store filenames or metadata.
- Grouping related files – enabling Git to represent the full structure of a project.
Each entry in a tree contains:
- The mode (e.g.,
100644for a regular file), - The type (
blobortree), - The SHA-1 hash of the referenced object,
- The filename.

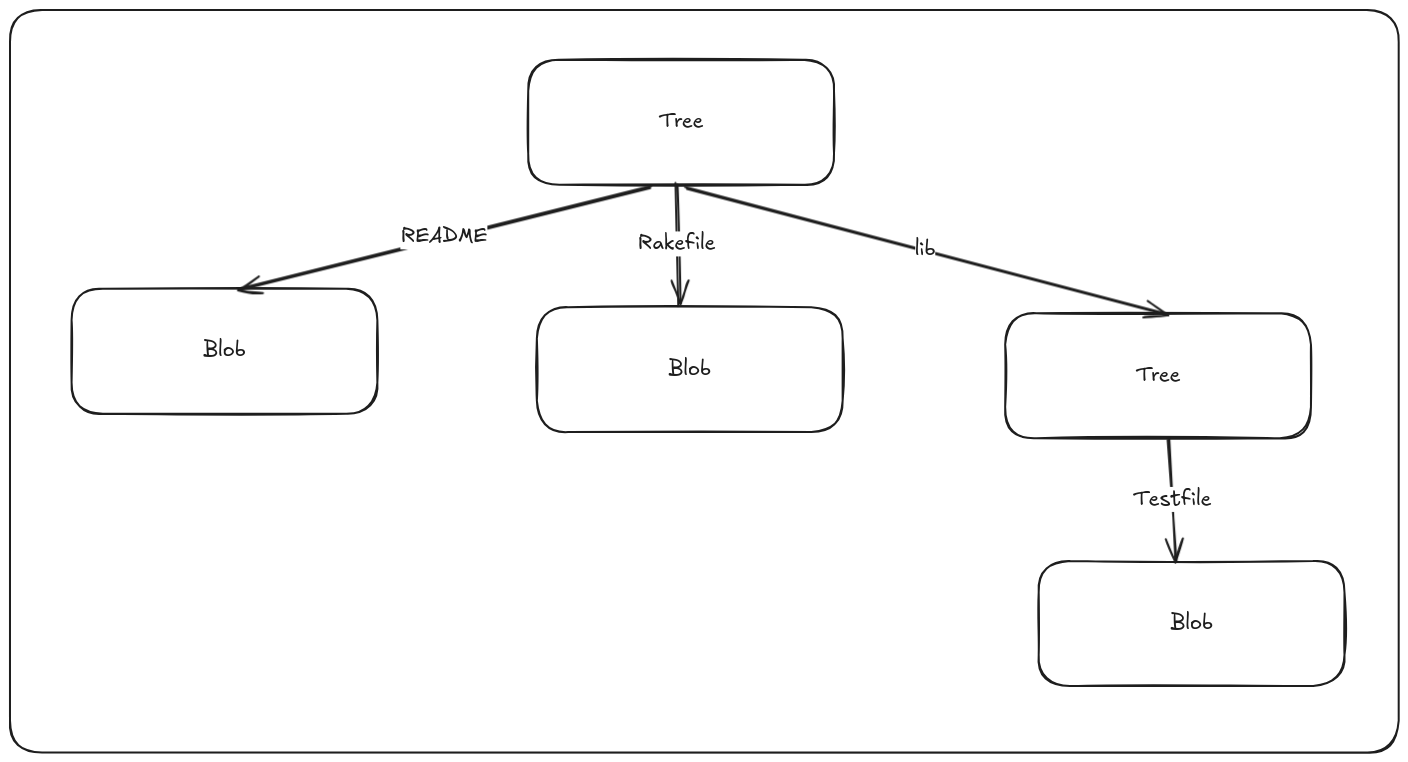
A tree represents what your working directory looked like at that point of time of commit. Notice that a tree object stores the hash of blobs and trees that it points to, the filename of blobs, and folder names of trees, and access permissions. The last three digits correspond to UNIX file permissions, and 100 in the first three digits indicate that it is a normal file, 120000 corresponds to a symbolic link.
Importantly, blobs do not store filenames or permissions. That information resides solely in tree objects. This design allows Git to store identical content from different files as a single blob, avoiding duplication. When a file is renamed, duplicated, or its permissions change, the blob remains unchanged—Git simply creates a new tree object pointing to the same blob with updated metadata. Since a tree’s identity (its hash) is derived from the contents it tracks (blobs, subtrees, filenames, permissions), any change to these causes a new tree object to be created. This structure underpins Git’s ability to efficiently represent and manage the entire project history with minimal redundancy.
Git uses a hierarchy of trees and blobs to efficiently store and represent directories and their contents. Trees form the backbone of Git’s snapshot model, organizing raw file data (blobs) into structured, navigable versions of a project.
Commits
In Git, each commit represents a snapshot of your project at a specific moment in time. While tree objects represent the structure and contents of the working directory, commit objects point to the root tree of the project at that moment, effectively capturing the entire state of the repository.
A commit object contains:
- A reference to the top-level tree object,
- Zero or more parent commits (enabling branching and merges),
- Author name and email,
- Timestamp,
- A commit message.
The commit’s identity (its SHA-1 hash) is derived from all this data—including the hash of the tree it references. This means that any change—whether in the content, structure, metadata, or commit history—results in a new, unique commit hash.
You might wonder if Git stores all this data every time a new commit is made. Fortunately, the answer is no. Git uses a smart approach: if a file hasn’t changed, Git reuses the existing blob by referencing its hash. Similarly, trees only change if the structure or metadata (like filenames or permissions) changes. This deduplication significantly reduces storage overhead.
When you switch between commits, Git simply updates the working directory by restoring the corresponding trees and blobs—exactly as they were at the time of that commit.
This entire process happens behind the scenes when you run git add and git commit:
- New or modified files are stored as blobs,
- Trees are created to organize these blobs,
- A commit is made to tie everything together with metadata and references to previous commits.
These three main Git objects — blobs, trees, and commits — are initially stored as separate files in your .git/objects directory.
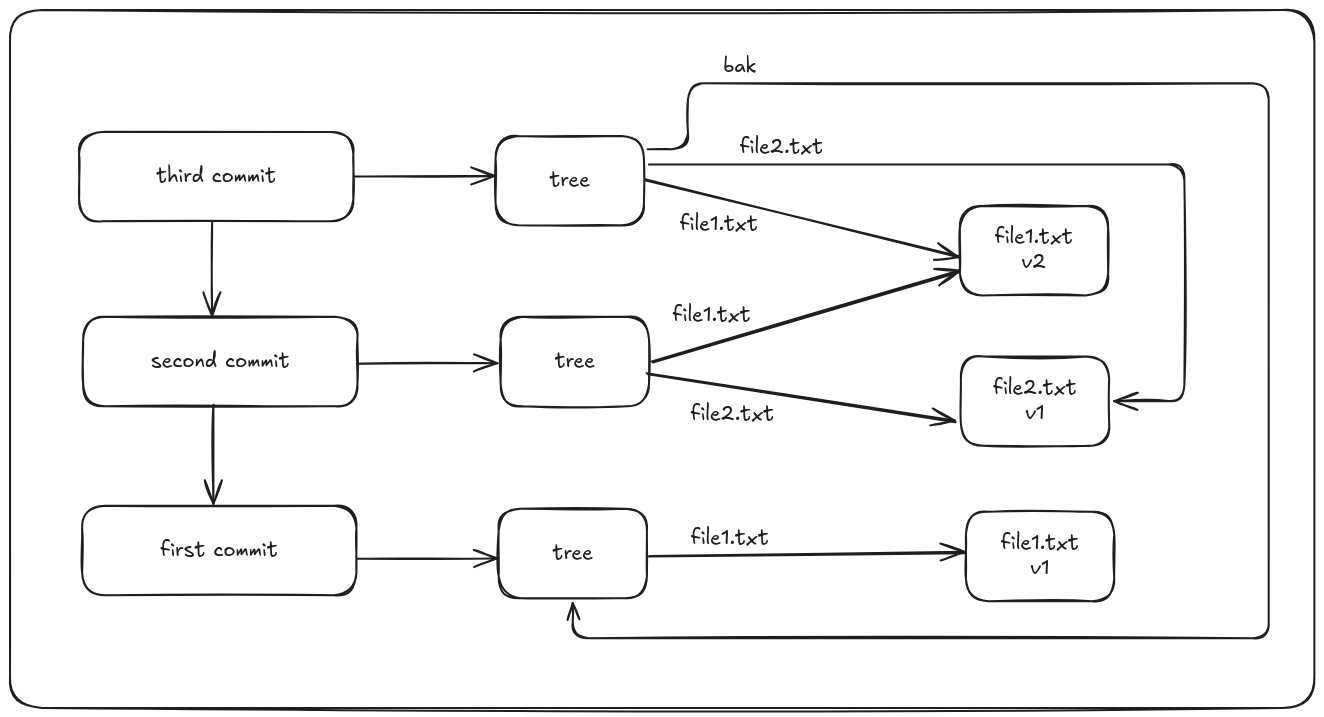
Here, the first commit creates a new file file1.txt. In the second commit, the contents file1.txt has been changed and a new file file2.txt has been added. In third commit, a new folder bak has been created, with file1.txt with its original contents.
Git refs
In Git, references (or refs) are simply files that store commit SHA-1 hashes, allowing you to refer to commits using human-readable names instead of long hashes. These reference files live inside the .git/refs directory—for example, .git/refs/heads/master points to the latest commit on the master branch.
A branch in Git is essentially a reference to the tip (latest commit) of a line of development. When you create a new branch using git branch, Git writes the SHA-1 of the current commit into a new file under .git/refs/heads/, effectively creating a new pointer to that commit.
This lightweight system of named references is what makes branching in Git fast, efficient, and easy to manage.
HEAD
When you run git branch, how does Git determine the SHA-1 of the latest commit? The answer lies in the HEAD file.
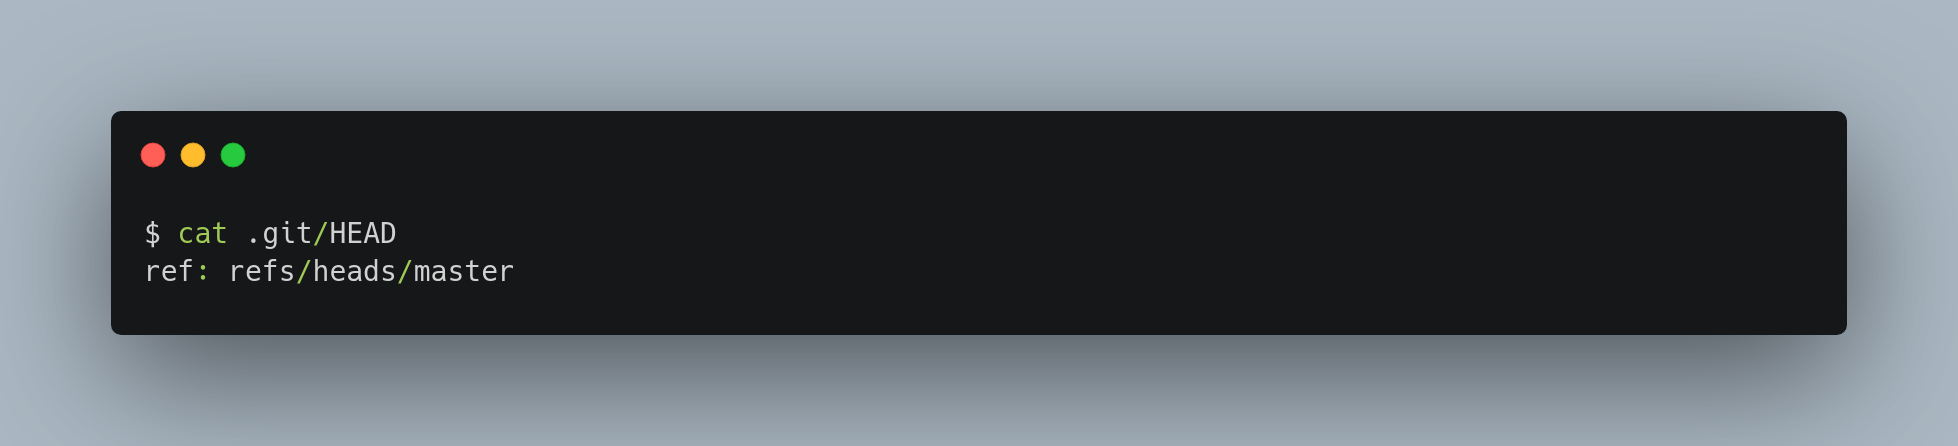
Typically, .git/HEAD is a symbolic reference that points to the currently checked-out branch. Instead of directly storing a commit hash, it points to another reference—like refs/heads/main—which in turn holds the SHA-1 of the latest commit on that branch.
However, in some cases, HEAD may contain an actual SHA-1 hash directly. This happens when you check out a specific tag, commit, or remote branch without switching to a local branch—placing the repository into what's known as a detached HEAD state.
Detached HEAD
A detached HEAD state in Git occurs when the HEAD is pointing directly to a specific commit, rather than to a branch. This typically happens when you check out a commit, tag, or remote branch without switching to a local branch.
In this state, any changes you make and commits you create are not associated with any branch. As a result, those commits may become hard to find later unless you explicitly create a new branch to reference them. While the HEAD now points to the checked-out commit, your branch reference remains unchanged, still pointing to its previous commit.
The HEAD file is located at .git/HEAD, and it plays a critical role in tracking your current position in the commit history.
If you run git checkout test, Git updates the file to look like this:

When you run git commit, it creates the commit object, specifying the parent of that commit object to be whatever SHA-1 value the reference in HEAD points to.
Tags
A tag in Git is similar to a commit object — it includes a tagger (name and email), a timestamp, a message, and a reference to another Git object. Most commonly, tags point to commits, giving them a permanent, human-readable name. Unlike branches, tags are immutable references: they do not move once created.
There are two types of tags in Git:
- Lightweight tags are simple references to a specific commit. They act like bookmarks and do not store any additional metadata. They don’t store any extra metadata beyond the commit reference, making them suitable for quick, temporary use.
- Annotated tags are full objects stored in the Git database. They contain a message, the tagger's information, and a timestamp, and can be viewed using
git show. When you create an annotated tag, Git creates a separate tag object that points to the target (usually a commit), and stores the reference under.git/refs/tags.
Annotated tags are generally preferred because they provide more context and can be cryptographically verified. However, lightweight tags are useful for simpler, throwaway markers when that additional information isn't necessary. While most tags point to commits, they can technically reference any Git object — such as a blob or tree — offering flexibility for advanced use cases.
Remotes
A third category of Git references is remote references, which track the state of branches on remote repositories. When you add a remote (e.g., origin) and push to it, Git stores the latest known state of each branch you’ve interacted with under the refs/remotes/ directory.For example, after pushing your master branch to a remote named origin, Git creates a reference at: refs/remotes/origin/master file. This reference records the last known commit on the master branch of the origin remote.
Unlike local branches (stored in refs/heads), remote references are read-only. You can check them out, but Git will not move HEAD to point to them directly, nor can you commit to them. Instead, they act as bookmarks — a snapshot of the last known state of the branch on the remote server. Git updates them automatically during fetch, pull, and push operations.
Change in .git directory after performing git commands
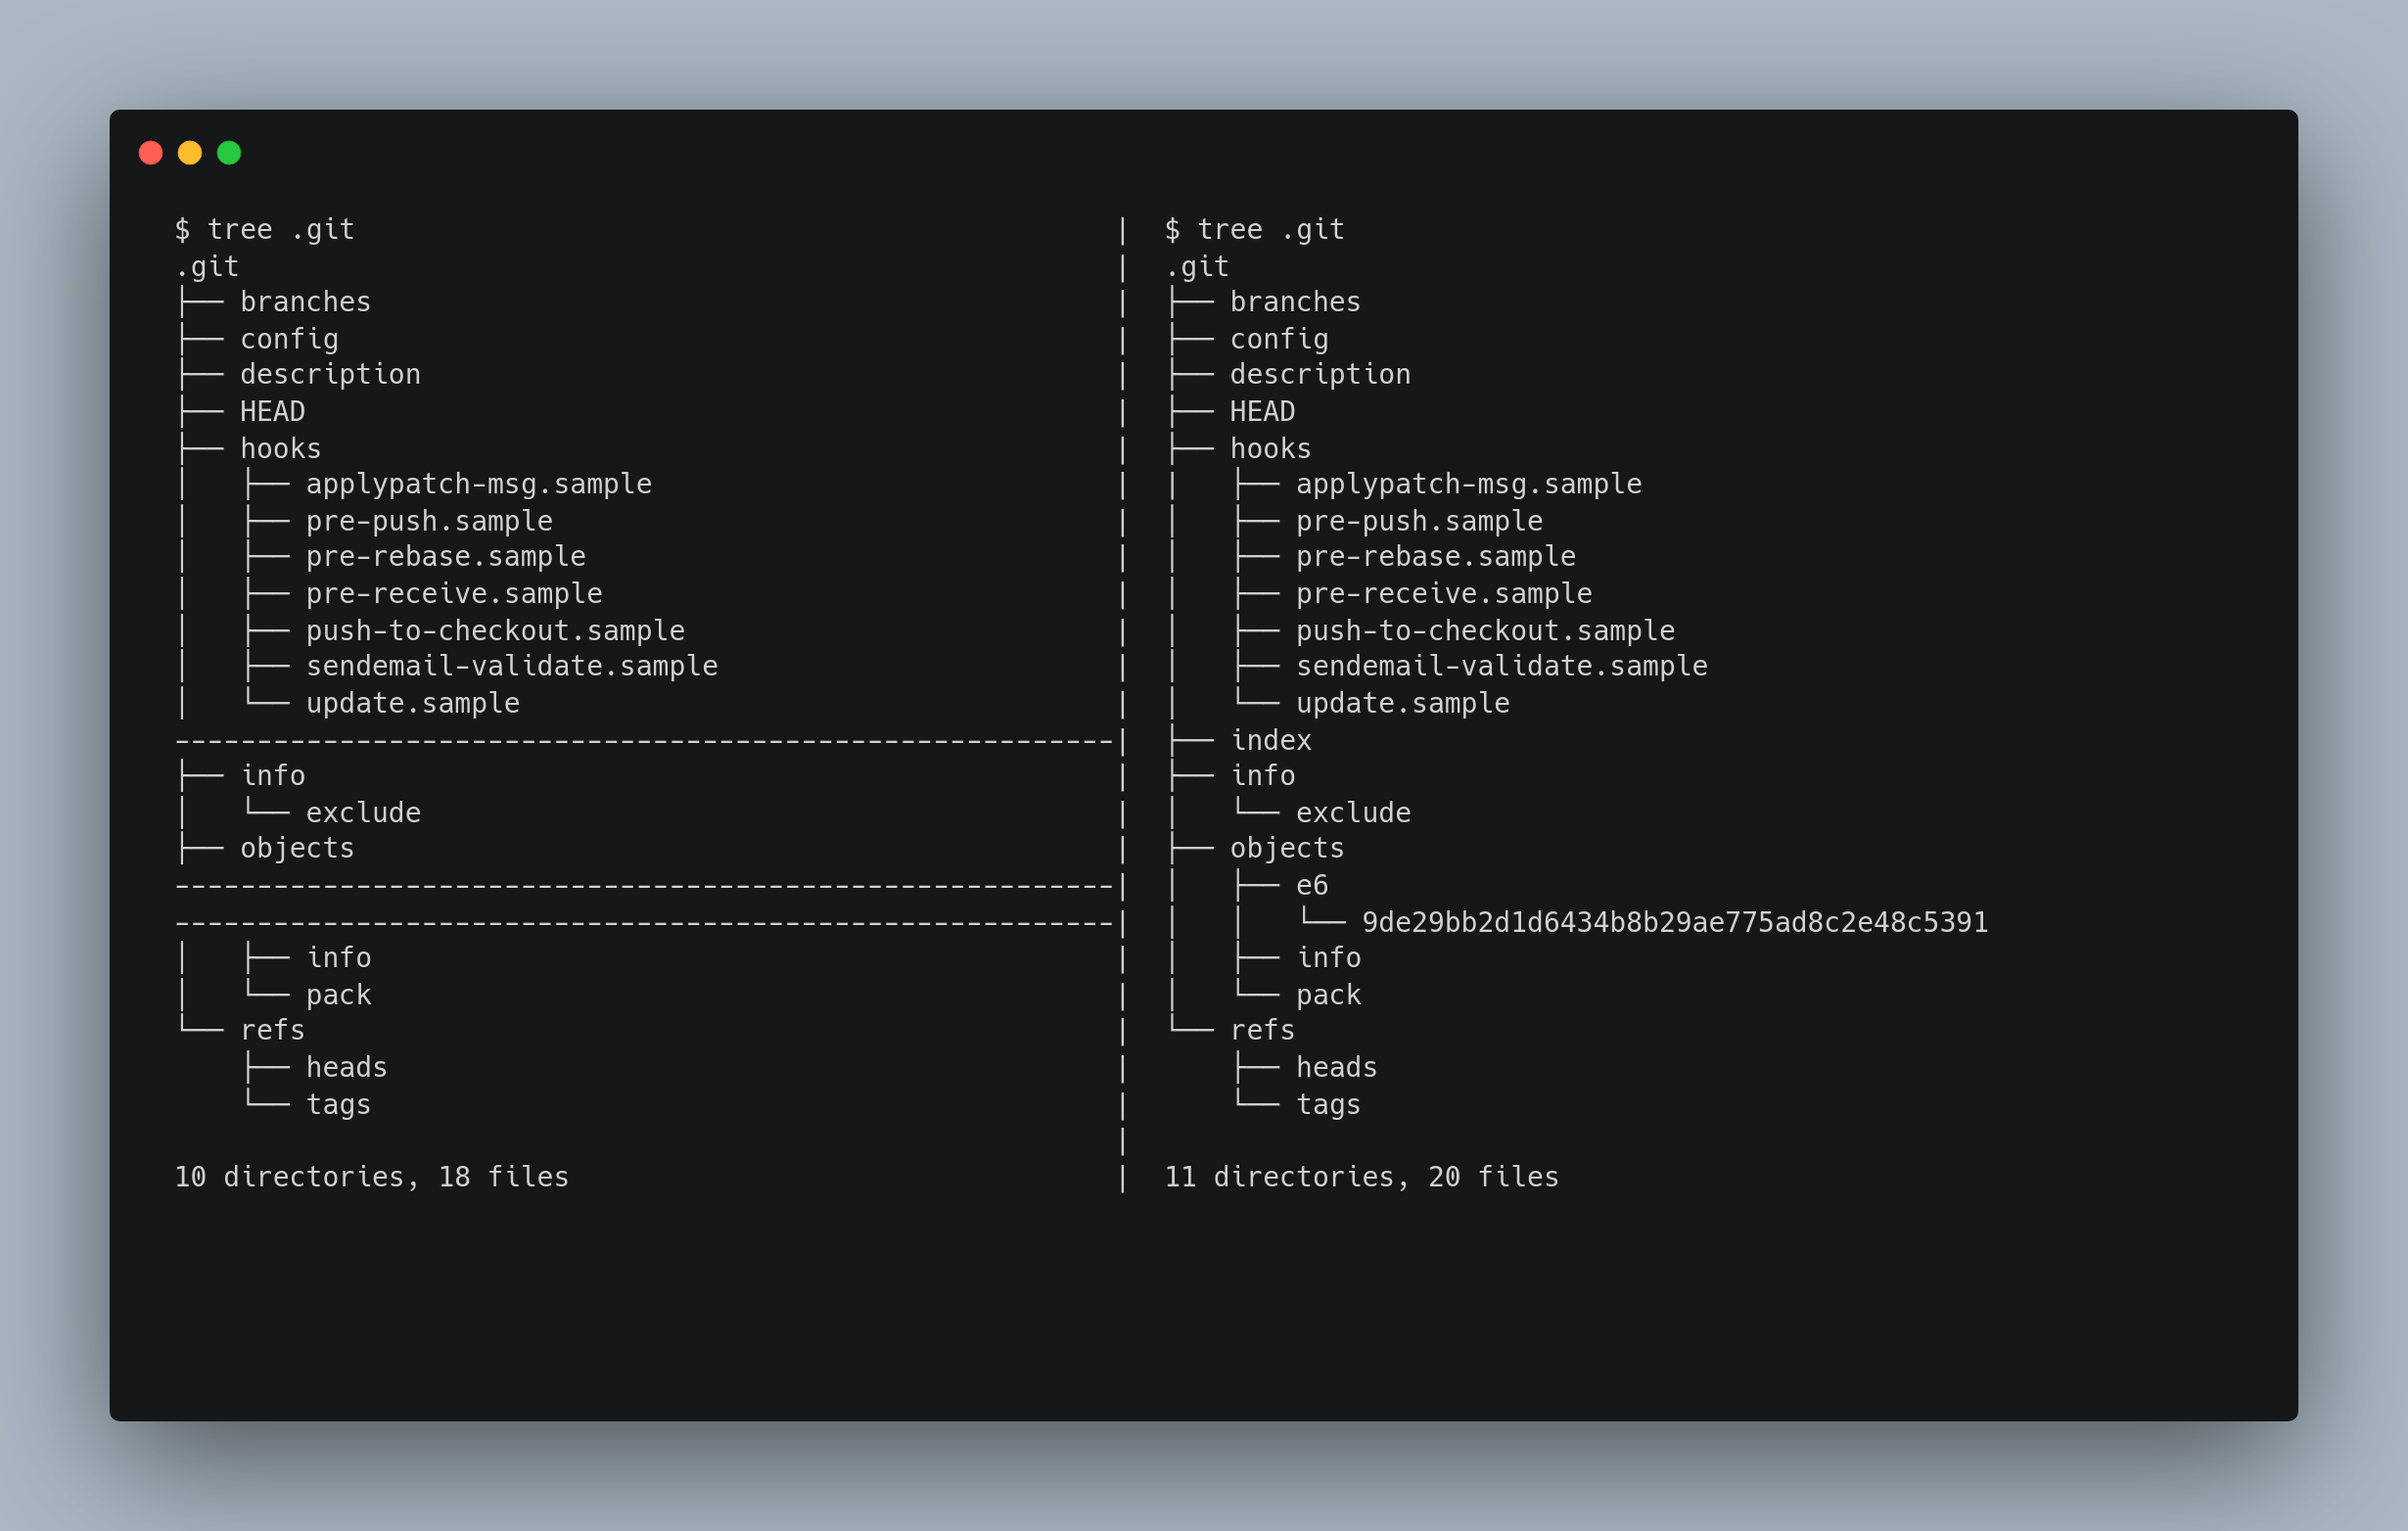
Here after adding a file to an empty git repository, we can see that it saves the contents in a Blob object and adds the staging area.
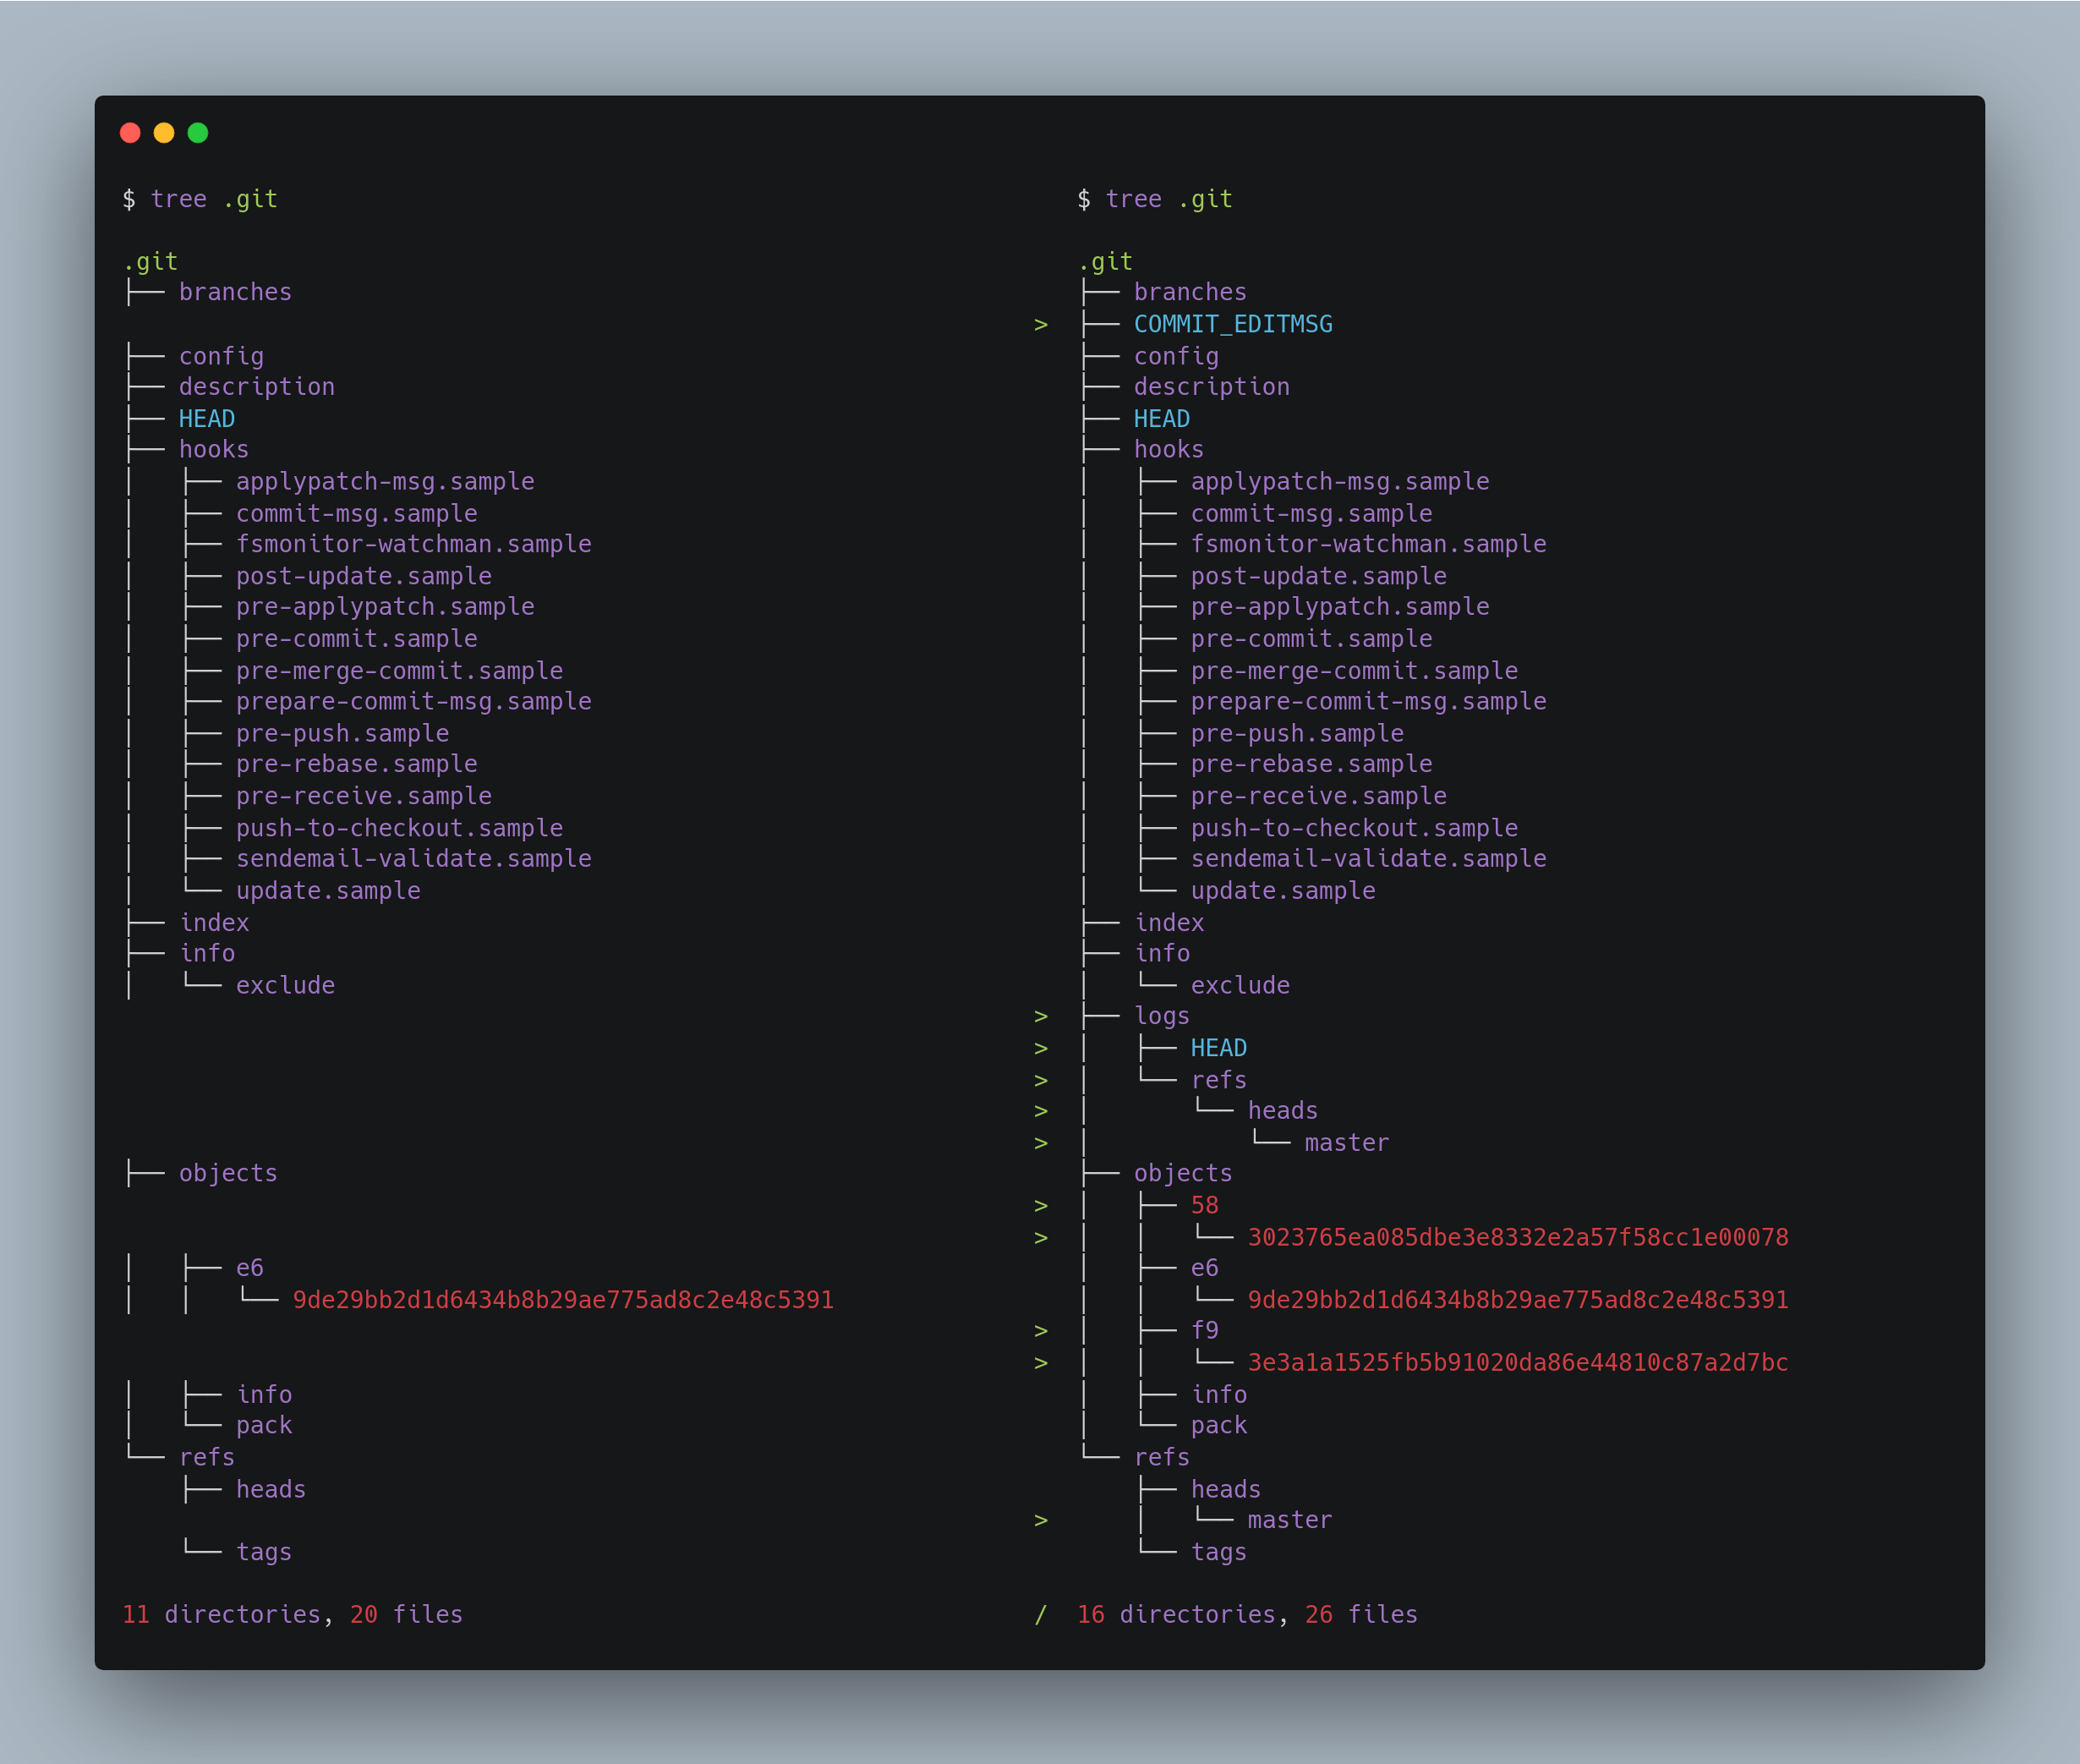
We can clearly see here that git commit has now created a master branch refs/heads/master, and added two new objects; one tree object and one commit object.
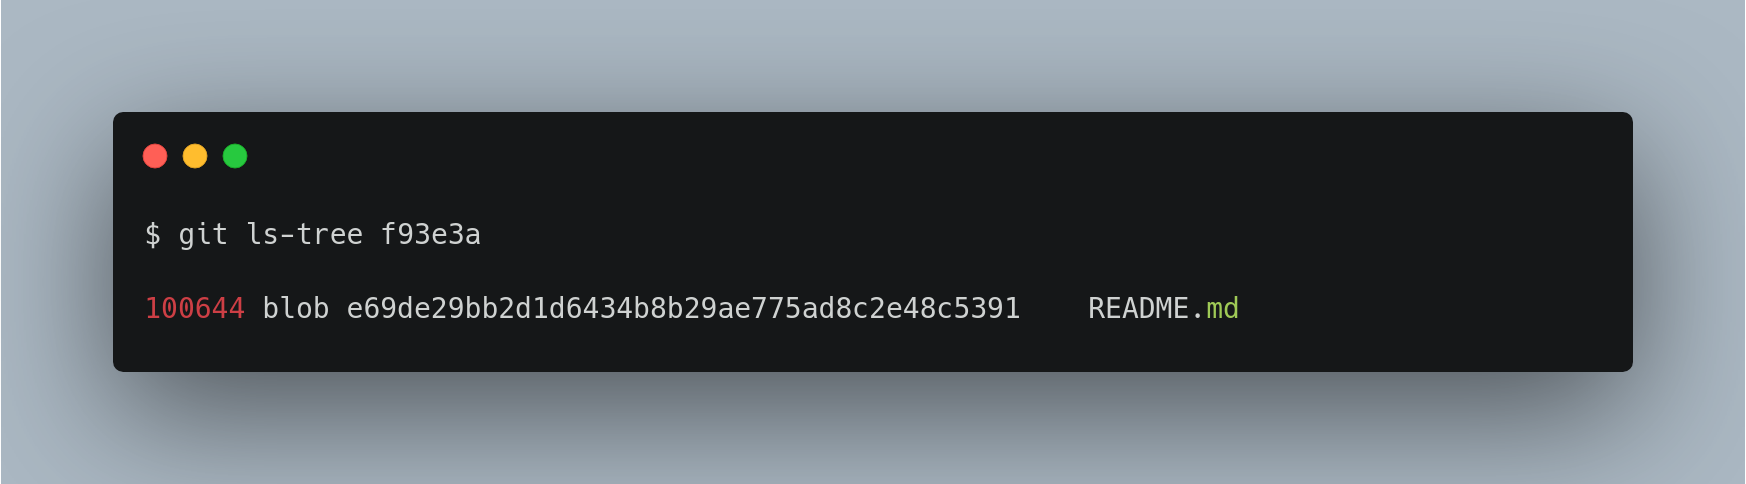
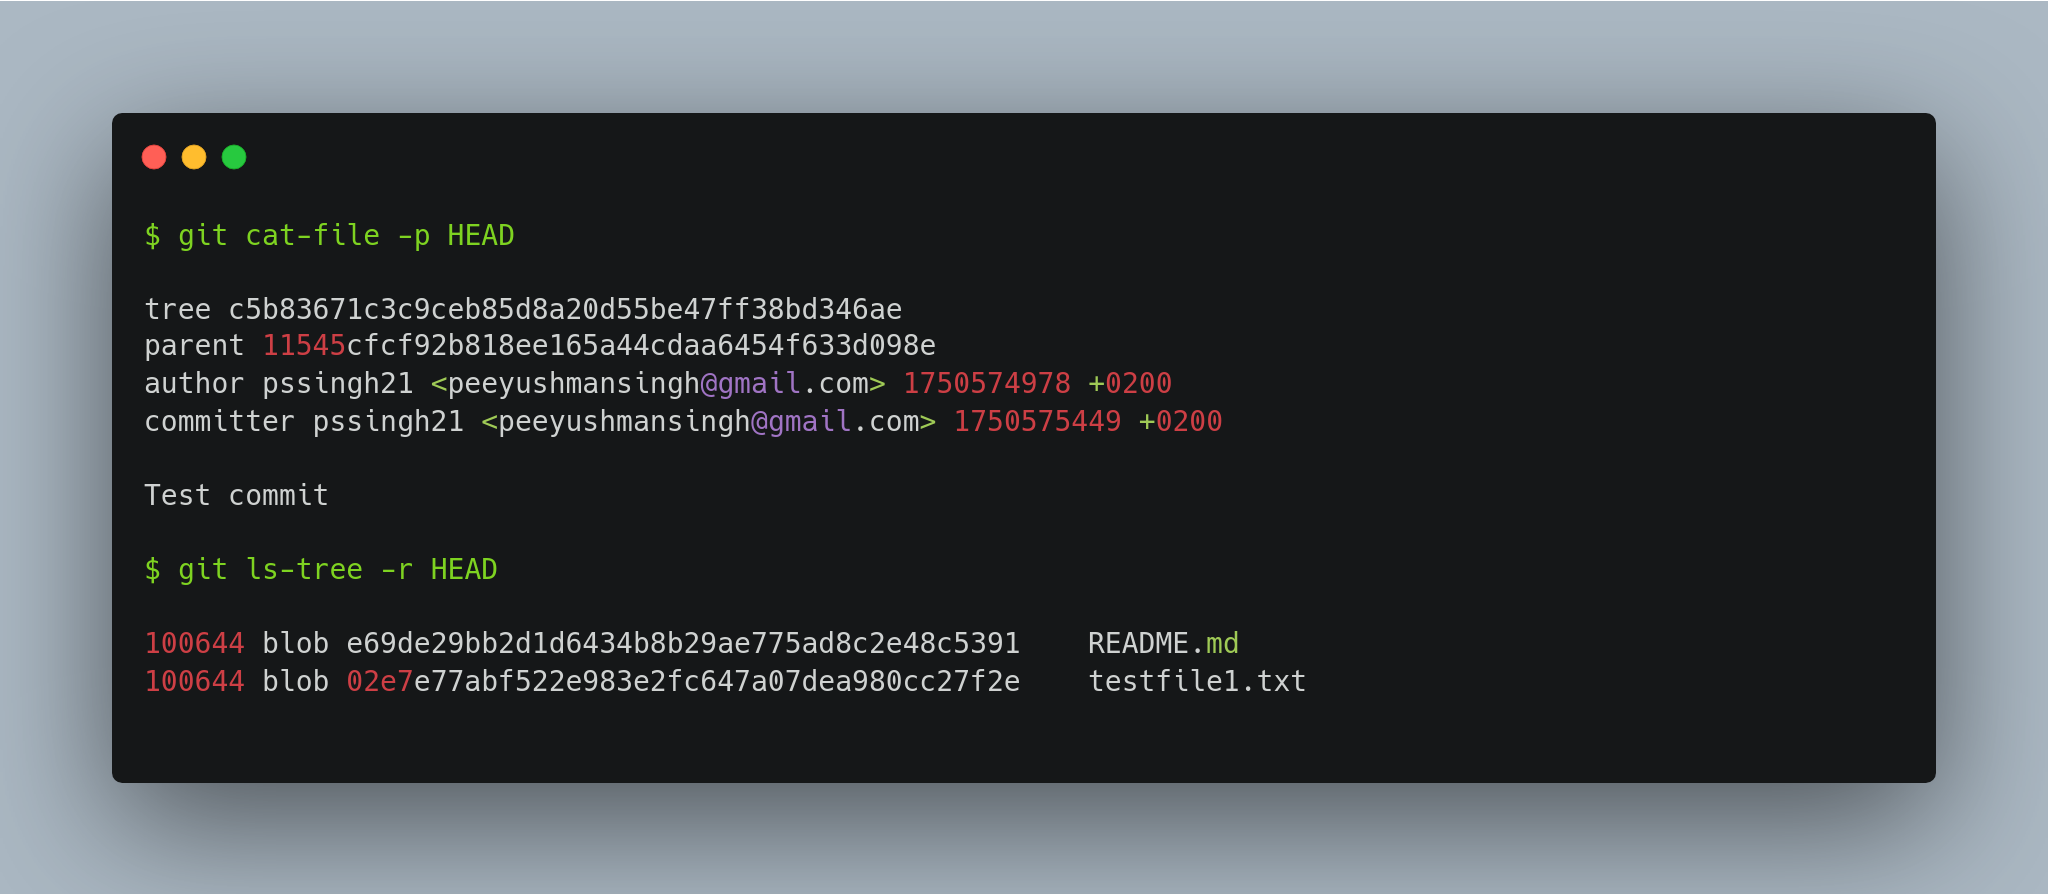
We can verify these by inspecting the git objects themselves, expecting one of them to be the commit and one a tree that the commit references to.

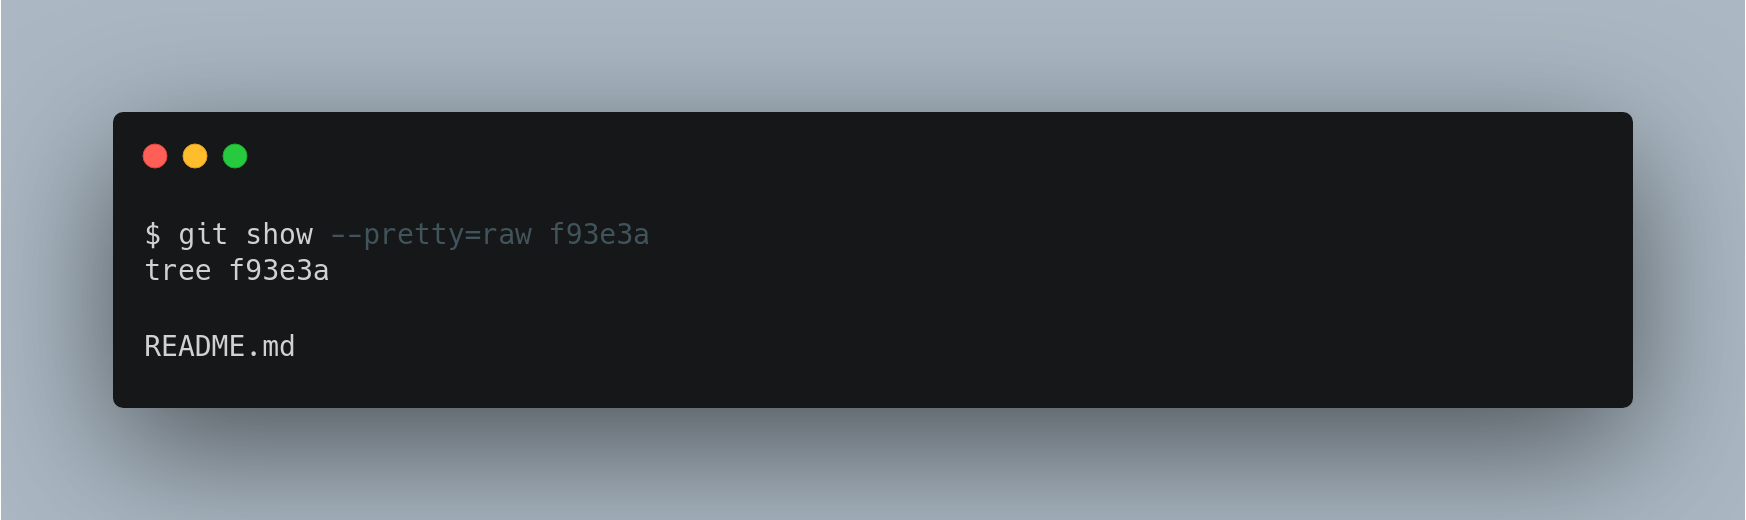
We can now find out if the tree is pointing to the Blob object we created.
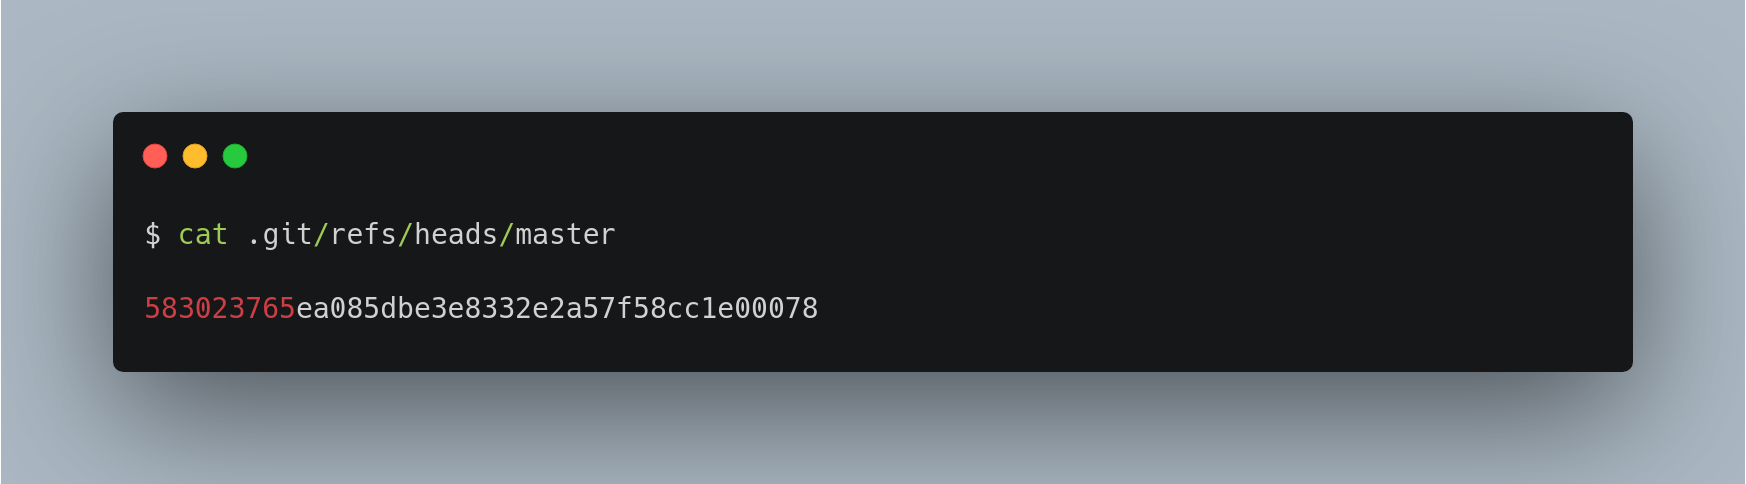
We can now check the contents of the .git/refs/heads/master file.
Now observe the changes in the directory structure after adding and committing another new file with the same content as the previous file.
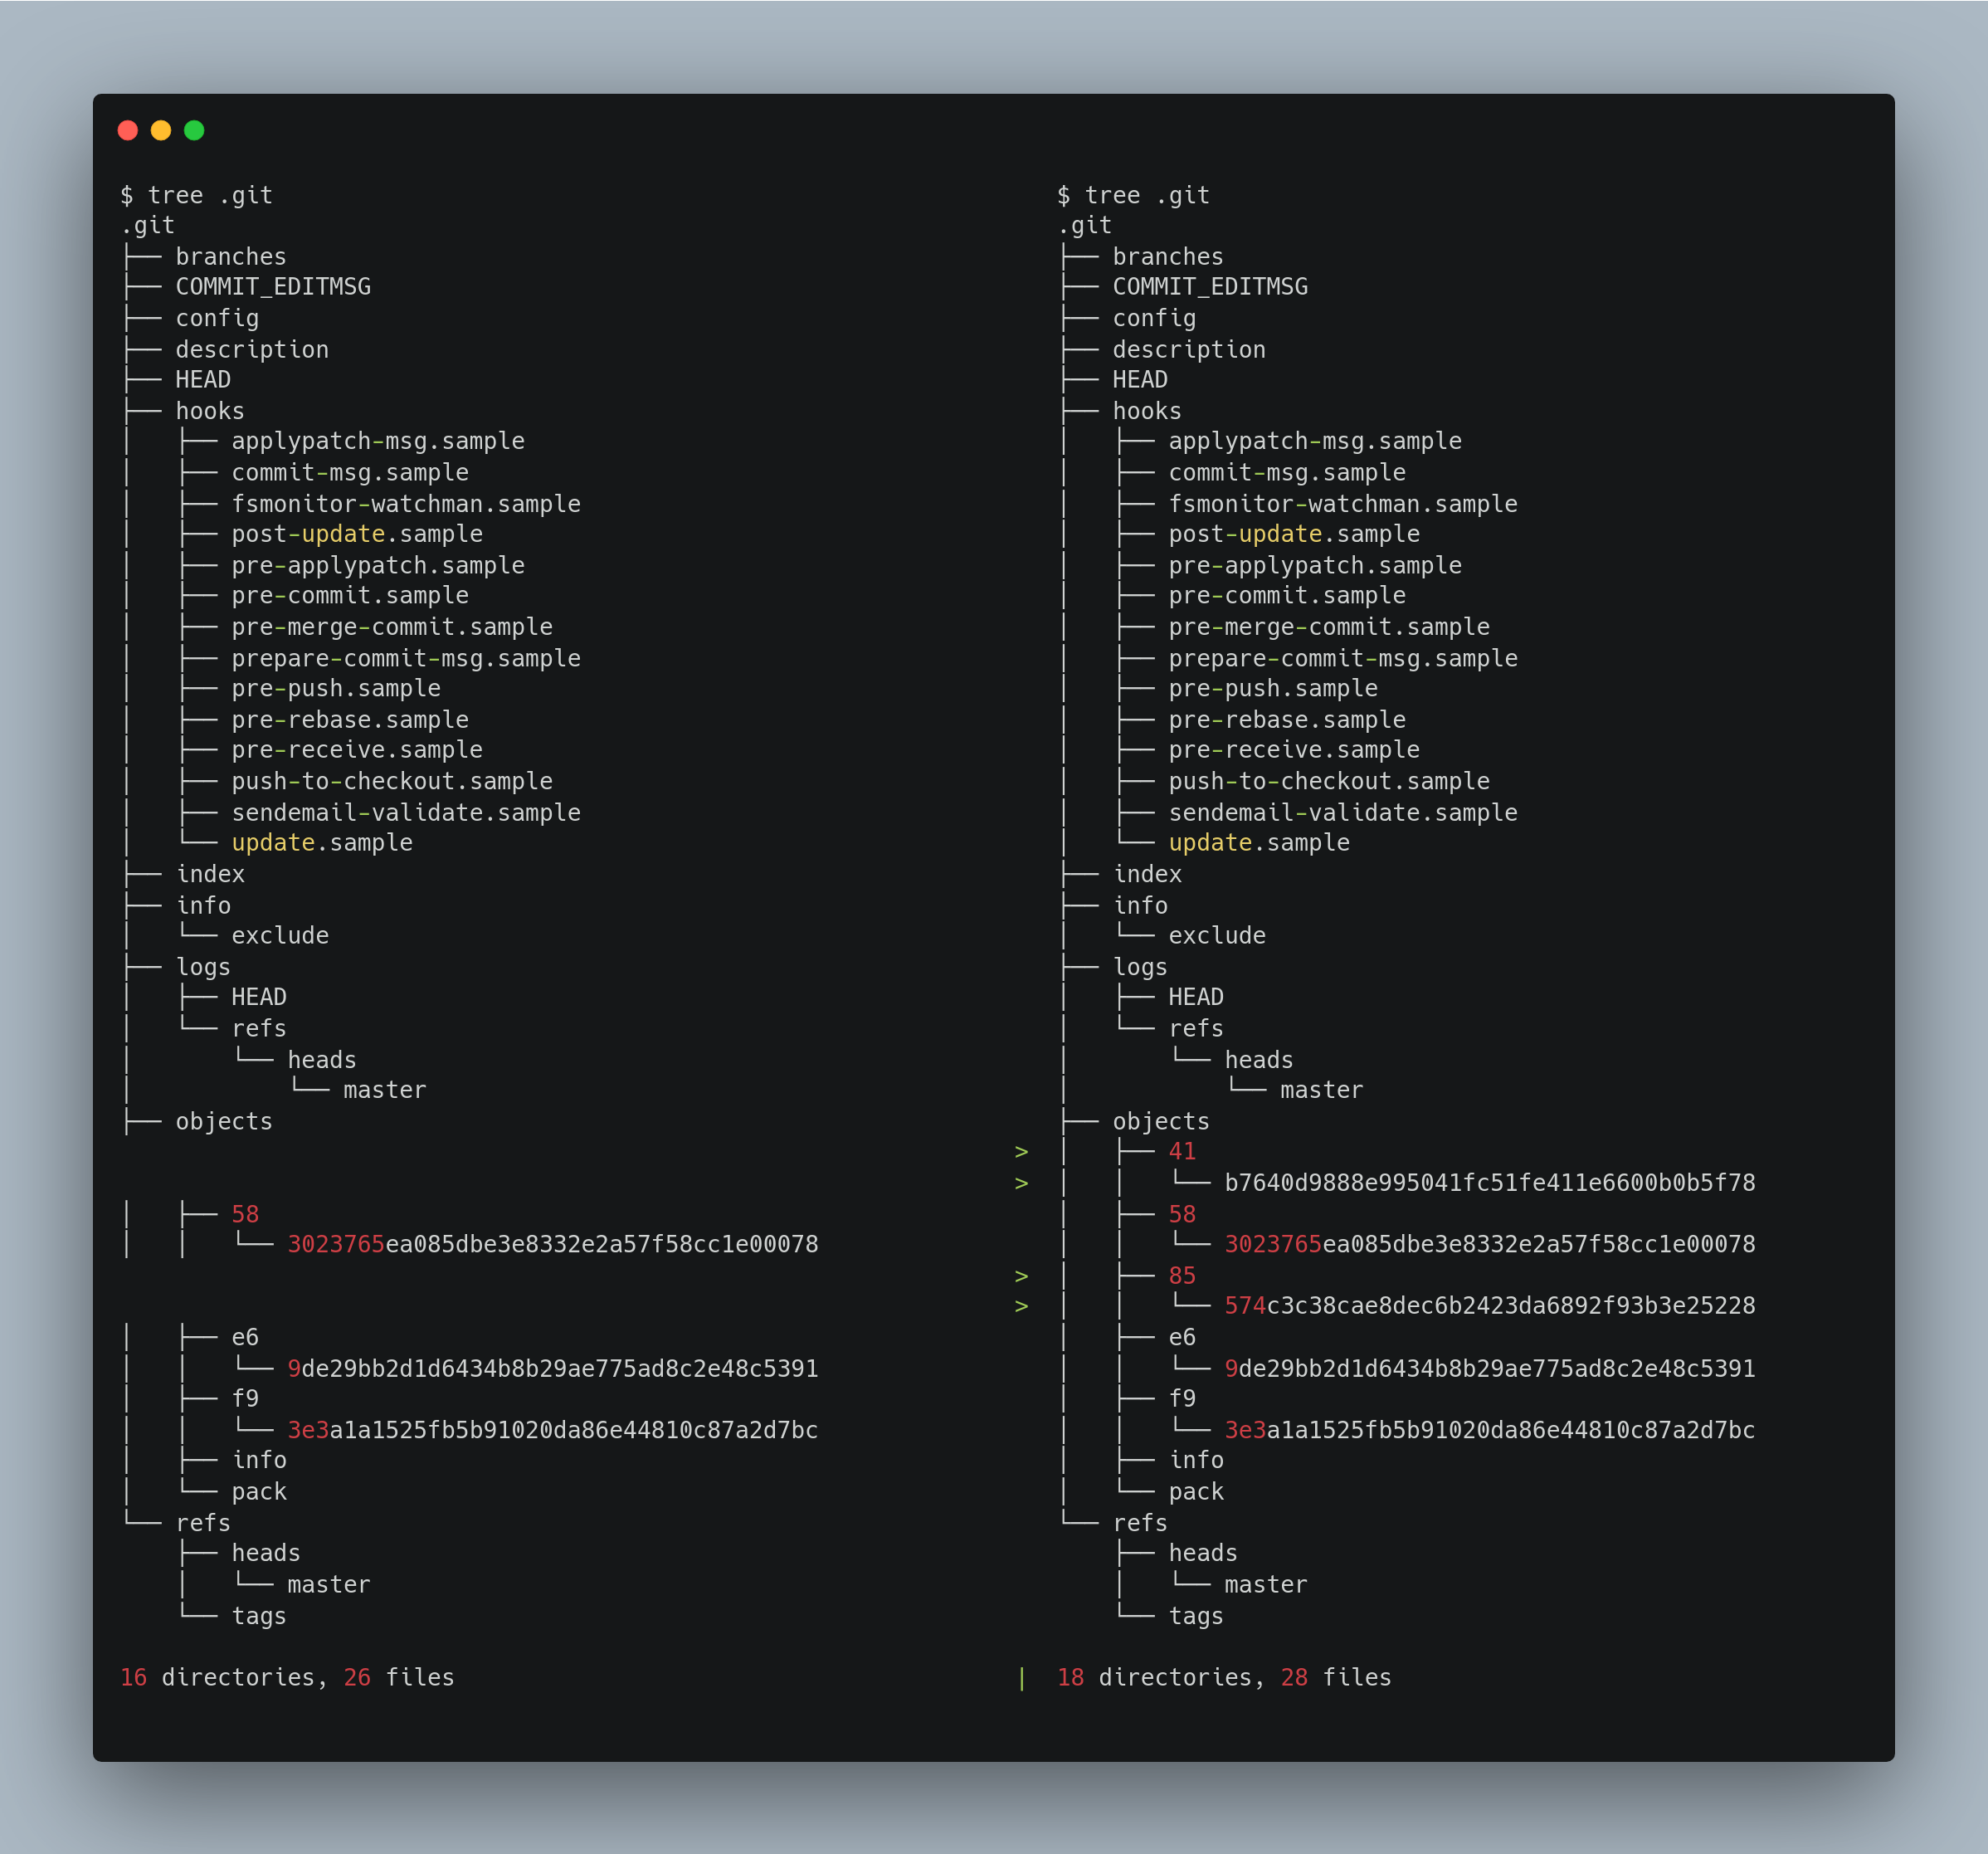
Here it just added two more objects, the new commit and new tree, but it reused the same blob as the contents were exactly the same. Also, of course, it also updated the refs/heads/master file to point to the new commit.
Packfiles
Initially, Git stores objects individually on disk in what’s called the “loose” object format. However, to save space and improve efficiency, Git occasionally bundles multiple loose objects into a single binary file known as a “packfile.” This packing process happens automatically when there are too many loose objects, when you run the git gc command manually, or when you push changes to a remote repository. After packing, you’ll notice that most loose objects disappear from the .git/objects directory, replaced by a new pair of packfile files.
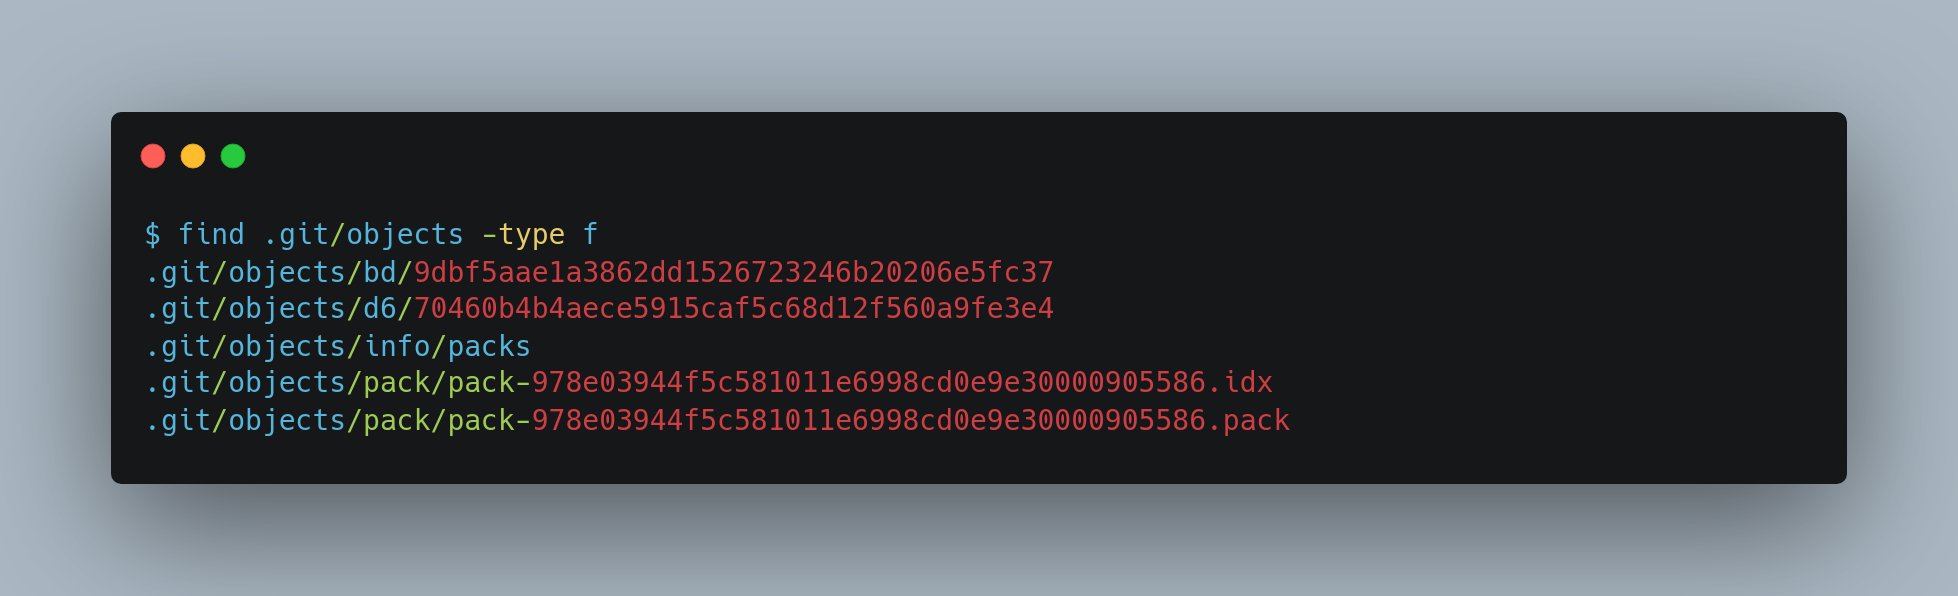
The objects that remain are the blobs that aren’t pointed to by any commit. Because you never added them to any commits, they’re considered dangling and aren’t packed up in your new packfile.
Areas in Git
Git has mainly the following areas:
- Working Area - Where modifications to files take place.
- Staging Area (Index) - A draft space for changes before committing.
- Repository - The final storage for committed changes.
- Remote repo (Optional) - A shared repository hosted on a server for collaboration.
- Stash Area - A temporary storage to save changes without committing them.
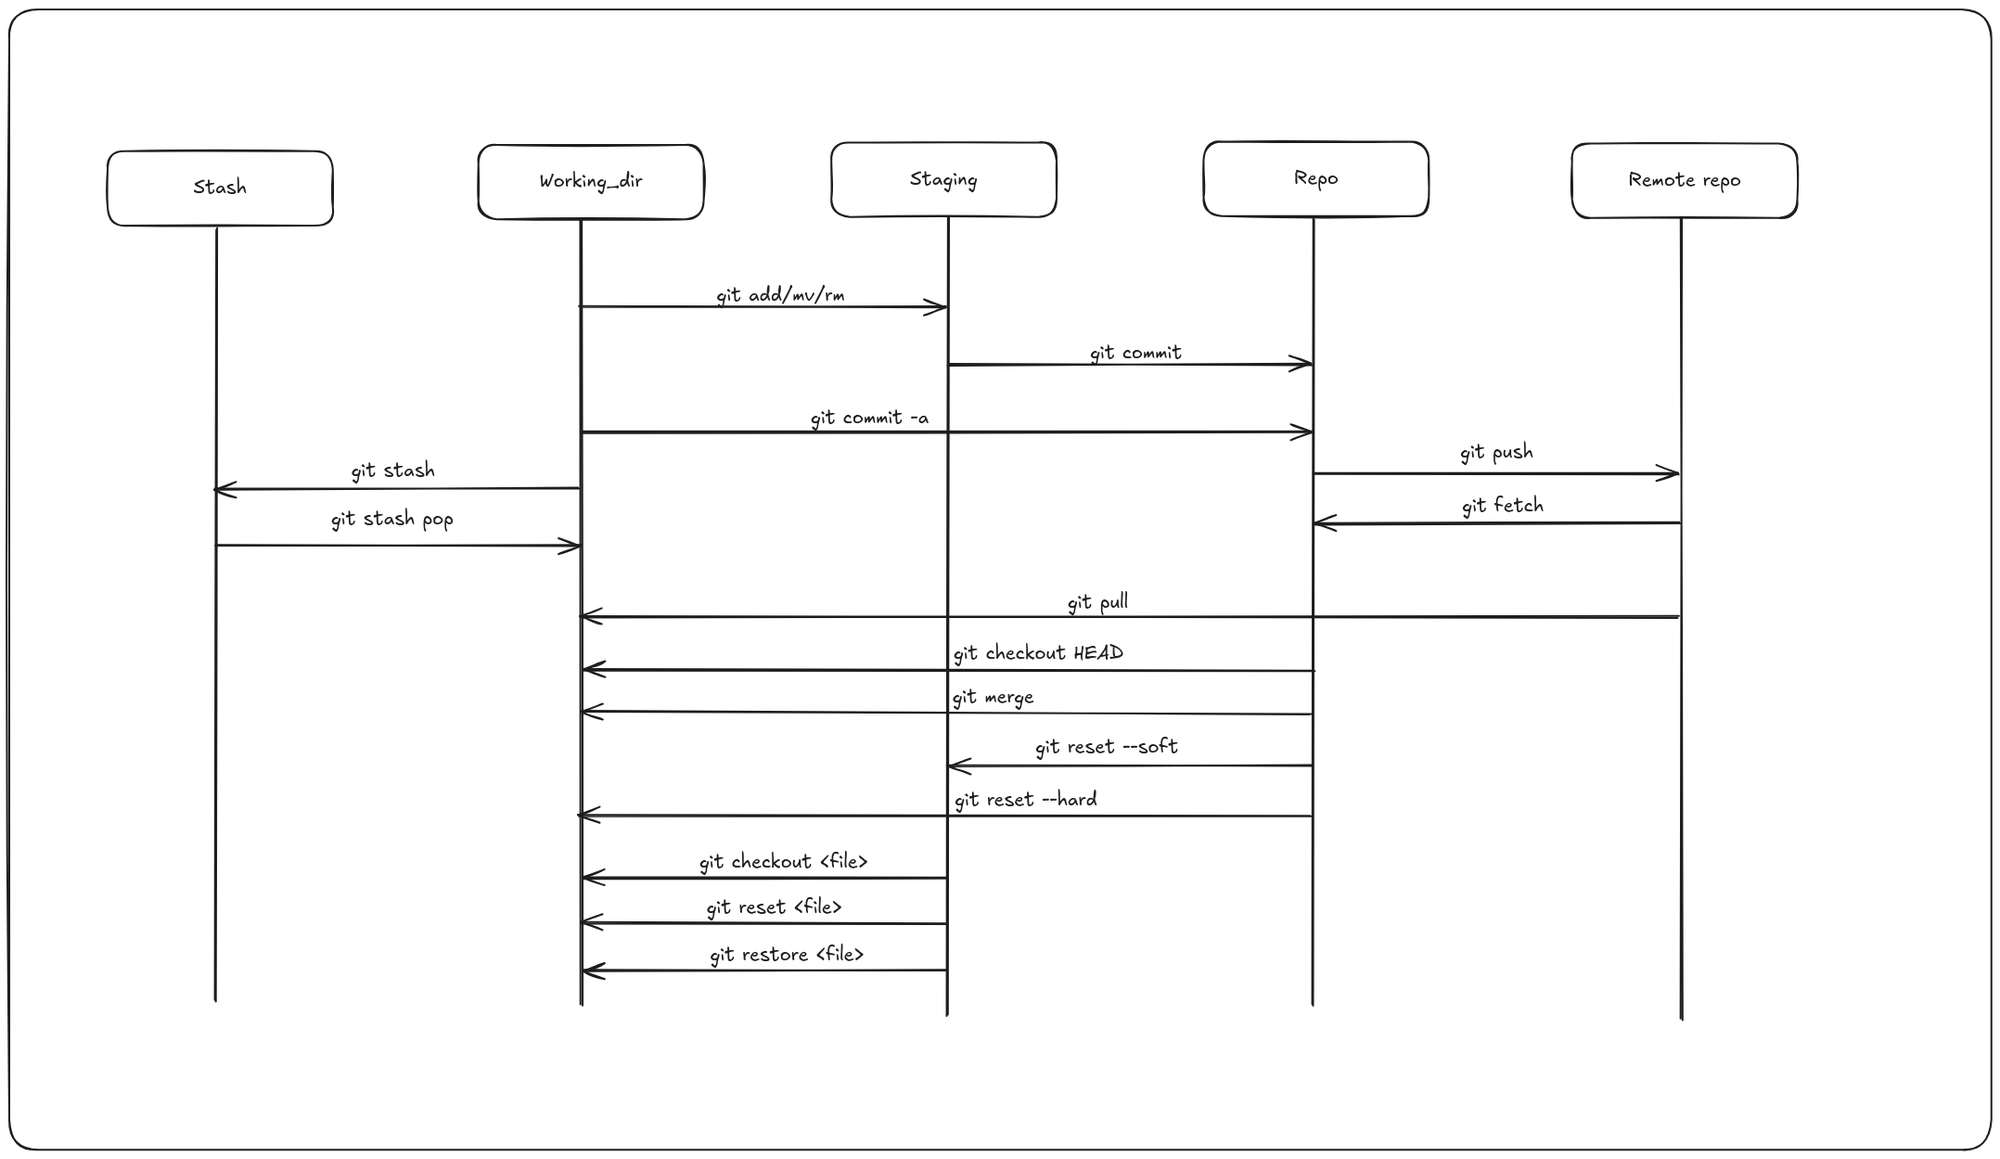
Most of the work in git happens in the following three areas: working dir, staging and repo. The state of files that reside in these areas are called modified, staged and committed respectively.
- Modified means that you have changed the file but have not committed it to your repo yet.
- Staged means that you have marked a modified file in its current version to go into your next commit snapshot. You selectively stage just those changes you want to be part of your next commit, which adds only those changes to the staging area.
- Committed means that the data is safely stored in your repo. It takes the files as they are in the staging area and stores that snapshot permanently to your Git directory.
Tracked vs untracked files
Each file in your working directory can be in one of two states: tracked or
untracked.
- Tracked files are files that were in the last snapshot, as well as any newly staged files; they can be unmodified, modified, or staged. In short, tracked files are files that Git knows about.
- Untracked files are everything else — any files in your working directory that were not in your last snapshot and are not in your staging area.
When you first clone a repository, all of your files will be tracked and unmodified because Git just checked them out, and you haven’t edited anything.

HEAD
HEAD is the pointer to the current branch reference, which is in turn a pointer to the last commit made on that branch. That means HEAD will be the parent of the next commit that is created. It’s generally simplest to think of HEAD as the snapshot of your last commit on that branch.
To see what HEAD is pointing to, we can use the following commands:
Index
The index—also known as the staging area—represents your proposed next commit. When you run git commit, Git uses the contents of the index to build the new commit.
Initially, Git populates the index with the file contents from the last checkout. As you make changes, you selectively update the index by staging files with git add. This staged snapshot is what git commit uses to generate the commit’s tree.
Although the index isn’t technically a tree (it’s stored as a flat manifest), you can think of it conceptually as a snapshot of your next commit, making it easier to manage what goes into version history.
Working dir
The other two trees store their content in an efficient but inconvenient manner, inside the .git folder. The working directory unpacks them into actual files, which makes it much easier for you to edit them. Think of the working directory as a sandbox, where you can try changes out before committing them to your staging area (index) and then to history.

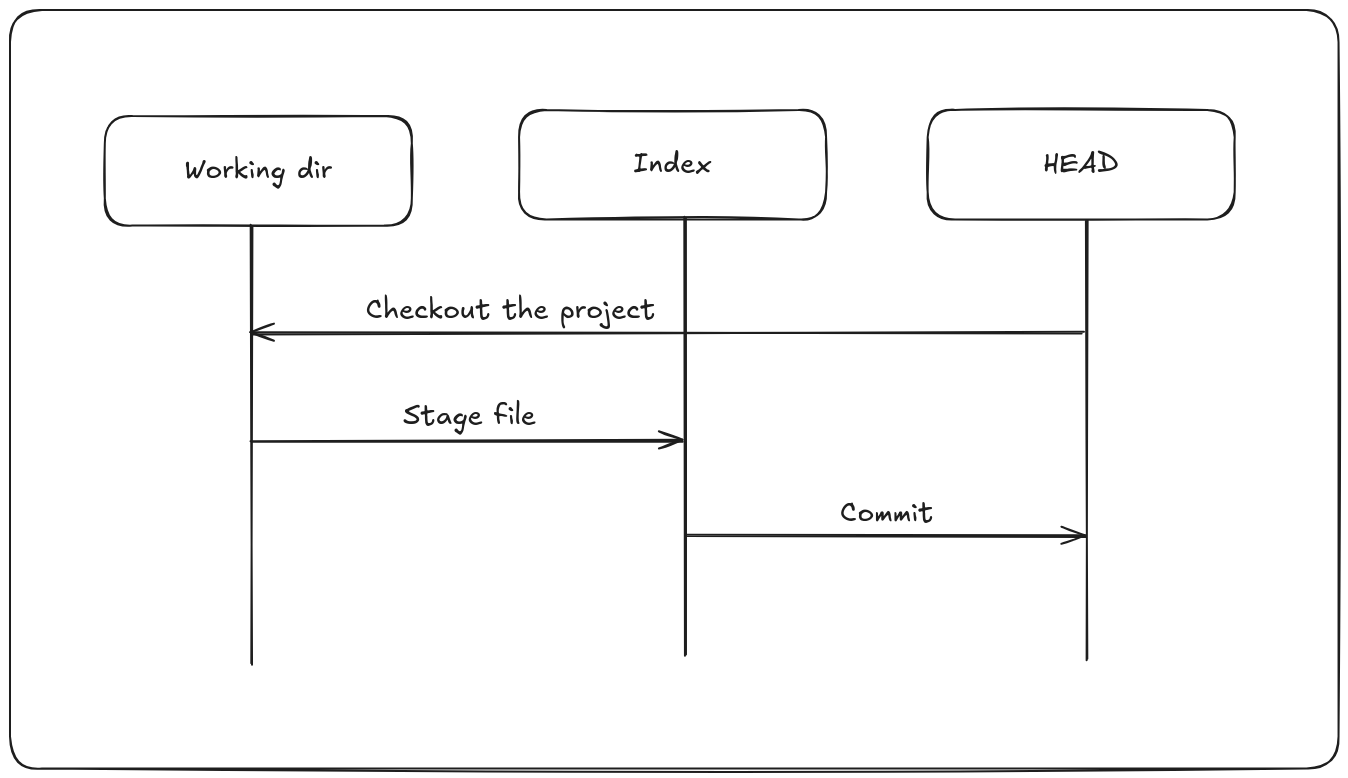
The Git workflow
Git’s typical workflow is to record snapshots of your project in successively better states, by manipulating these three trees.
Git commands
Git clone
To get a copy of an existing Git repository—such as a project you want to contribute to—you use the git clone command. Unlike other version control systems like Subversion, where you might use checkout to get a working copy, clone in Git means you’re copying the entire repository. This includes the full history of every file, not just the latest snapshot. When you run git clone, you download almost all the data from the server. This makes Git unique: if the server’s disk gets corrupted, you can often restore it from any client clone since each clone contains a complete backup of the repository’s history (though server-specific features like hooks may not be included).
Git add
The git add command serves multiple purposes: it starts tracking new files, stages changes for the next commit, and can also mark merge-conflicted files as resolved. It’s helpful to think of git add as “add this exact content to the next commit” rather than simply “add this file to the project.” The command accepts a path to either a file or a directory; if a directory is specified, it recursively stages all files within it.
Git does not commit changes directly from the working directory into the repository. Instead, changes are first recorded in the index (also called the staging area), preparing them for the next commit.
Git diff
To view changes you’ve made but haven’t yet staged, run git diff without any arguments. This compares your working directory against the staging area, showing what’s been modified but not yet added to the next commit. To see what changes are currently staged and ready to be committed, use git diff --staged (which is synonymous with --cached). This compares the staging area to your last commit, revealing what will be included in your upcoming commit.
Git commit
Any changes that haven’t been staged with git add—including new or modified files—won’t be included in the commit. They will remain as modified files in your working directory.
The simplest way to create a commit is by running git commit. This opens your default editor to write a commit message. When you save and close the editor, Git creates the commit, excluding any comment lines and diff output. Alternatively, you can provide the commit message directly on the command line using the -m flag.
Each commit records a snapshot of your project at that moment, allowing you to revisit or compare these points in your project’s history.
If you want to skip the staging step for already tracked files, use git commit -a. This option automatically stages all modified tracked files before committing, so you don’t need to run git add first.
Git rm
To remove a file from Git’s tracking, you need to delete it from the staging area and then commit the change. The git rm command handles this by removing the file from both your working directory and the staging area, ensuring it doesn’t appear as an untracked file afterward. Essentially, git rm combines deleting the file from your working directory with git add. It adds the deletion of the file to the staging area.
Another useful thing you may want to do is to keep the file in your working tree but remove it from your staging area. If you want to stop tracking a file but keep it in your working directory, use git rm --cached. This removes the file from Git’s staging area while leaving the file intact on your disk.
Git mv
When you rename a file in Git, Git doesn’t explicitly store metadata about the rename. Instead, it detects renames later by comparing file contents. To rename a file within Git, you can use the git mv command, which stages the rename operation for you.
Git log
Once you’ve made several commits or cloned a repository with existing history, you’ll likely want to review what has changed. The primary tool for this is the git log command.
By default, git log lists commits in reverse chronological order, showing the most recent commits first. Each entry includes the commit’s SHA-1 hash, author name and email, date, and commit message.
The --stat option adds a summary beneath each commit, listing modified files, the number of files changed, and lines added or removed. It also provides an overall summary at the end.
Another handy option is --pretty, which customizes the log output format. For example, --pretty=oneline condenses each commit to a single line, ideal for scanning large histories. Other preset formats like short, full, and fuller vary the amount of detail displayed.
The most flexible format is --pretty=format:, allowing you to define a custom output. This is especially useful for scripting or machine parsing, as it ensures consistent output regardless of Git updates. Combining --pretty=oneline or a custom format with --graph adds an ASCII graph that visually represents branch and merge history.
Author vs committer
A common question is the difference between author and committer: the author is the person who originally wrote the changes, while the committer is the person who last applied them. For example, if you submit a patch that a project maintainer applies, you are credited as the author, and the maintainer as the committer.
Working with Git remotes
Remote repositories are versions of your project hosted on the Internet, a network, or even your local machine. You can have multiple remotes, each typically configured with read-only or read/write access. Collaborating with others involves managing these remotes—adding new ones, removing outdated ones, and handling remote branches, including tracking settings.
Importantly, a “remote” doesn’t have to be on a different machine; it can be a repository located elsewhere on the same host. Regardless, interacting with any remote—local or distant—involves the usual Git operations like pushing, pulling, and fetching.
Git remote - Showing your remotes
To view the remote servers configured for your repository, use the git remote command. This lists the short names (handles) of each remote you’ve set up. If you cloned the repository, you’ll typically see at least origin — the default name Git assigns to the source server.
git remote
Adding the -v flag shows the URLs associated with each remote for both fetching and pushing:
git remote -v
If you have multiple remotes, this command lists them all, making it easy to pull contributions from different sources. However, it doesn’t indicate whether you have push permissions for those remotes.
Git remote add
While the git clone command automatically adds the remote named origin for you, you can also add remotes explicitly. To add a new remote repository with a convenient short name, use git remote add <shortname> <url>. For example:
git remote add pb https://github.com/paulboone/ticgit
This lets you use pb instead of the full URL in Git commands. To fetch updates from Paul’s repository that you don’t yet have locally, run: git fetch pb
Paul’s master branch will then be accessible locally as pb/master. You can merge it into your branches or check out a new local branch to inspect it.
Git remote fetch & pull
The git fetch <remote> command contacts the specified remote repository and retrieves any data you don’t yet have locally — such as new branches or updated commits — without modifying your working directory or current branches. It simply updates your local references to reflect the remote state. You can inspect or merge these changes manually when you're ready.
When you clone a repository, Git automatically adds that remote under the name origin. So running git fetch origin pulls down any updates pushed to the original repository since your last fetch or clone.
If your local branch is configured to track a remote branch, you can use git pull instead. This command is a shortcut that combines git fetch followed by a git merge, pulling in the latest changes from the tracked remote branch into your current branch.
By default, git clone sets the default branch (e.g., main or master) to track its remote counterpart. Running git pull after cloning will typically fetch and merge updates from that remote branch.
From Git version 2.27 onward, Git will warn you if the pull.rebase configuration is not set. You can specify your preferred behavior with:
- To use the default (merge if necessary):
git config --global pull.rebase false - To always rebase instead of merge:
git config --global pull.rebase true
This setting helps you choose between a cleaner linear history (via rebase) or preserving merge commits when integrating remote changes.
Git push remote
Once your local project has reached a shareable state, you can upload your changes to a remote repository using: git push <remote> <branch>. For example, to push your local master branch to the origin remote:
git push origin master
This command works only if:
- You have write access to the remote repository.
- No conflicting changes have been pushed since your last fetch or pull.
If someone else pushes updates before you do, your push will be rejected to prevent overwriting their work. In that case, you'll need to fetch their changes, integrate them into your local branch (typically via merge or rebase), and then push again.
Git remote rename & remove
You can run git remote rename to change a remote’s shortname. For instance, if you want to rename pb to paul, you can do so with git remote rename
git remote rename pb paul
This updates all associated remote-tracking branches. So, pb/master becomes paul/master
If you need to remove a remote — for instance, if a server has moved, a mirror is no longer used, or a collaborator has stopped contributing — you can do so with either of the following commands: git remote remove or git remote rm. For example:
git remote remove paul
Tagging
Listing your tags
Tags can be listed with the command: git tag
Creating annotated tags
Creating an annotated tag in Git is straightforward. Use the -a flag with the git tag command to indicate an annotated tag, and optionally include a tagging message with -m:
git tag -a v1.4 -m "my version 1.4"
If you omit the -m message, Git will open your default editor for you to enter one manually.
To view the details of an annotated tag—including the tagger’s name, date, message, and the associated commit—use: git show v1.4. This displays the full tag metadata followed by the commit it references.
Creating lightweight tags
A lightweight tag is essentially a named reference to a commit—just the commit’s SHA-1 checksum stored in a file, with no additional metadata. To create one, simply run:
git tag v1.4-lw
You don’t need to include -a, -s, or -m options. This creates a tag that acts like a simple bookmark to a specific commit.
Now if you run git show v1.4-lw, Git will display only the commit details, without any tag-specific metadata like the tagger name or message. Lightweight tags are useful for quick, local references when you don’t need full tagging information.
Tagging later
You can also tag commits after you’ve moved past them. To tag that commit, you specify the commit checksum (or part of it) at the end of the command.
git tag -a v1.2 9fceb02
Git push tag
By default, git push does not automatically transfer tags to remote repositories. To share a tag, you need to explicitly push it:
git push origin v1.5
This command pushes the v1.5 tag to the origin remote. If you want to push all tags at once, use the --tags option:
git push origin --tags
This pushes all local tags (both lightweight and annotated) that don’t already exist on the remote. It’s a convenient way to synchronize your entire set of tags with the remote repository.
Deleting tags
To delete a tag on your local repository, you can use git tag -d <tagname>
git tag -d v1.4-lw
Note that this does not remove the tag from any remote servers. There are two common variations for deleting a tag from a remote server.
The first variation is:
git push origin :refs/tags/v1.4-lw
The second (and more intuitive) way to delete a remote tag is with:
git push origin --delete <tagname>
Checking out tags
To view the files as they existed at a specific tag, you can check out the tag with:
git checkout <tagname>
However, this puts your repository into a "detached HEAD" state. In this state, Git points directly to a specific commit instead of a branch. If you make changes and commit while in detached HEAD state, the tag reference won't move, and your new commits won't be part of any branch. These commits will be hard to find later unless you explicitly save the commit hash or create a new branch.
If you want to make changes — for example, fixing a bug on an older release — it's best to first create a new branch from the tag:
git checkout -b <new-branch-name> <tagname>
This way, your changes will be tracked in a proper branch.
Git branching
A branch is simply a named reference (or pointer) to a specific commit. Contrary to popular belief, branches aren’t inherently divergent paths—instead, they are bookmarks pointing to a particular commit in the repository’s history. Branches always point to the latest commit in a line of development.
When you make a commit, Git creates a commit object that includes:
- A pointer to the snapshot of the staged content (the project state at that moment),
- The author’s name and email,
- The commit message,
- And pointers to its parent commits (zero for the initial commit, one for normal commits, and multiple for merge commits).
Staging files calculates a checksum (a SHA-1 hash) for each file, stores that version in the repository as a blob, and adds the checksum to the staging area.
When you run git commit, Git computes checksums for directories (called tree objects) that list the files and blobs they contain. It then creates a commit object linking to the root tree, enabling Git to recreate the project snapshot when needed.
Thus, your Git repository consists of:
- Blobs: storing file contents,
- Trees: representing directory structures and associating filenames with blobs,
- Commits: containing metadata and a pointer to the root tree.
Each new commit points to its immediate predecessor commit, forming a chain.
A branch in Git is a lightweight, movable pointer to a commit. The default branch name is master. When you create commits, the master pointer automatically moves forward to the newest commit.
Importantly, the master branch is not special — it behaves exactly like any other branch. It’s simply the default name created by git init and remains common because many users don’t change it.
Creating a new branch
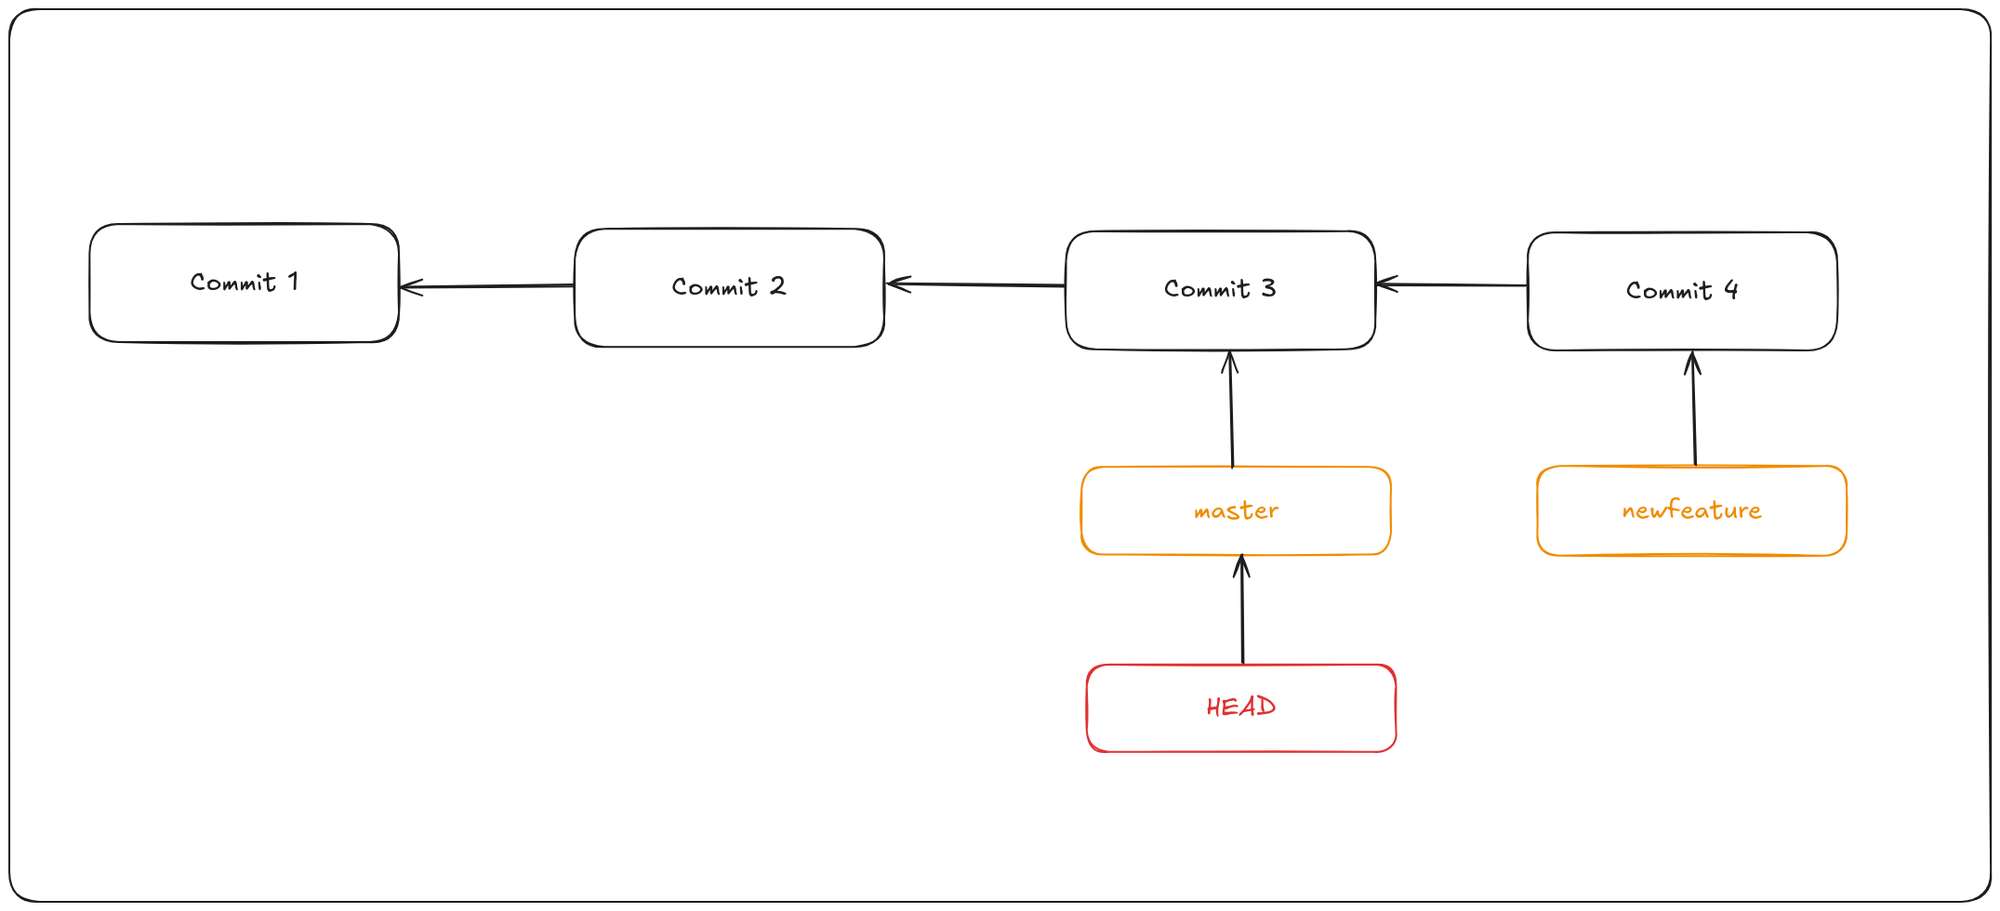
When you create a new branch, Git simply creates a new pointer that you can move independently. For example, to create a branch named newfeature, you run: git branch newfeature
This command creates a new pointer called newfeature that points to the same commit your current branch is on. So, how does Git know which branch you’re currently on? It uses a special pointer called HEAD, which always points to your current branch. When you create a new branch, the new pointer starts at the commit where HEAD is currently pointing.
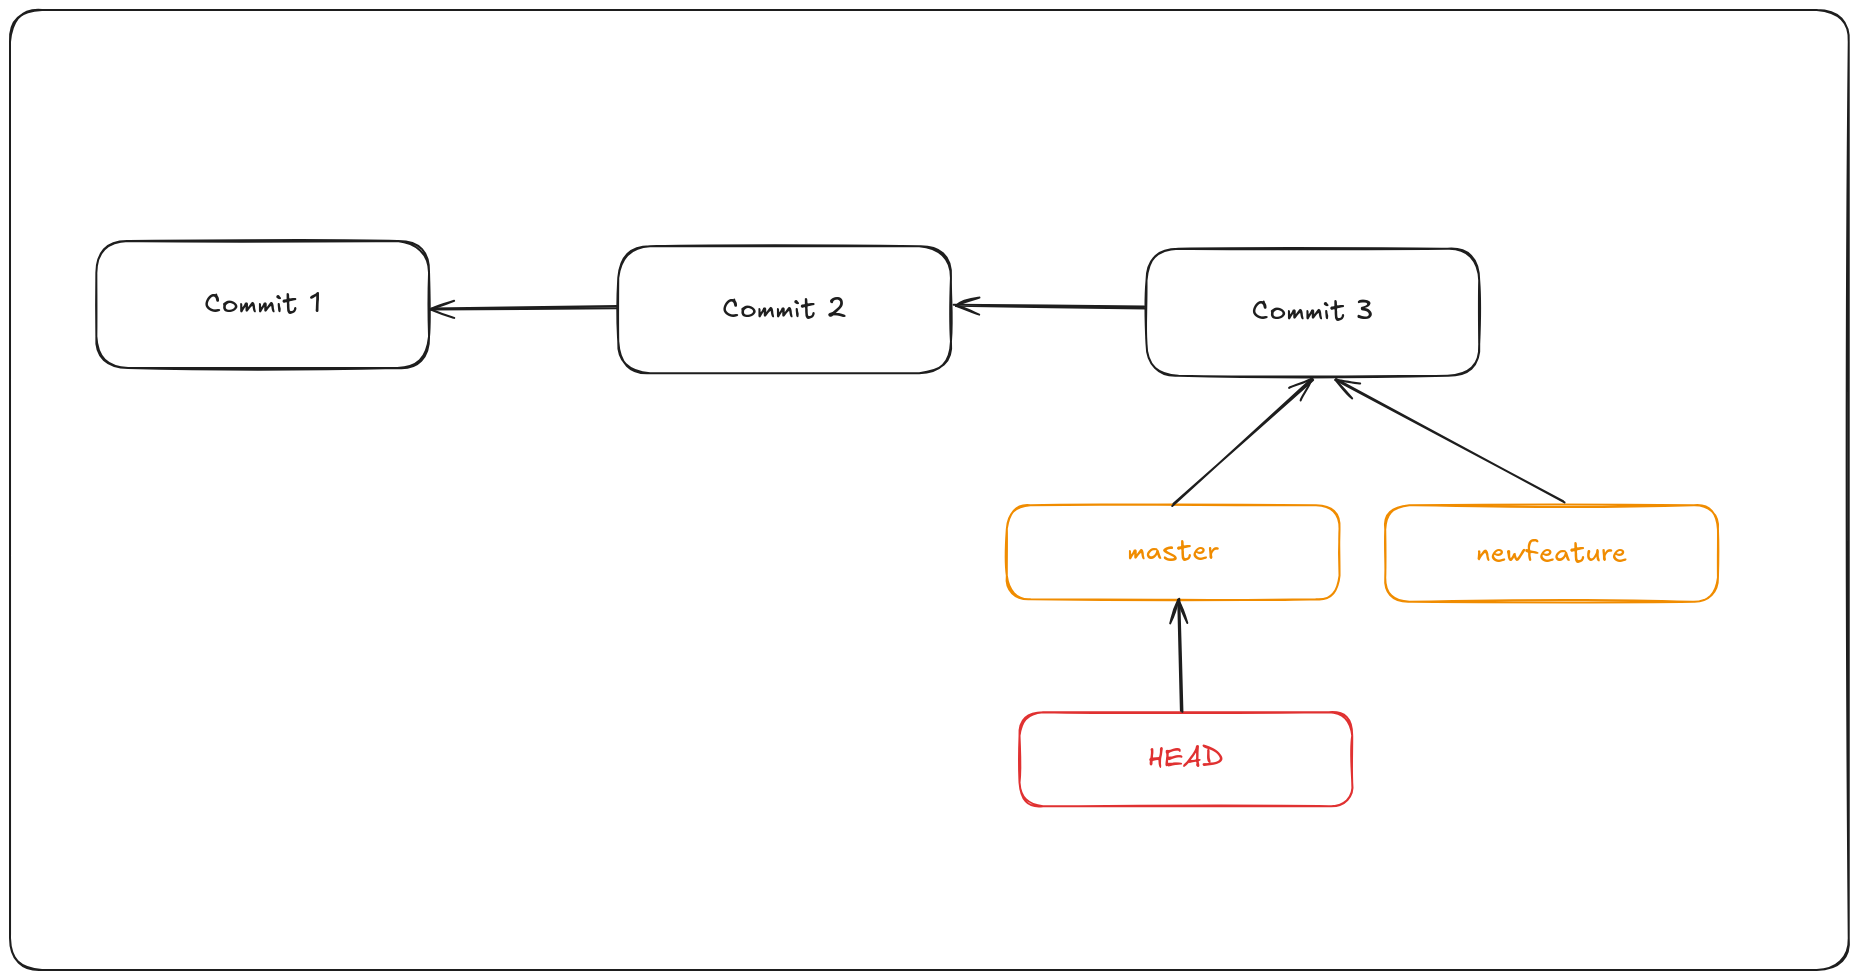
In Git, this is a pointer to the local branch you’re currently on. In this case, you’re still on master. The git branch command only created a new branch — it didn’t switch to that. You can see the master and newfeature branches that are right on commit3.
To switch to an existing branch, you run the git checkout command. To switch to the newfeature branch:
git checkout newfeature
To create a new branch and switch to it with one command you could do the following command. This is a combination of git branch and git checkout.
git checkout -b newfeature
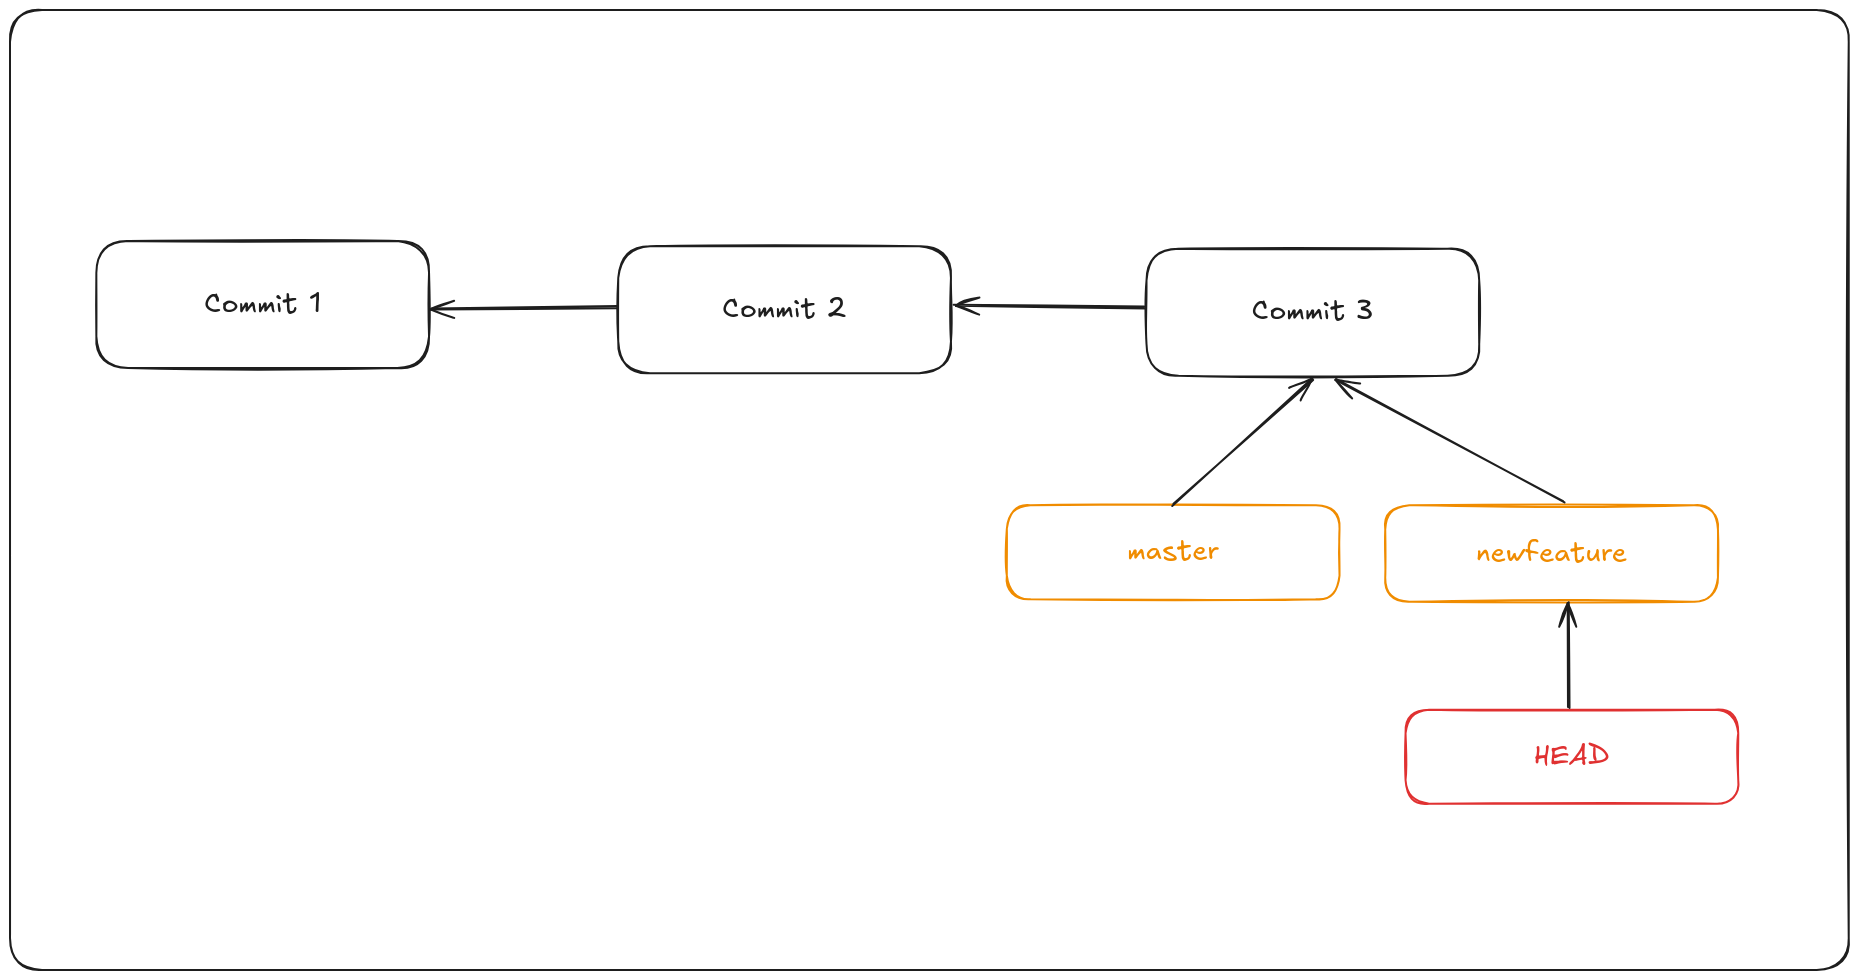
This moves HEAD to point to the newfeature branch.
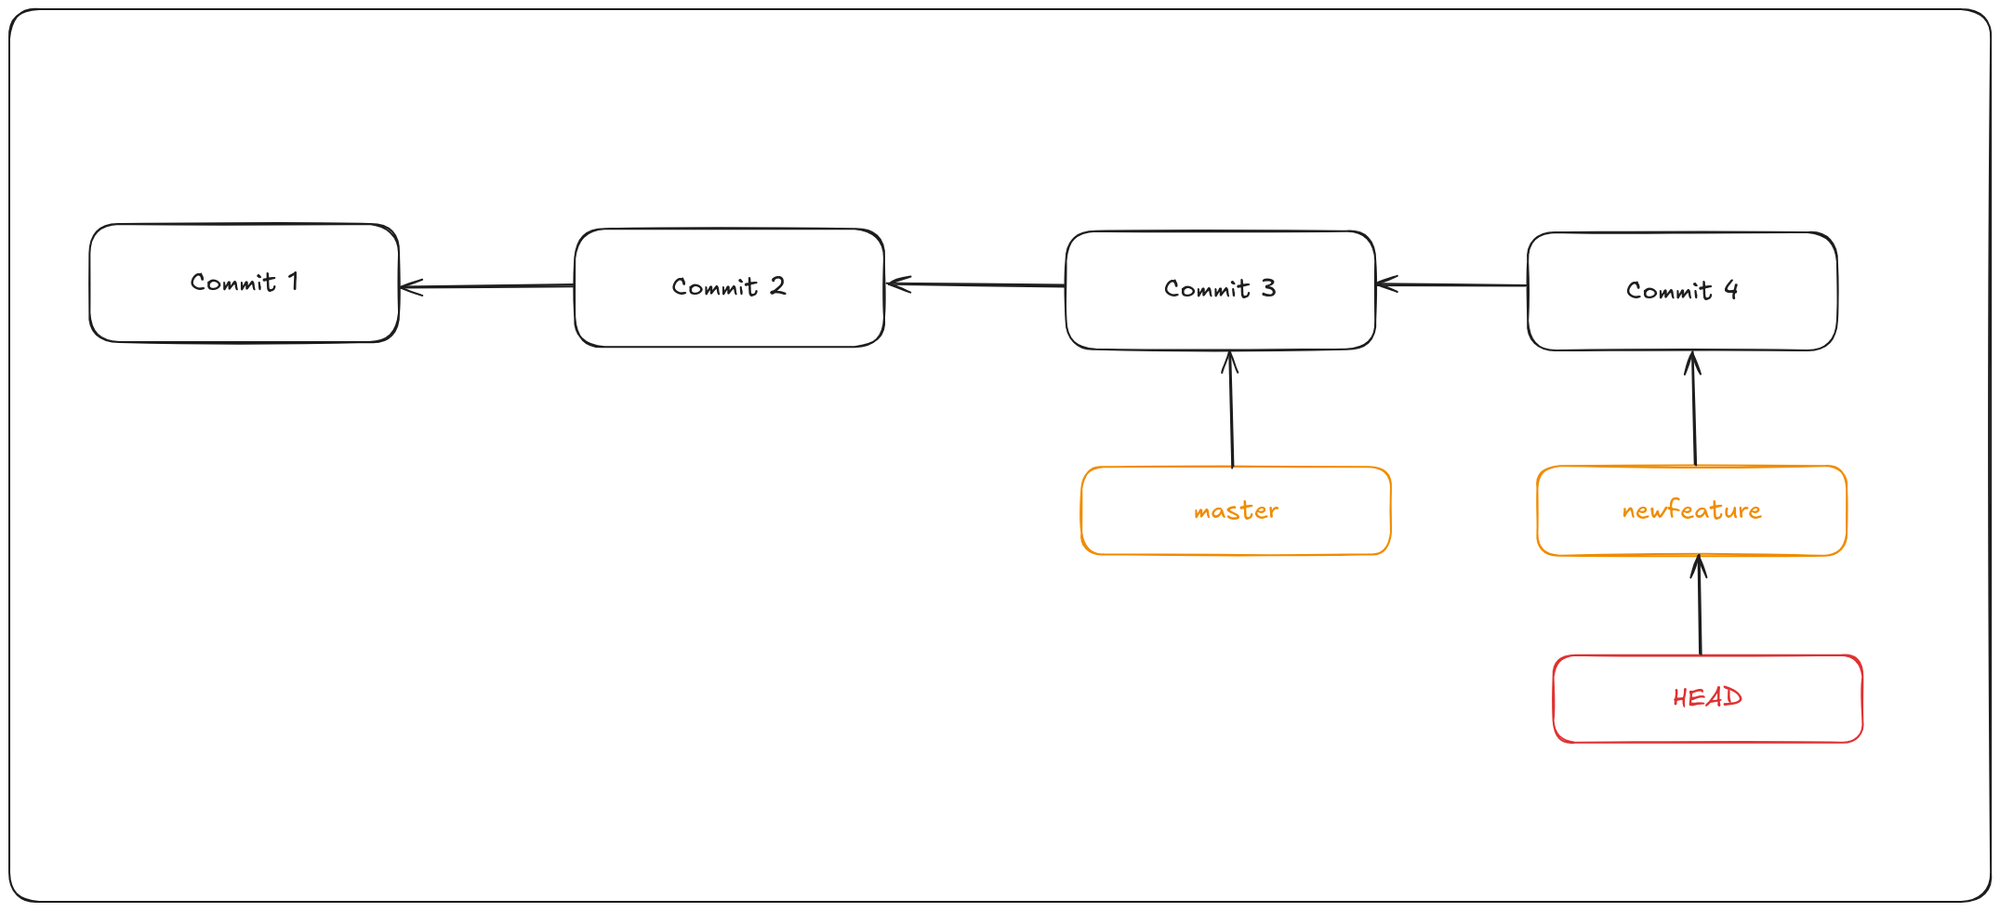
Now if you add another commit, it will move the newfeature branch to the new commit, without moving the master branch.
Now let’s switch back to the master branch.
This moves the HEAD pointer back to point to the master branch, and it reverted the files in your working directory back to the snapshot that master points to. This also means that the changes you make from this point forward will diverge from an older version of the project. It essentially rewinds the work you’ve done in your newfeature branch so you can go in a different direction. When you switch branches in Git, files in your working directory will change. If you switch to an older branch, your working directory
will be reverted to look like it did the last time you committed on that branch. If Git cannot do it cleanly, it will not let you switch at all.
If you commit at this point, the branches will be diverted.
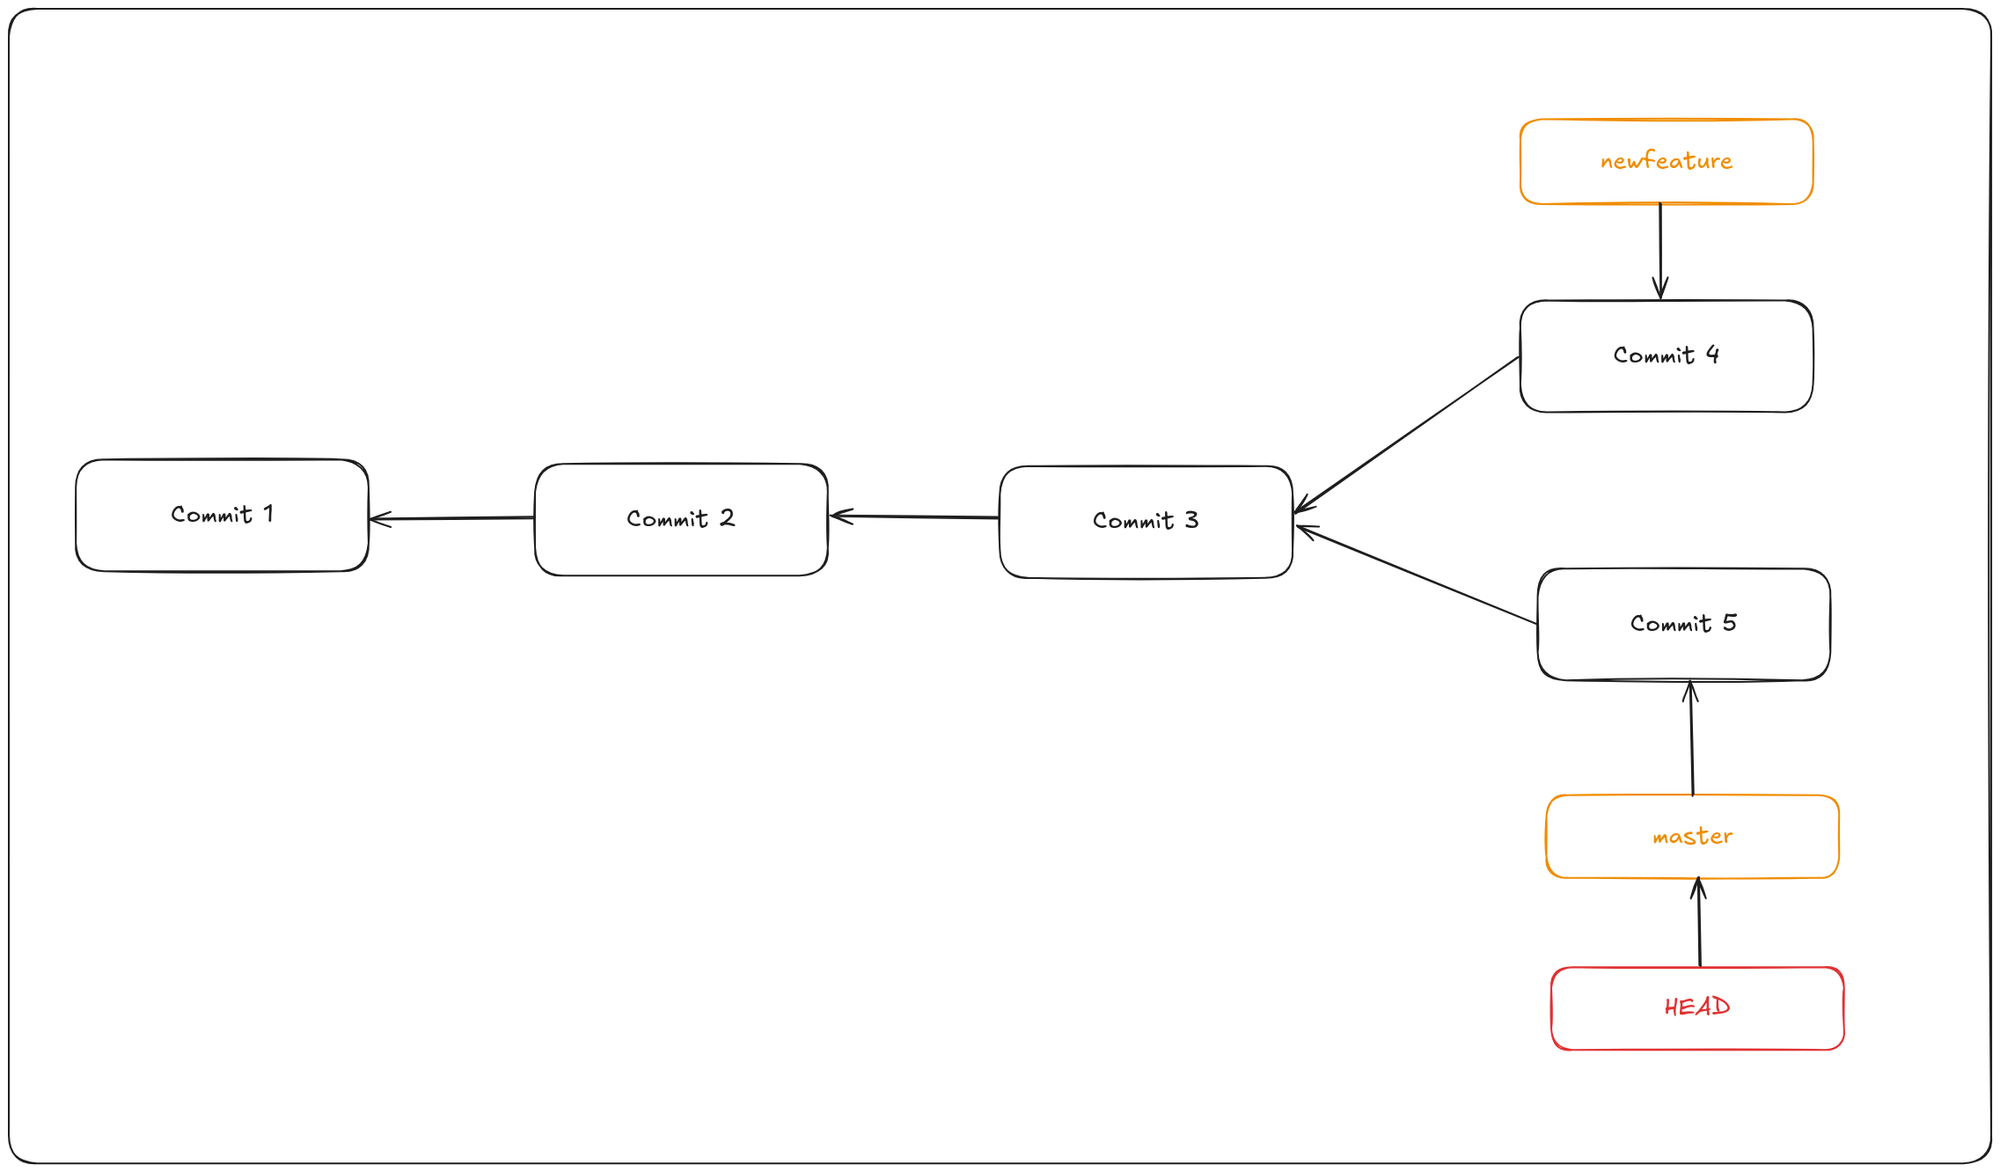
Now your project history has diverged. You created and switched to a branch, did some work on it, and then switched back to your main branch and did other work. Both of those changes are isolated in separate branches: you can switch back and forth between the branches and merge them together when you’re ready.
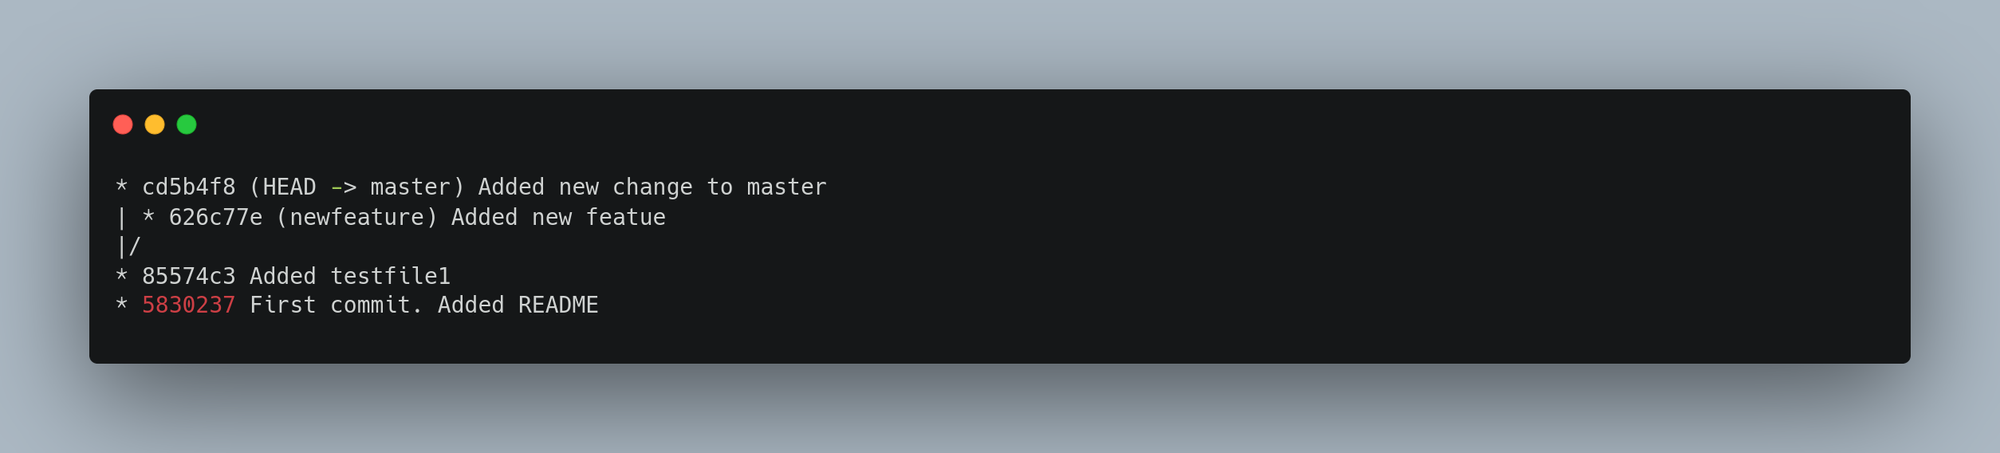
You can also see this easily with the git log command. If you run git log --oneline --decorate --graph --all. It will print out the history of your commits, showing where your branch pointers are and how your history has diverged.
Because a branch in Git is actually a simple file that contains the 40 character SHA-1 checksum of the commit it points to, branches are cheap to create and destroy.
This is in sharp contrast to the way most older VCS tools branch, which involves copying all of the project’s files into a second directory. This can take several seconds or even minutes, depending on the size of the project, whereas in Git the process is always instantaneous. Also, because we’re recording the parents when we commit, finding a proper merge base for merging is automatically done for us and is generally very easy to do. These features help encourage developers to create and use branches often.
It’s typical to create a new branch and want to switch to that new branch at the same time — this can be done in one operation with git checkout -b <newbranchname>
From Git version 2.23 onwards you can use git switch instead of git checkout to:
- Switch to an existing branch:
git switch newfeature - Create a new branch and switch to it using the
-cor--createoption:git switch -c newfeature2 - Return to your previously checked out branch:
git switch -
Changing a branch name
If you want to rename a branch — for example, from bad-branch-name to corrected-branch-name — while preserving all history, start by renaming it locally:
git branch --move bad-branch-name corrected-branch-name
This updates the branch name only in your local repository. To share the renamed branch with others, push it to the remote and set the upstream tracking.
git push --set-upstream origin corrected-branch-name
Next, delete the old branch name from the remote:
git push origin --delete bad-branch-name
Avoid renaming branches that others are actively using—especially default branches like master, main, or default. Renaming such branches can break integrations, CI/CD pipelines, and scripts relying on those names. Always consult your collaborators before renaming branches, and thoroughly update any references to the old branch name throughout your repository and tooling.
Remote branches
Remote references are pointers in your remote repositories, including branches, tags, and more. Remote-tracking branches are local references that track the state of those remote branches. You cannot move them directly; Git updates these references automatically whenever you communicate with the remote, ensuring they accurately reflect the remote repository’s latest state. Think of remote-tracking branches as bookmarks marking where remote branches were the last time you connected.
Remote-tracking branch names follow the format <remote>/<branch>. For example, to see the state of the master branch on your origin remote as of the last fetch, you’d look at origin/master.
When you clone a repository using git clone, Git automatically names the remote origin, fetches all its data, and creates a local pointer called origin/master to track the remote’s master branch. It also creates a local master branch that starts at the same commit as origin/master, giving you a place to begin working.
Note that “origin” is not special—just like the branch name “master” has no special meaning beyond convention, “origin” is simply the default name Git assigns to the remote when you clone. If you clone with a different remote name, for example using git clone -o myremote, then your default remote-tracking branch will be myremote/master instead.
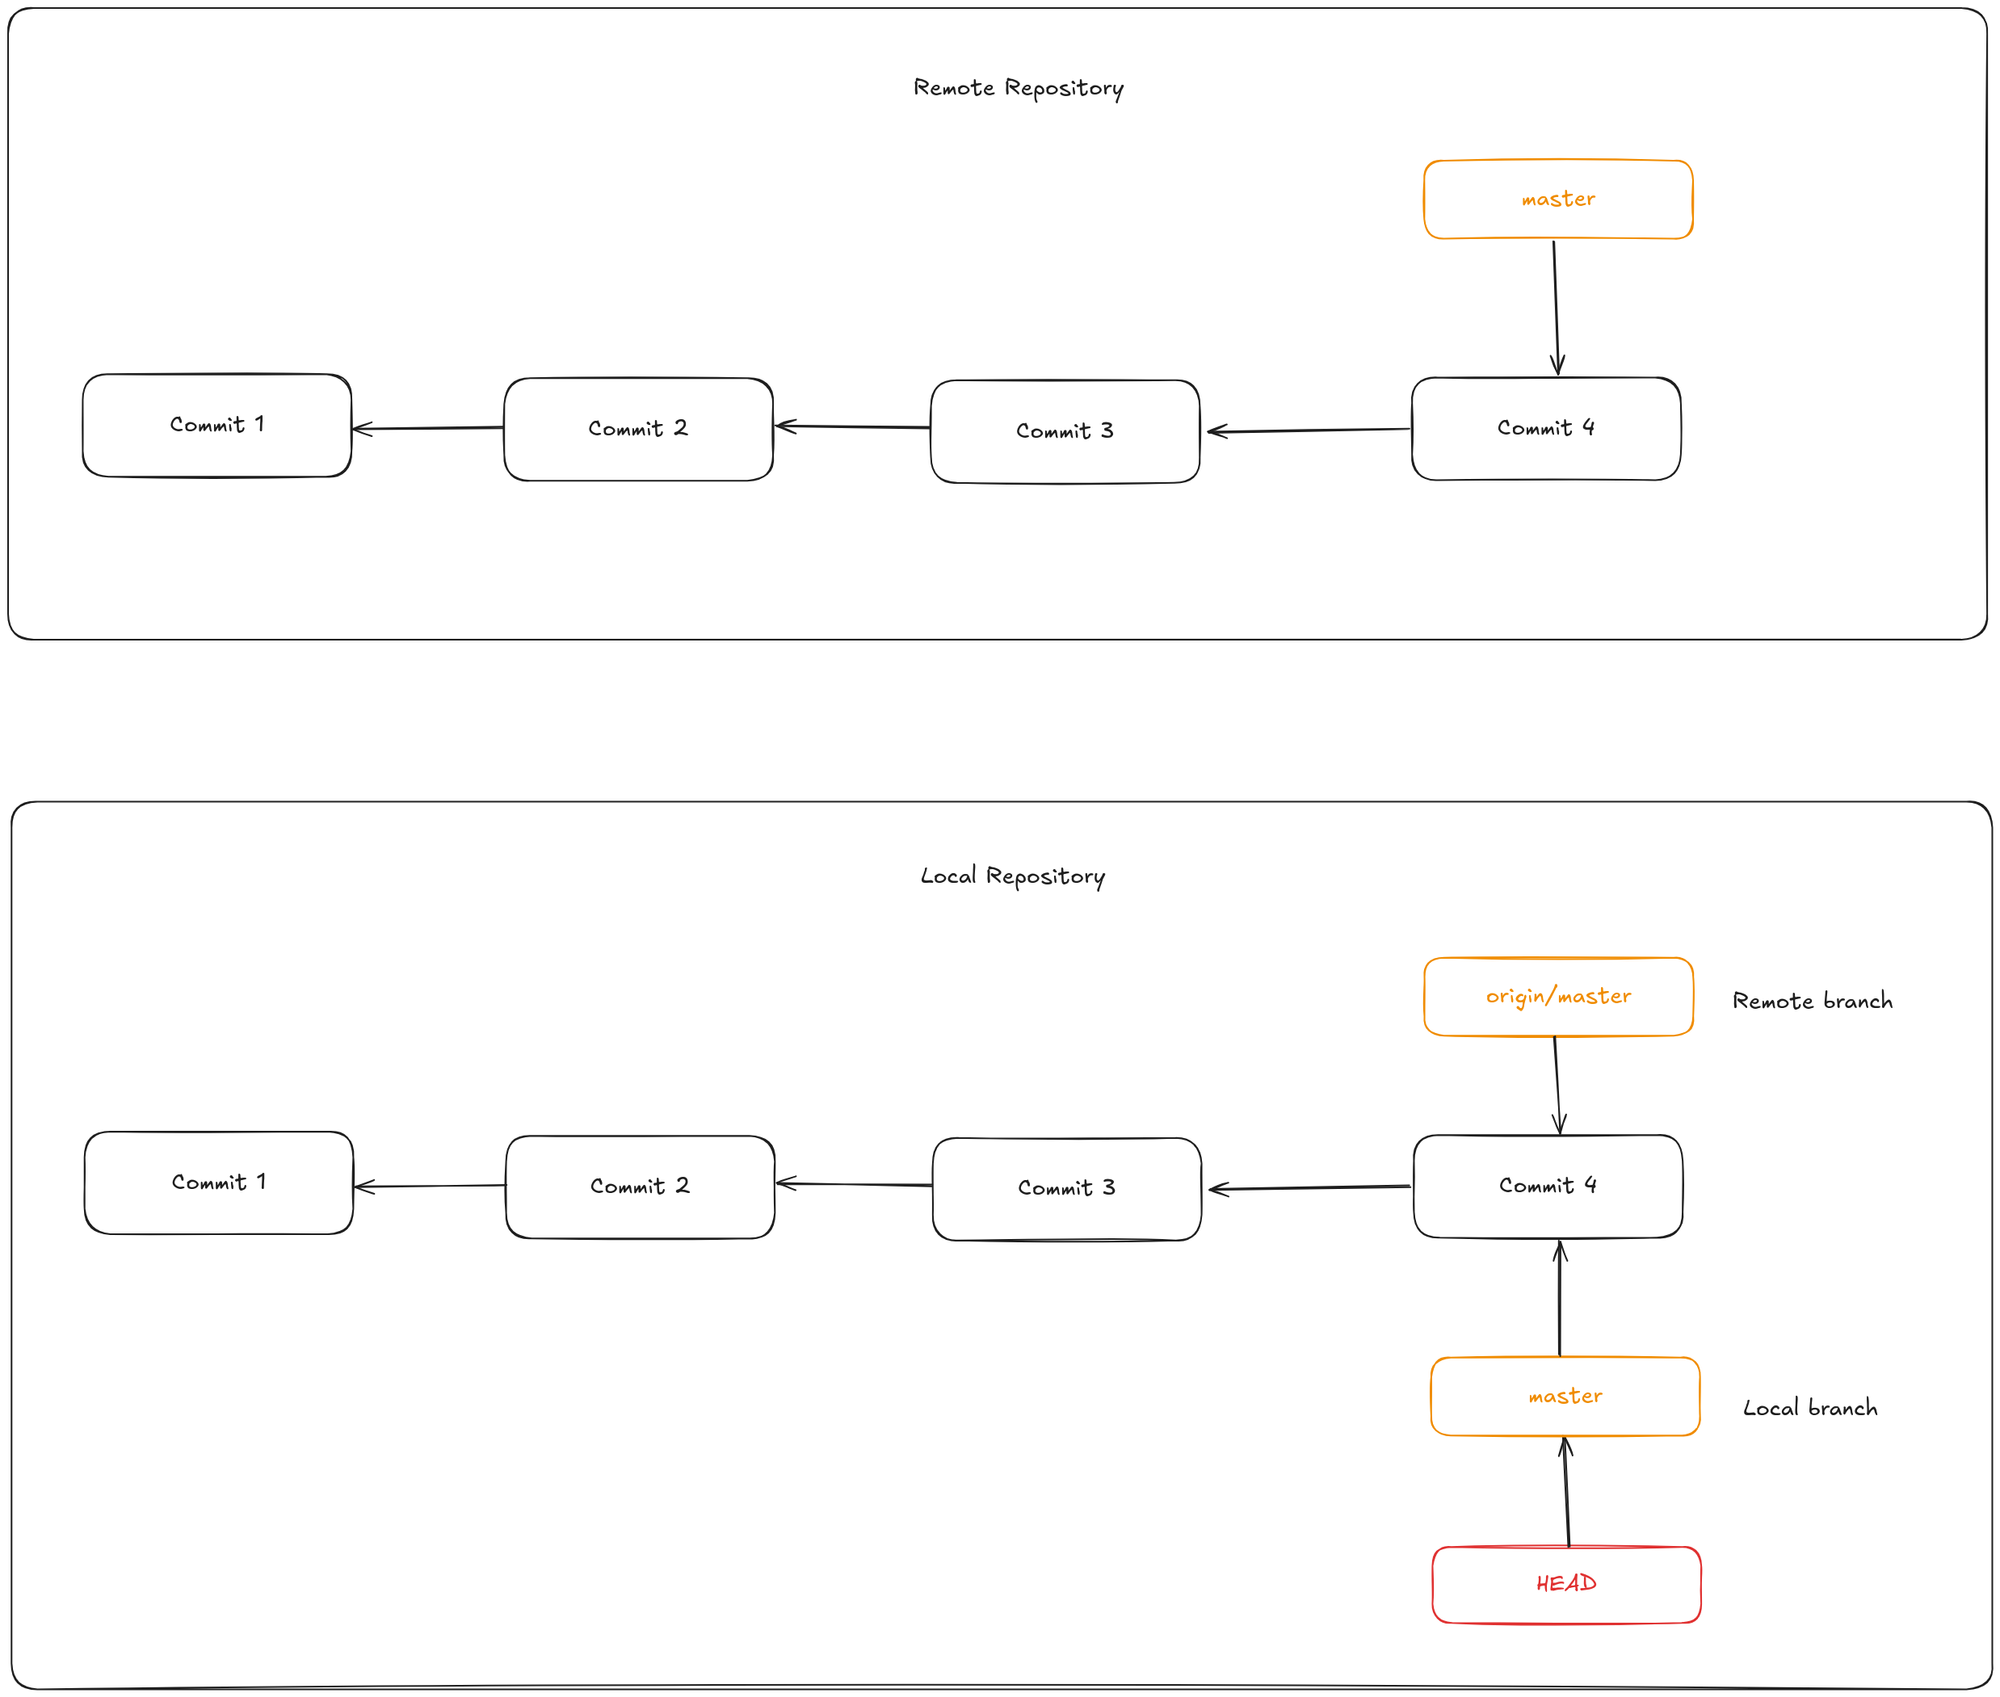
Local and remote work can diverge. If you do some work on your local master branch, and, in the meantime, someone else pushes to the remote repo and updates its master branch, then your histories move forward differently. Also, as long as you stay out of contact with your origin server, your origin/master pointer doesn’t move.
To synchronize your work with a given remote, you run a git fetch command (in our case, git fetch origin). This command looks up which server “origin” is, fetches any data from it that you don’t yet have, and updates your local database, moving your origin/master pointer to its new, more up-to-date position.

Tracking branches and upstream branches
When you check out a local branch from a remote-tracking branch, Git automatically creates a tracking branch. The remote branch it tracks is called the upstream branch. A tracking branch is a local branch linked directly to a remote branch, so when you run git pull on it, Git knows which remote and branch to fetch from and merge. For example:
git checkout --track origin/serverfix
This command creates a local serverfix branch that tracks the remote origin/serverfix branch. Because this is such a common operation, Git also provides a shortcut: if the branch name you want to check out (a) doesn’t exist locally and (b) matches exactly one remote branch, Git will automatically create a tracking branch for you.
If you want to create a local branch with a different name than the remote branch, you can do:
git checkout -b sf origin/serverfix
Now, your local sf branch will track origin/serverfix and pull changes from it by default.
If you already have a local branch and want to set or change its upstream branch, use:
git branch -u origin/serverfix
Finally, once a tracking branch is set, you can refer to its upstream branch using the shorthand @{upstream} or @{u}. For instance, if your local master branch tracks origin/master, you can run: git merge @{u} instead of git merge origin/master
Git push
To share a branch with others, you need to push it to a remote repository where you have write access. Local branches are not automatically synced with remotes—you must explicitly push any branches you want to share.
For example, if you have a branch named serverfix that you want to collaborate on, you can push it with:
git push origin serverfix
This is a shorthand where Git automatically expands serverfix to refs/heads/serverfix:refs/heads/serverfix, meaning “take my local serverfix branch and update the remote’s serverfix branch.”
Alternatively, you can write this explicitly as: git push origin serverfix:serverfix. This means the same thing—push your local serverfix branch to the remote serverfix branch.
You can also push a local branch to a differently named remote branch by specifying a different target. For example, to push your local serverfix branch to a remote branch called awesomebranch, run: git push origin serverfix:awesomebranch
Git pull
The git fetch command downloads all changes from the remote repository that you don’t have locally but does not modify your working directory—it simply updates your local copy of the remote data, allowing you to merge manually when you choose.
In contrast, the git pull command combines git fetch followed immediately by a git merge (in most cases). If your current branch is set up to track a remote branch—either through explicit configuration or automatically during clone or checkout—git pull will:
- Identify the remote server and branch your local branch is tracking,
- Fetch the latest changes from that remote branch,
- Attempt to merge those changes into your current branch automatically.
Deleting remote branches
To delete a branch on a remote repository, use the --delete option with git push. This removes the branch reference from the remote server. Note that the actual data usually remains on the server until a garbage collection runs, so accidentally deleted branches can often be recovered.
git push origin --delete serverfix
Ancestry References
Git allows you to navigate a repository’s history using ancestry references.
Caret
Adding a caret (^) to a commit reference (e.g., HEAD^) refers to the first parent of that commit.
git show HEAD^ will show the parent of HEAD.
You can also specify a number after the ^ to identify which parent you want; for example, d921970^2 means “the second parent of d921970.” This syntax is useful only for merge commits, which have more than one parent — the first parent of a merge commit is from the branch you were on when you merged (frequently master), while the second parent of a merge commit is from the branch that was merged (say, bugfix)
Tilde
The other main ancestry specification is the ~ (tilde). This also refers to the first parent, so HEAD~ and HEAD^ are equivalent. The difference becomes apparent when you specify a number. HEAD~2 means “the first parent of the first parent,” or “the grandparent” — it traverses the first parents the number of times you specify. This can also be written HEAD~~~, which again is the first parent of the first parent.
You can also combine these syntaxes — you can get the second parent of the grandparent (assuming it was a merge commit) by using HEAD~3^2, and so on.
Git merge
Merging in Git means combining the changes from one branch into another. This is how you bring your work together after working separately on different features or bug fixes. To combine the changes from one branch into another, use git merge. Usually, you first switch to the branch you want to merge into (often main or master), then run the merge command with the branch name you want to combine in.
Merge strategies
Fast forward merge
A fast-forward merge occurs when the target branch has not diverged from the source branch. In this case, Git simply moves the target branch pointer to the latest commit in the source branch. This strategy is simple and keeps the commit history linear. In this most commonly used merge strategy, history is just one straight line. When you create a branch, make some commits in that branch, the time you're ready to merge, there is no new merge on the master. That way master's pointer is just moved straight forward and history is one straight line.
In this example if you want to merge the newfeature branch into master:
$ git checkout master
$ git merge hotfix
You can delete the newfeature branch now using the command
git branch -d newfeature
Ort (default)
This is the default merge strategy when pulling or merging one branch. This strategy can only resolve two heads using a 3-way merge algorithm. When there is more than one common ancestor that can be used for 3-way merge, it creates a merged tree of the common ancestors and uses that as the reference tree for the 3-way merge. The name for this algorithm is an acronym ("Ostensibly Recursive’s Twin") and came from the fact that it was written as a replacement for the previous default algorithm, recursive.
git checkout master
git merge bugfix
In this case, your development history has diverged from some older point. Because the commit on the branch you’re on isn’t a direct ancestor of the branch you’re merging in, Git has to do some work. In this case, Git does a simple three-way merge, using the two snapshots pointed to by the branch tips and the common ancestor of the two.
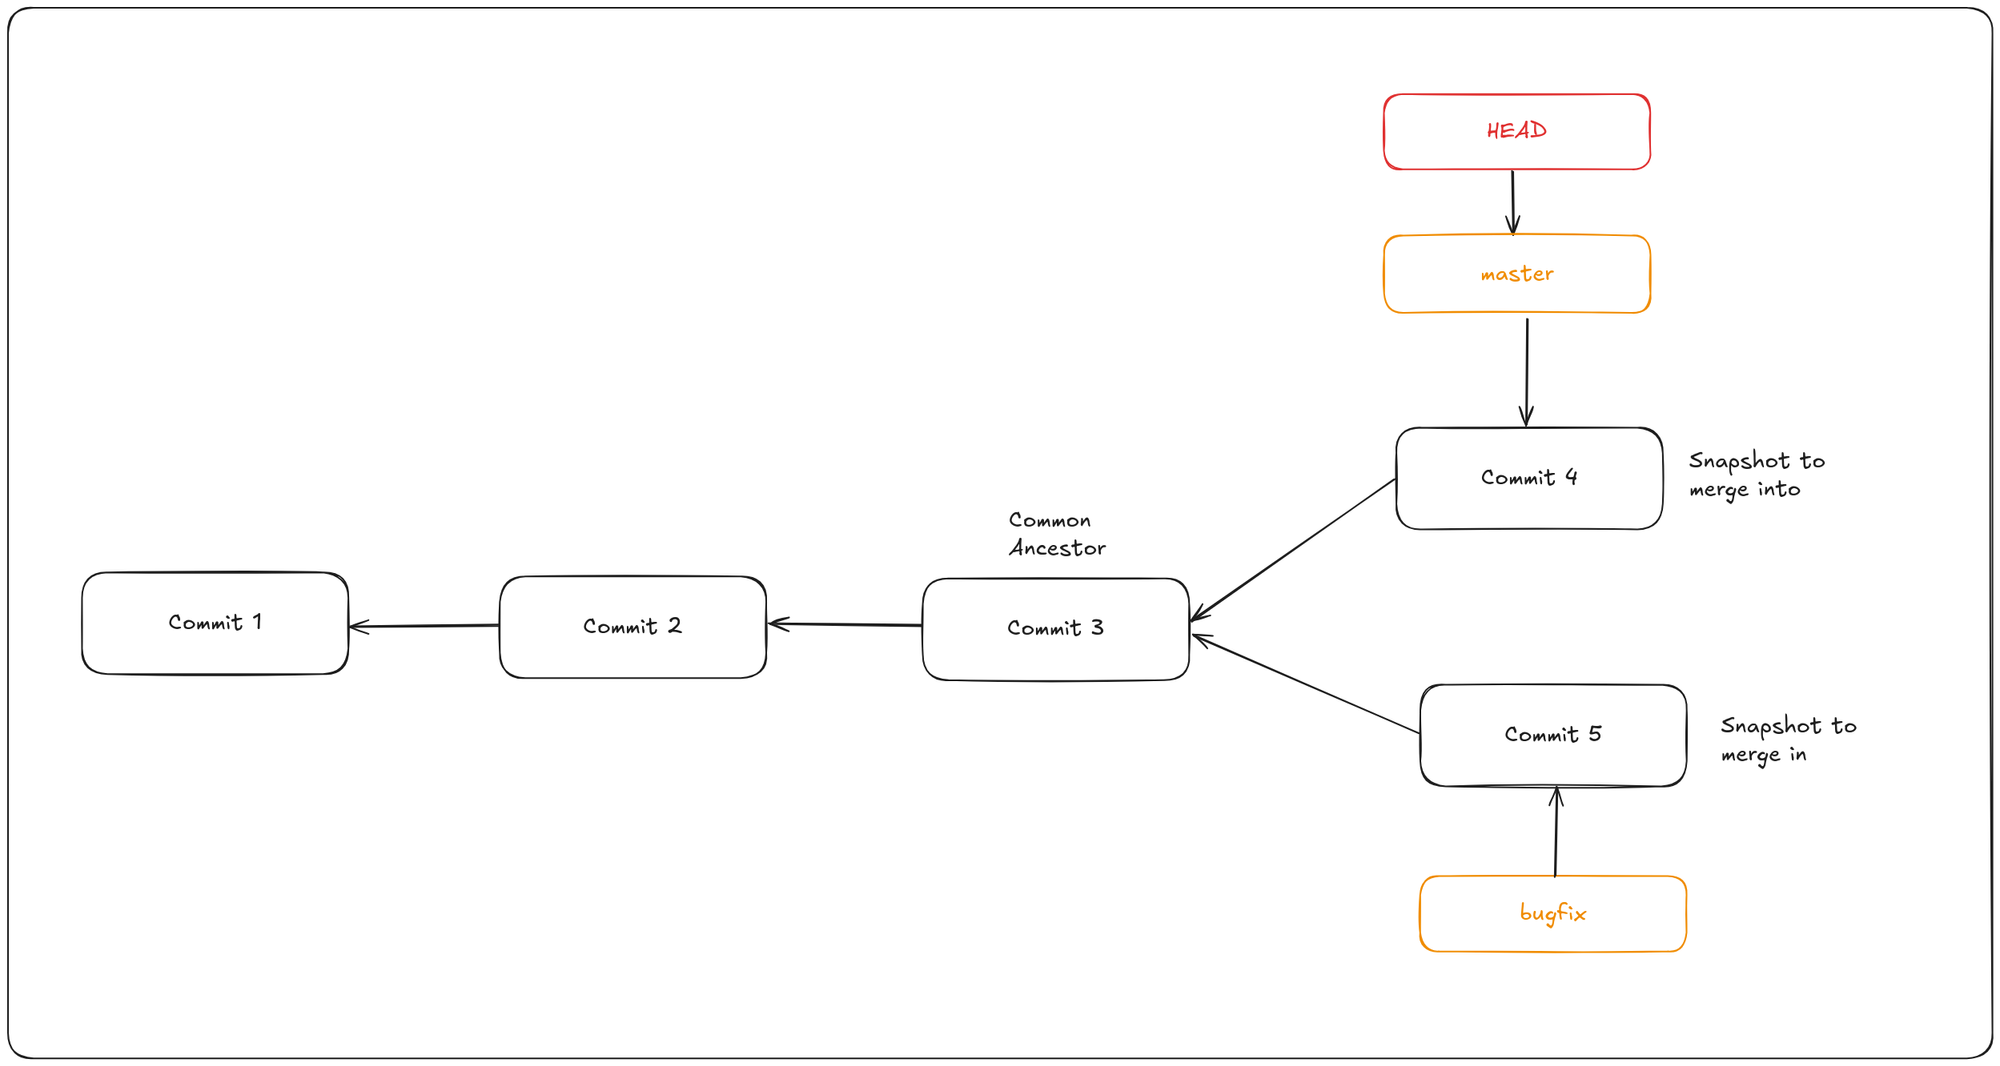
Instead of just moving the branch pointer forward, Git creates a new snapshot that results from this three-way merge and automatically creates a new commit that points to it. This is referred to as a merge commit, and is special in that it has more than one parent.
Sometimes, merging doesn’t go smoothly. If you and another branch both changed the same part of the same file differently, Git can’t automatically merge those changes. For example, if your bugfix and the newfeature branch modified the same section of a file, you’ll encounter a merge conflict.
In this case, Git will pause the merge process instead of creating a new merge commit. To check which files are still unmerged, run git status
Files with unresolved conflicts are listed as unmerged. Git inserts conflict markers directly into these files, so you can open them and manually resolve the conflicts.
Staging the file tells Git that the conflicts have been resolved. After staging all conflicted files, finalize the merge by running git commit to finalize the merge commit.
Recursive merge
Recursive merge handles cases where branches have diverged by creating a new merge commit. This commit records the combined changes from both branches, preserving the history of both lines of development. When it's time to merge, git recurses over the branch and creates a new merge commit. The merge commit continues to have two parents.
Octopus merge
An octopus merge in Git allows you to merge multiple branches into one branch simultaneously, rather than merging them two at a time. This strategy is useful for combining several feature branches into a single branch, but it can complicate conflict resolution if there are issues among the branches being merged.
git merge -s branch1 branch2 branch3
Squash and merge
Squash and merge squashes all the commits from a feature branch into a single commit before merging into the target branch. This strategy simplifies the commit history, making it easier to follow. Ideal for merging feature branches with numerous small commits, resulting in a cleaner main branch history.
git merge --squash feature-branch
Ours merge
This resolves any number of heads, but the resulting tree of the merge is always that of the current branch head, effectively ignoring all changes from all other branches. It is meant to be used to supersede old development history of side branches.
git merge -s ours branch-name
Subtree merge
The subtree merge strategy is useful when you want to merge a project into a subdirectory of another project. Use the subtree strategy when merging an entire project into a subdirectory of the current repository.
Aborting a merge
If you encounter unexpected conflicts and want to back out without resolving them, you can abort the merge with: git merge --abort. This will stop the merge and return your repository to the state before the merge began.
Alternatively, if you want to completely reset your repository to the last commit, discarding all uncommitted changes, use git reset --hard HEAD, and your repository will be back to the last committed state. This will erase any uncommitted work, so be sure you don’t need those changes before running it.
Undoing merges
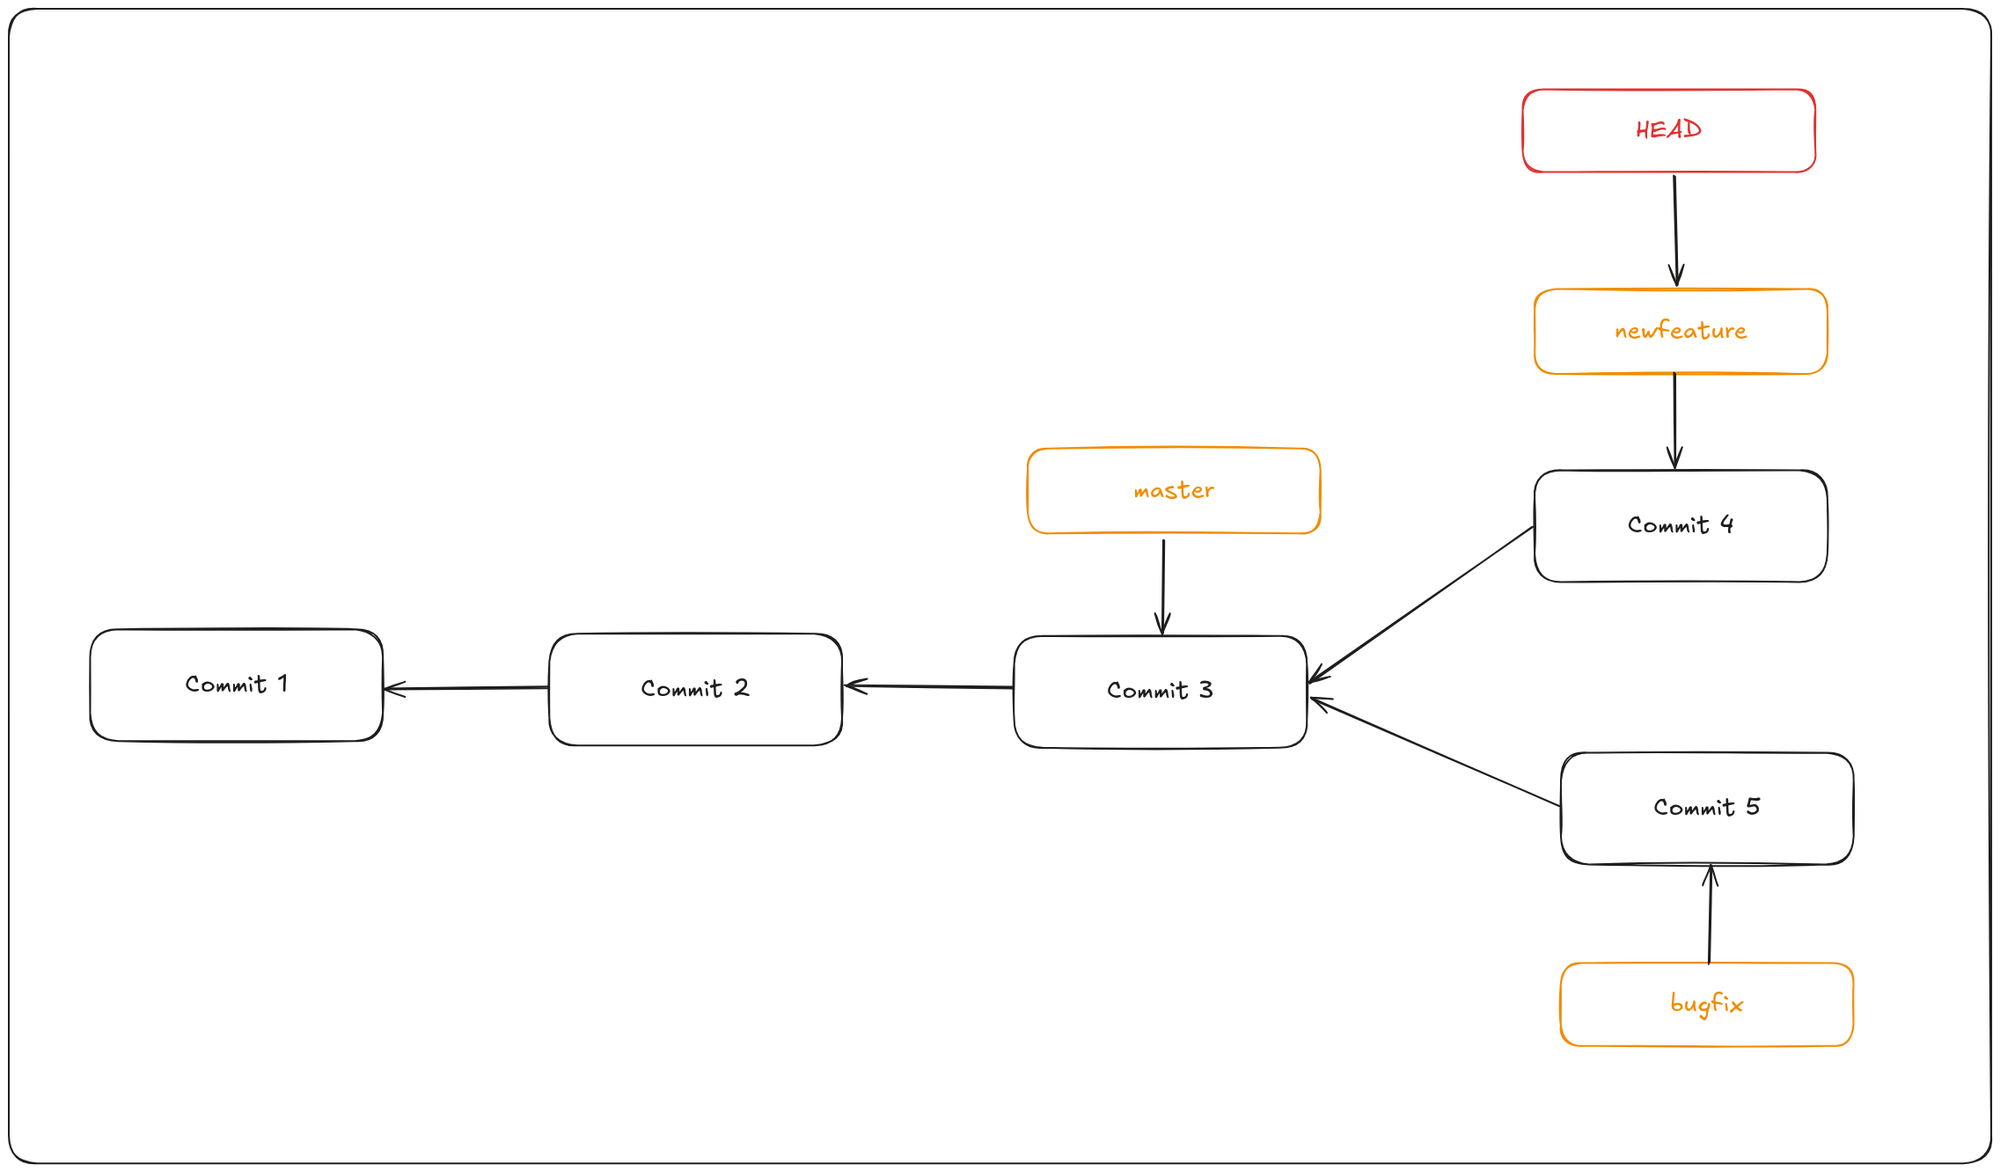
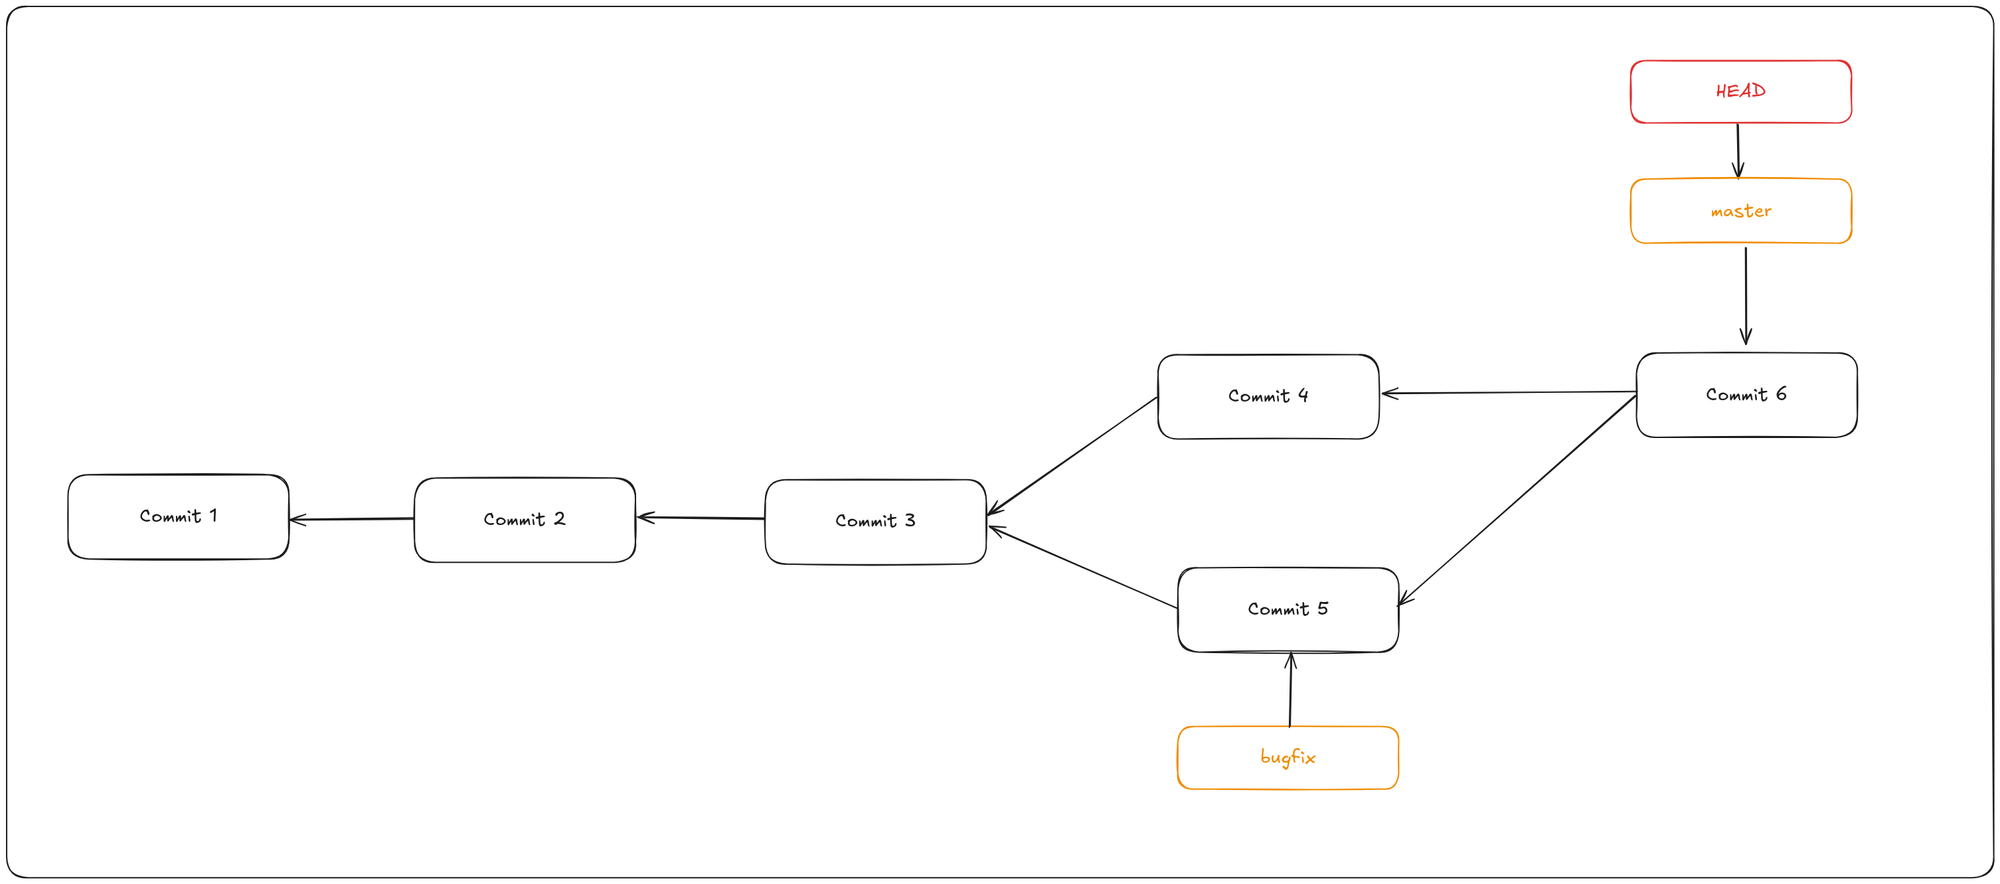
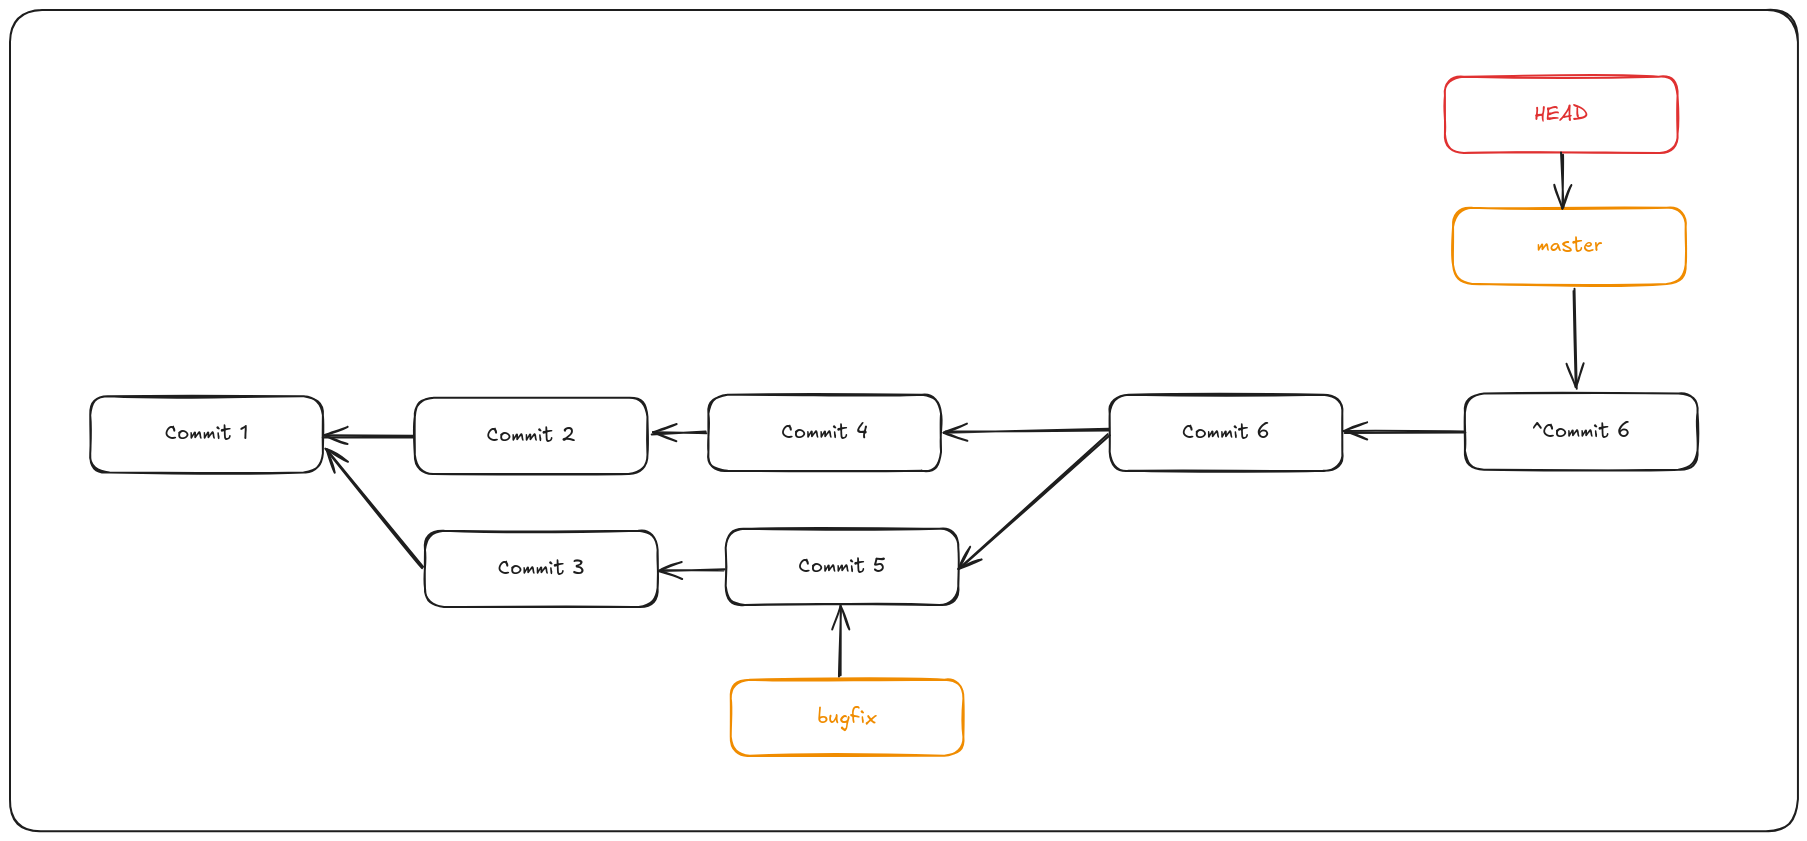
Let’s say you started work on a topic branch, accidentally merged it into master, and now your commit history looks like this:
You need to remove commit 6 somehow. There are two ways to approach this problem, depending on what your desired outcome is.
Git reset --hard
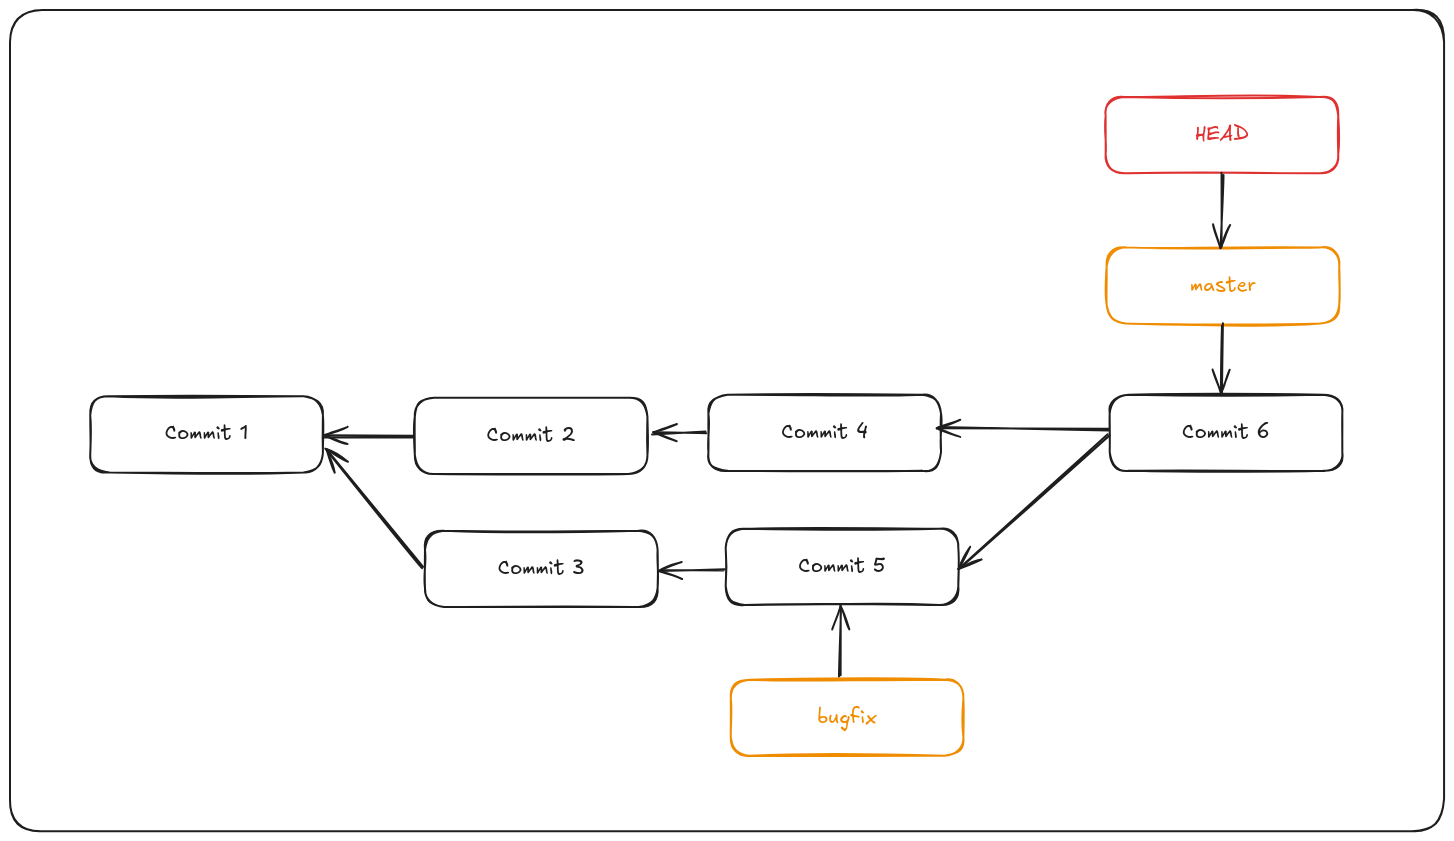
If the unwanted merge commit only exists on your local repository, the easiest and best solution is to move the branches so that they point where you want them to. In most cases, you can do git reset --hard HEAD~, this will reset the branch pointers so they look like this:

reset --hard goes through three steps:
- Move the branch HEAD points to. In this case, we want to move master to where it was before the merge commit (Commit 4).
- Make the index look like HEAD.
- Make the working directory look like the index.
The downside of this approach is that it’s rewriting history, which can be problematic with a shared repository. If other people have the commits you’re rewriting, you should probably avoid reset. This approach also won’t work if any other commits have been created since the merge; moving the refs would effectively lose those changes.
Git revert
Git gives you the option of making a new commit which undoes all the changes from an existing one. Git calls this operation a “revert”:
git revert -m 1 HEAD
The -m 1 flag indicates which parent is the “mainline” and should be kept. When you invoke a merge into HEAD (git merge bugfix), the new commit has two parents: the first one is HEAD (Commit 4), and the second is the tip of the branch being merged in (Commit 5). In this case, we want to undo all the changes introduced by merging in parent #2 (Commit 5), while keeping all the content from parent #1 (Commit 4).
The history with the revert commit looks like this:
The new commit ^Commit 6 has exactly the same contents as Commit 4, so starting from here it’s as if the merge never happened, except that the now-unmerged commits will still be in HEAD’s history. Git will get confused if you try to merge bugfix into master again!
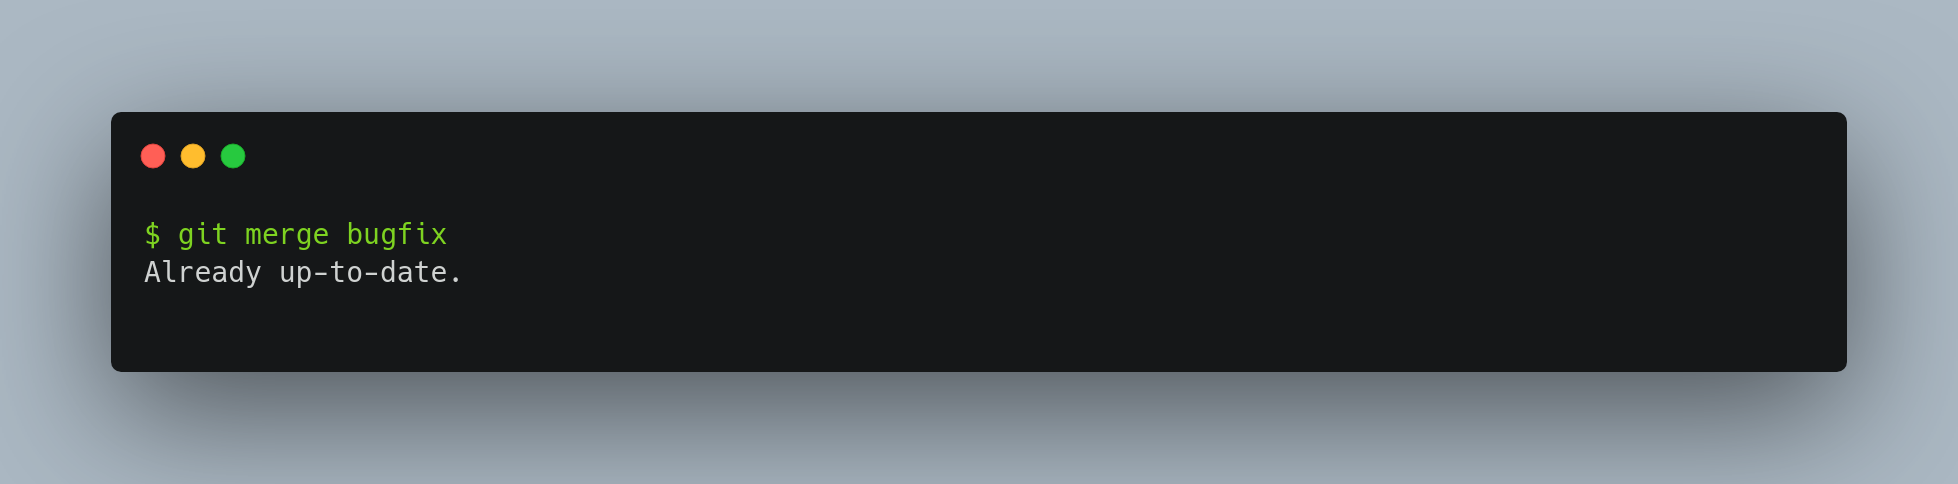
This is weird because the changes frombugfix were reverted, and they do not exist on the master branch. Yet, Git says master is up-to-date. There’s nothing in bugfix that isn’t already reachable from master. What’s worse, if you add work to bugfix and merge again, Git will only bring in the changes since the reverted merge:

The best way around this is to un-revert the original merge, since now you want to bring in the changes that were reverted out, then create a new merge commit:

In this example, Commit6 and ^Commit6 cancel out. ^^Commit6 effectively merges in the changes from Commit3 and Commit5, and Commit8 merges in the changes from Commit7, so now bugfix is fully merged.
Git config rerere
Rerere stands for reuse recorded resolution. As the name suggests, it lets Git remember how you resolved a particular merge conflict so that if the same conflict arises again, Git can automatically apply the previous resolution for you.
This feature is especially useful if you frequently merge or rebase, or if you maintain a long-lived feature branch. Instead of manually resolving the same conflicts repeatedly, rerere saves you time by shortcutting the process.
When enabled, Git stores snapshots of the conflicted areas before and after you resolve them. Later, if Git encounters an identical conflict, it reuses your previous fix automatically—no manual intervention needed.
For example, you can repeatedly attempt a merge, fix conflicts, and then abort the merge. Over time, rerere will build a cache of your resolutions, making the final merge seamless since Git can apply those fixes on its own.
This also works well when you rebase a branch multiple times or switch between merging and rebasing. Once a conflict is resolved and recorded, rerere helps avoid resolving it again.
To enable rerere globally, run: git config --global rerere.enabled true
With this enabled, Git will automatically record conflict resolutions during merges.
If needed, you can manually interact with the rerere cache using: git rerere. Running this command checks the cache for any applicable resolutions and tries to apply them to current conflicts (though this is usually automatic when rerere is enabled).
Rewriting history
Git restore - Unmodifying a modified file
What if you want to discard all your changes to a file and go back to the state as in the last commit? So, from working dir to discard.
git restore <filename>
This command resets the file in your working directory to match the most recent commit. You’ll often see this suggested when running git status.
Git restore staged - Unstaging a staged file
If you have mistakenly staged a file, how do you unstage them without discarding the changes, i.e. the changes should still persist in your working dir.
git restore --staged <filename>
This command removes the file from the staging area while preserving your modifications. You’ll also see this suggestion when running git status.
Git commit --amend
A common need is to fix a commit you made too early—maybe you forgot to add some files or want to update the commit message. To redo that commit, stage the missing changes and use git commit --amend.
You can update your most recent commit using the --amend flag with git commit. This command replaces your last commit with a new one that includes the current staging area. If no changes were staged, it simply reopens the commit message editor with the previous message for you to edit. You can amend multiple times if needed; each amended commit completely replaces the prior one, so your history stays clean with a single updated commit.
It’s important to understand that when you’re amending your last commit, you’re not so much fixing it as replacing it entirely with a new, improved commit that pushes the old commit out of the way and puts the new commit in its place. Effectively, it’s as if the previous commit never happened, and it won’t show up in your repository history.
Modify commit message
To edit just the commit message run:
git commit --amend
This opens your default editor with the previous message. Edit it as needed, save, and close the editor. Git will create a new commit with the updated message, replacing the previous one.
Modify commit content
To change the actual contents of the last commit:
- Make the changes you forgot.
- Stage them using
git add. - Run:
git commit --amend
This updates the last commit to include the new changes and, optionally, a new message.
Amending a commit rewrites history — it changes the commit’s SHA-1. Do not amend a commit that has already been pushed to a shared repository, as it can create conflicts for others.
Git push --force-with-lease
Only amend commits that are still local and have not been pushed somewhere. If you amend a commit that’s already on a remote and push with --force, it can disrupt collaborators. To minimize risk, use git push --force-with-lease instead of a plain --force. This option ensures you only overwrite the remote branch if it hasn’t changed since your last fetch, preventing accidental overwrites of others’ work.
Git rebase
In Git, there are two main ways to integrate changes from one branch into another: the merge and the rebase. With the rebase command, you can take all the changes that were committed on one branch and replay them on a different branch.
git rebase master bugfix
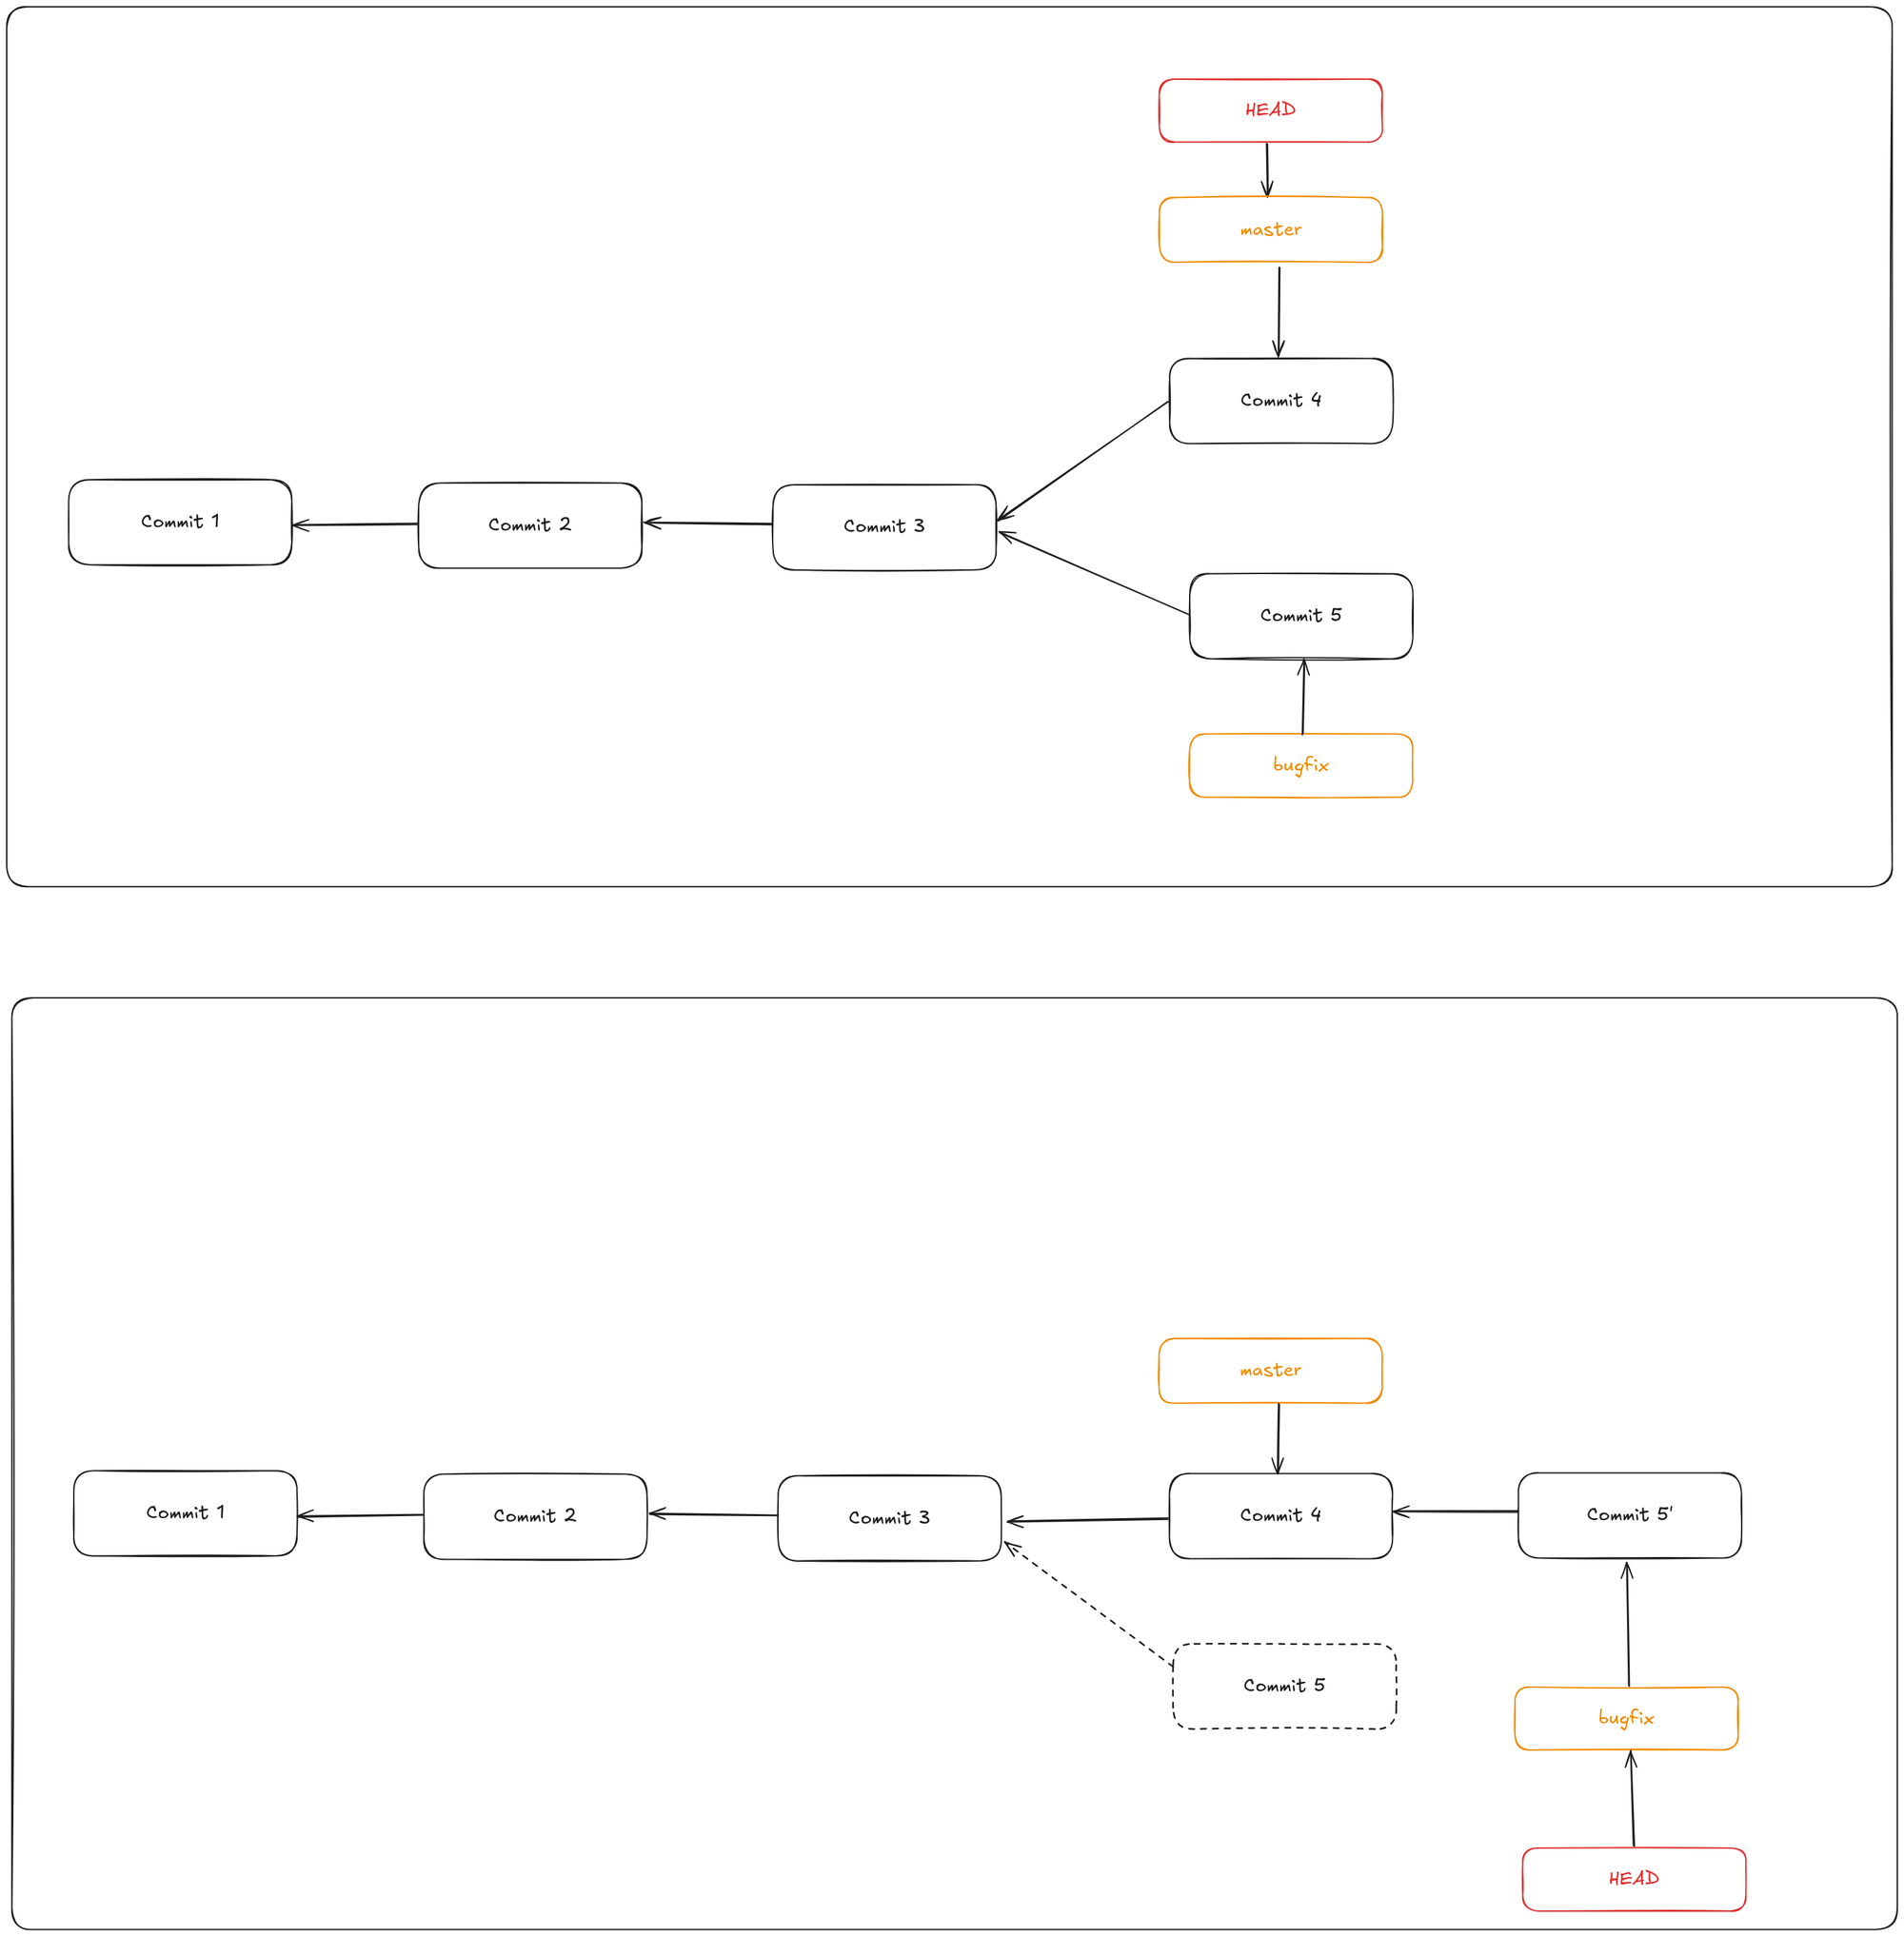
You can now to a git checkout master and git merge bugfix to simply fast-forward the master branch.
This operation works by finding the common ancestor of the branch you’re on and the branch you want to rebase onto. It then takes each commit from your current branch, saves the changes (diffs) introduced by those commits temporarily, resets your branch to match the target branch, and finally reapplies each saved change one by one.
The end result of a rebase is functionally the same as a merge, but the commit history appears cleaner and linear — as if all your work happened sequentially, even if it originally occurred in parallel.
Rebasing is often used to make sure your commits apply cleanly on a remote branch. For example, if you’re contributing to a project you don’t maintain, you might do your work on a feature branch and then rebase it onto origin/master before submitting. This makes it easier for maintainers to integrate your changes, often requiring only a fast-forward or a straightforward apply.
The key difference is that rebasing reapplies your changes in order on top of another branch, while merging combines the endpoints of branches together.
Never rebase commits that have been pushed to a shared repository and that others might have based work on. Rebasing rewrites commit history by creating new commits to replace the old ones. If others have pulled your original commits and built work on top of them, rewriting those commits can cause serious conflicts and confusion.
Git rebase - Changing multiple commit messages
To edit multiple recent commit messages, use an interactive rebase with the -i flag. You must indicate how far back you want to rewrite commits by telling the command which commit to rebase onto.
git rebase -i HEAD~3
This command opens an editor with the last three commits listed. You’re rebasing onto the parent of the oldest commit you want to change — in this case, 3 commits ago. It may be easier to remember the ~3 because you’re trying to edit the last three commits, but keep in mind that you’re actually designating four commits ago, the parent of the last commit you want to edit.
git rebase -i HEAD~3
Remember again that this is a rebasing command — every commit in the range HEAD~3..HEAD with a changed message and all of its descendants will be rewritten.
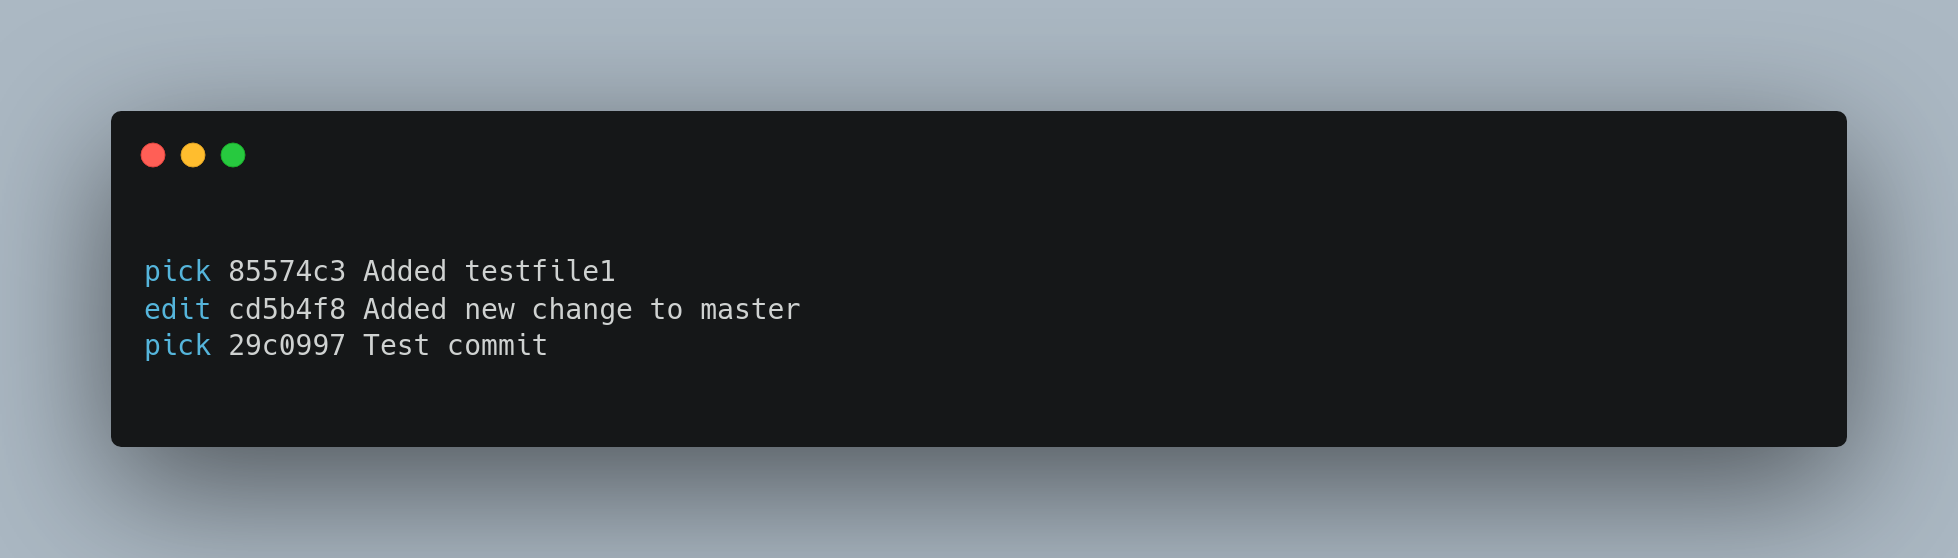
Running this command gives you a list of commits in your text editor that looks something like this:
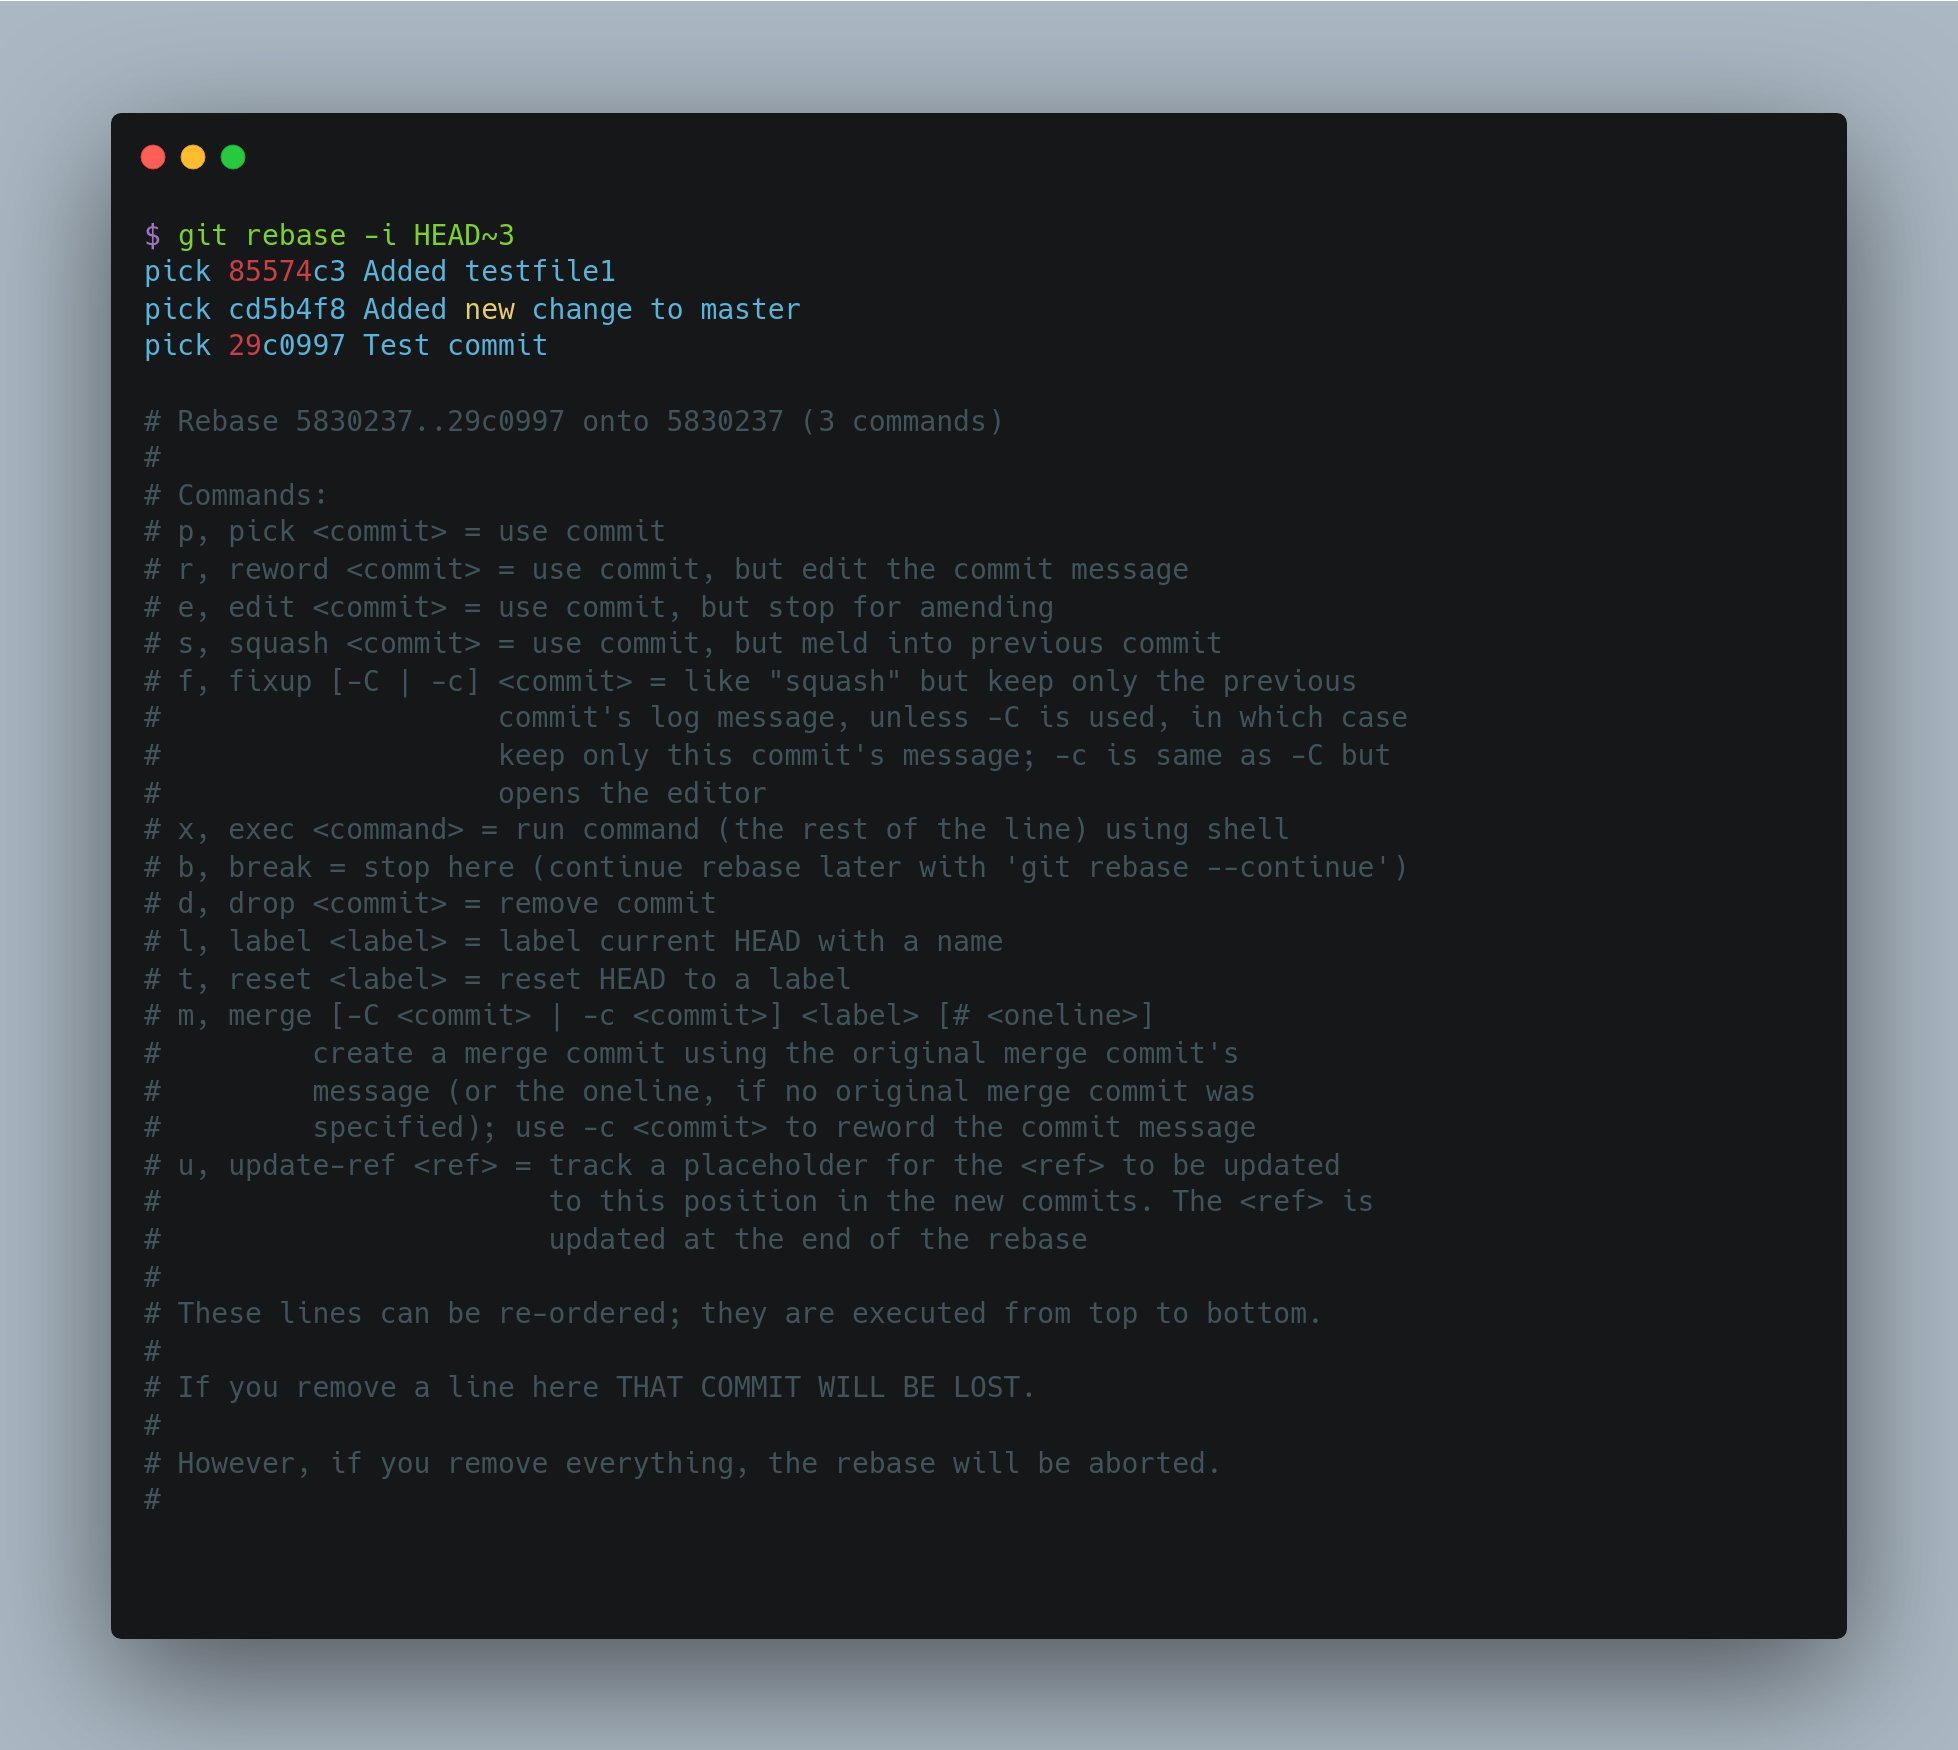
It’s important to note that these commits are listed in the opposite order than you normally see them using the log command. Here, the most recent commit is placed at the end. The interactive rebase gives you a script that it’s going to run. It will start at the commit you specify on the command line (HEAD~3) and replay the changes introduced in each of these commits from top to bottom. It lists the oldest at the top, rather than the newest, because that’s the first one it will replay.
You need to edit the script so that it stops at the commit you want to edit. To do so, change the word pick to the word edit for each of the commits you want the script to stop after. For example, to modify only the third commit message, you change the file to look like this

When you save and exit the editor, Git rewinds you back to the last commit in that list and drops you on the command line with the following message:
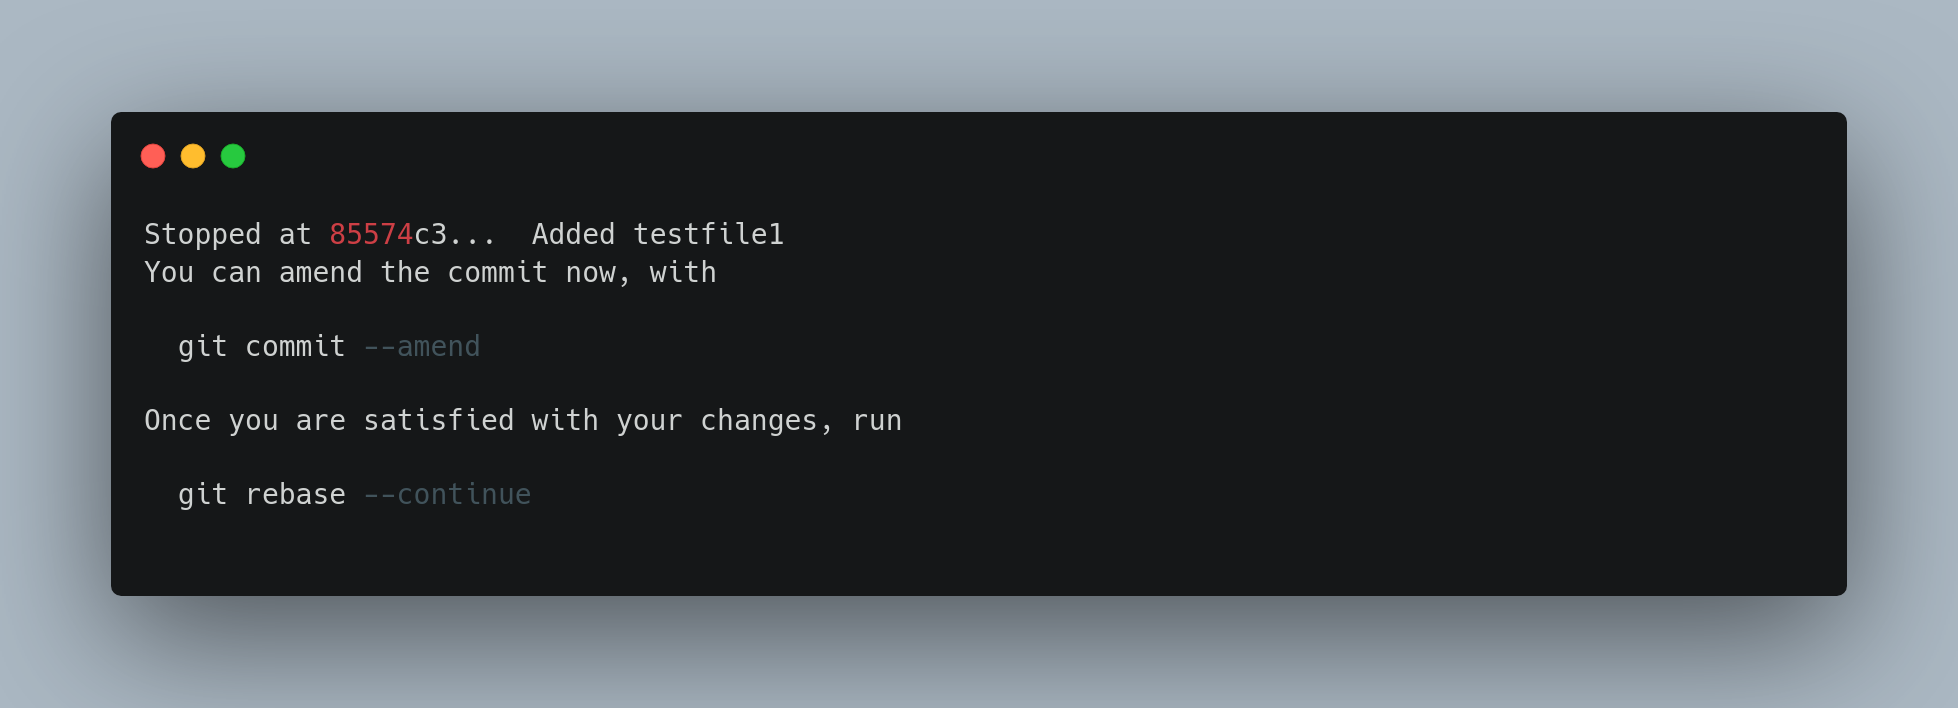
These instructions tell you exactly what to do. Type:
git commit --amend
Change the commit message, and exit the editor. Then, run:
git rebase --continue
This command will apply the other two commits automatically, and then you’re done. If you change pick to edit on more lines, you can repeat these steps for each commit you change to edit. Each time, Git will stop, let you amend the commit, and continue when you’re finished.
Git rebase - Reordering commits
You can also use interactive rebases to reorder or remove commits entirely. If you want to remove the Test commit commit and change the order in which the other two commits are introduced, you can change the rebase script from this:

to this:
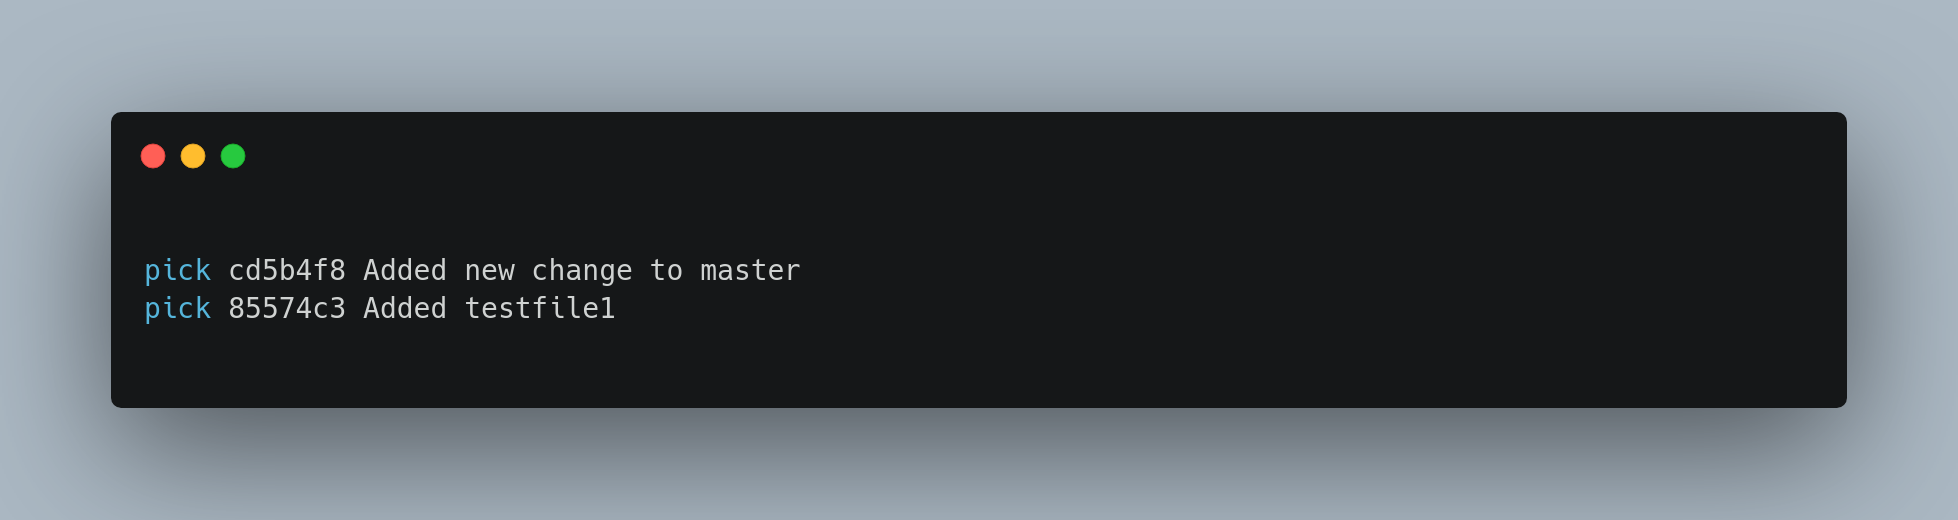
When you save and exit the editor, Git rewinds your branch to the parent of these commits, applies cd5b4f8 and then 85574c3, and then stops. You effectively change the order of those commits and remove the Test commit commit completely.
Git rebase - Squashing commits
It’s also possible to take a series of commits and squash them down into a single commit with the interactive rebasing tool.
If, instead of pick or edit, you specify squash, Git applies both that change and the change directly before it and makes you merge the commit messages together. So, if you want to make a single commit from these three commits, you make the script look like this
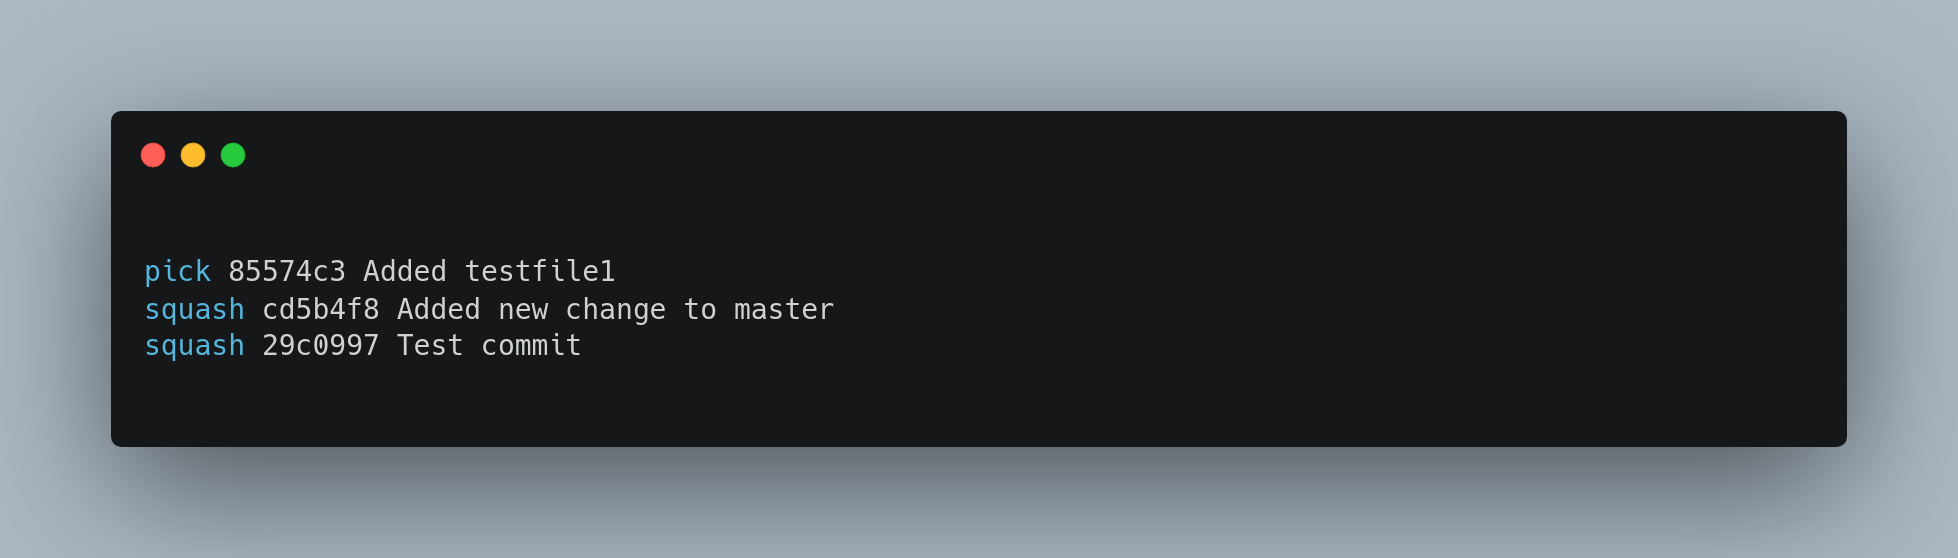
When you save and exit the editor, Git applies all three changes and then opens an editor for you to edit the commit message. When you save that, you have a single commit that introduces the changes of all three previous commits.
Git rebase - Splitting a commit
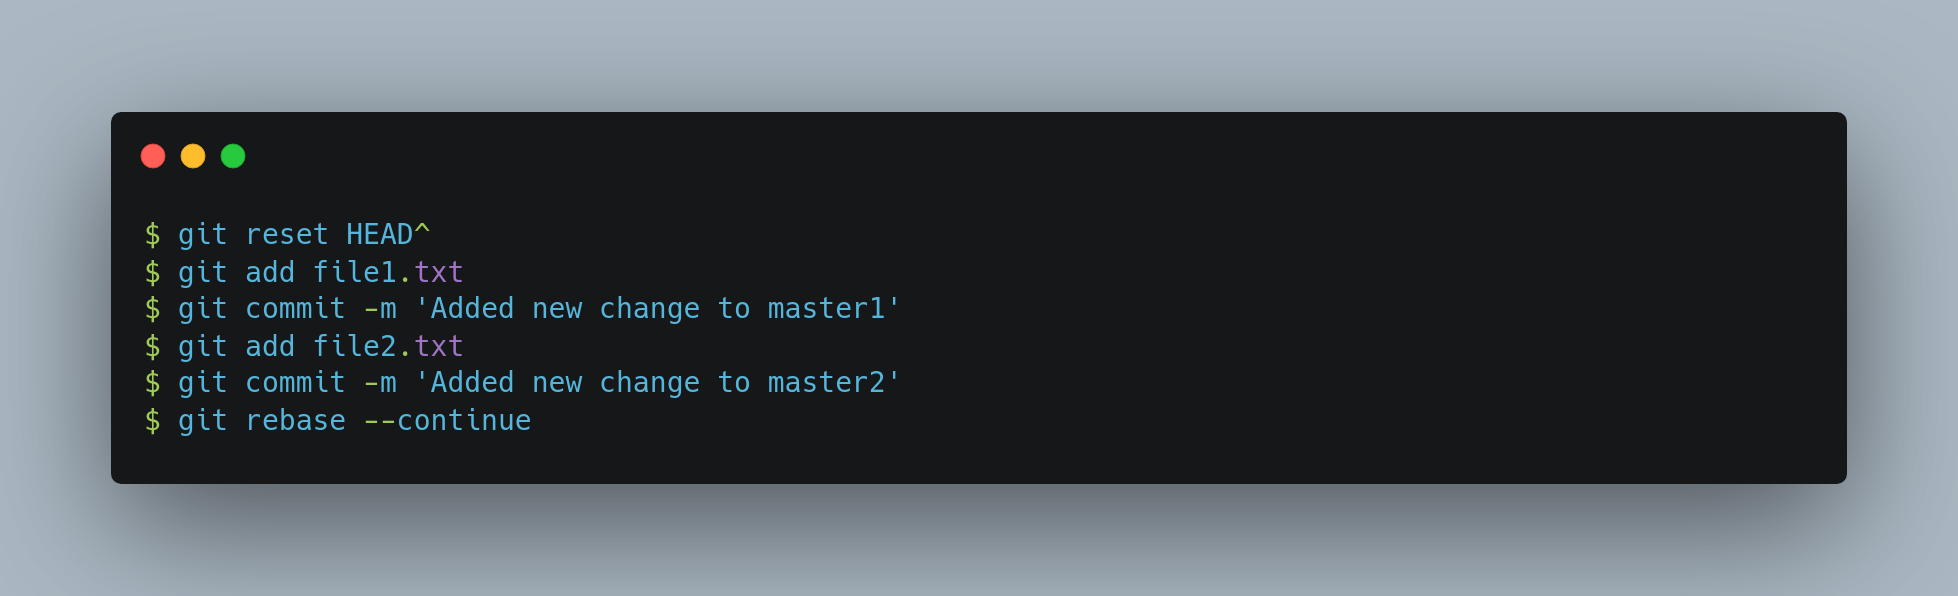
Splitting a commit undoes a commit and then partially stages and commits as many times as commits you want to end up with. For example, suppose you want to split the middle commit of your three commits into two different commits. You can do that in the rebase -i script by changing the instruction on the commit you want to split to “edit”:
Then, when the script drops you to the command line, you reset that commit, take the changes that have been reset, and create multiple commits out of them.
When you save and exit the editor, Git rewinds to the parent of the first commit in your list, applies the first commit 85574c3) applies the second cd5b4f8, and drops you to the console. There, you can do a mixed reset of that commit with git reset HEAD^, which effectively undoes that commit and leaves the modified files unstaged. Now you can stage and commit files until you have several commits, and run git rebase --continue when you’re done.
Git applies the last commit 29c0997 in the script, and your history looks like this:
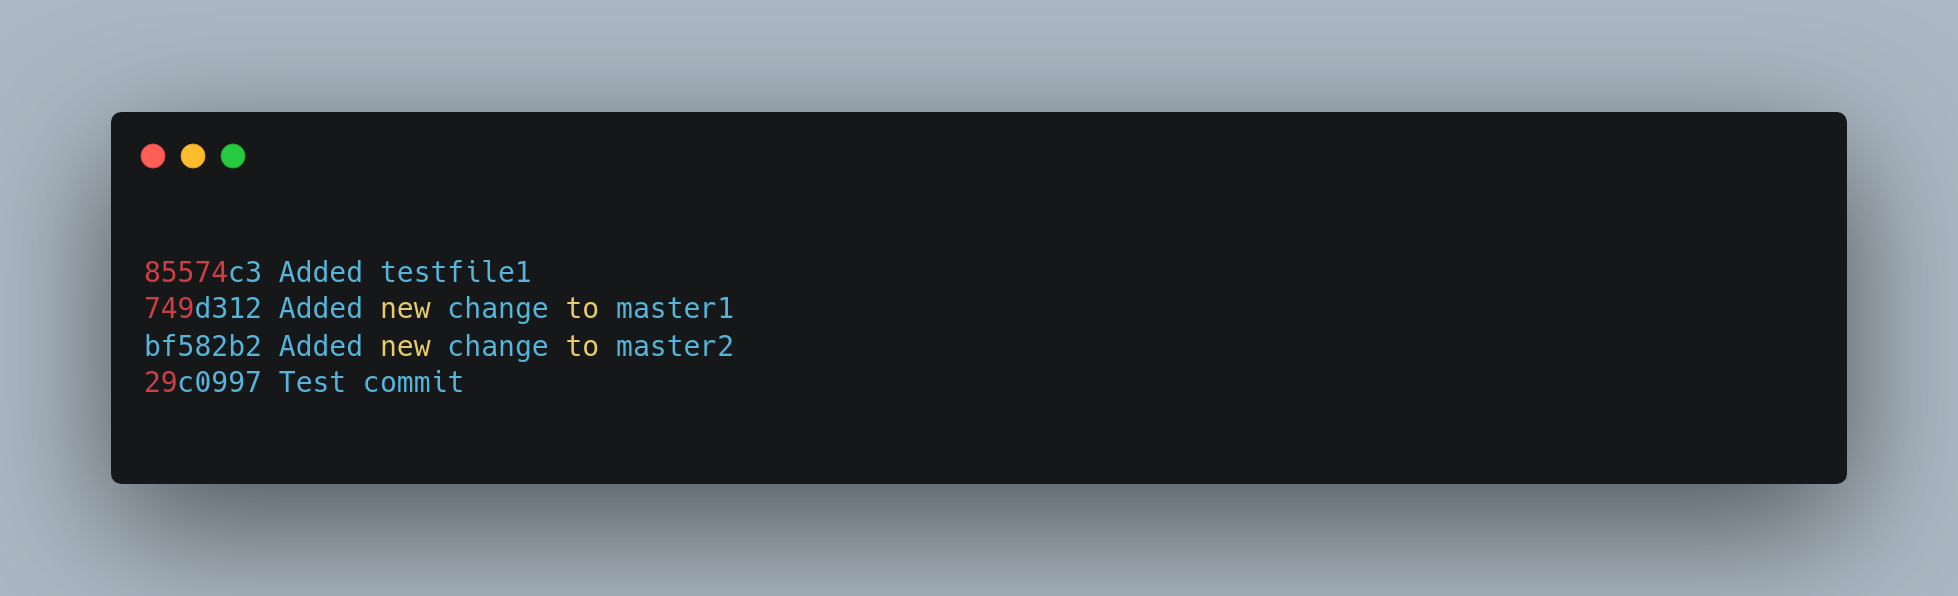
This changes the SHA-1s of the three most recent commits in your list, so make sure no changed commit shows up in that list that you’ve already pushed to a shared repository. Notice that the last commit 85574c3 in the list is unchanged. Despite this commit being shown in the script, because it was marked as pick and was applied prior to any rebase changes, Git leaves the commit unmodified.
Git rebase - Deleting a commit
If you want to get rid of a commit, you can delete it using the rebase -i script. In the list of commits, put the word drop before the commit you want to delete (or just delete that line from the rebase script)
Because of the way Git builds commit objects, deleting or altering a commit will cause the rewriting of all the commits that follow it. The further back in your repo’s history you go, the more commits will need to be recreated. This can cause lots of merge conflicts if you have many commits later in the sequence that depend on the one you just deleted.
Git rebase abort
If you get partway through a rebase and decide it’s not a good idea, you can always stop. Type git rebase --abort, and your repo will be returned to the state it was in before you started the rebase.
If you finish a rebase and decide it’s not what you want, you can use git reflog to recover an earlier version of your branch.
Git reflog
One of the things Git does in the background while you’re working away is keep a “reflog” — a log of refs, where your HEAD and branch references have been for the last few months.
You can see your reflog by using git reflog

Every time your branch tip is updated for any reason, Git stores that information for you in this temporary history. You can use your reflog data to refer to older commits as well. For example, to view the state of HEAD five steps ago, you can use the @{5} reference that you see in the reflog output: git show HEAD@{5}
To move your branch back to that point, you can run: git reset --hard HEAD@{5}
It’s important to note that reflog information is strictly local — it’s a log only of what you’ve done in your repository. The references won’t be the same on someone else’s copy of the repository; also, right after you initially clone a repository, you’ll have an empty reflog, as no activity has occurred yet in your repository. Reflog is especially useful for recovering lost commits, undoing mistakes, and restoring deleted branches.
Git stash
When you're in the middle of work and need to switch branches, committing half-finished changes isn’t ideal. The git stash command provides a way to temporarily save your modifications without committing them.
Stashing saves the current state of your working directory — including staged and modified tracked files — and stores it in a stack-like structure. You can apply these saved changes later, even on a different branch.
To push a new stash onto your stack, run git stash or git stash push
Your working directory is now clean, allowing you to switch branches freely. To view saved stashes, you can use git stash list
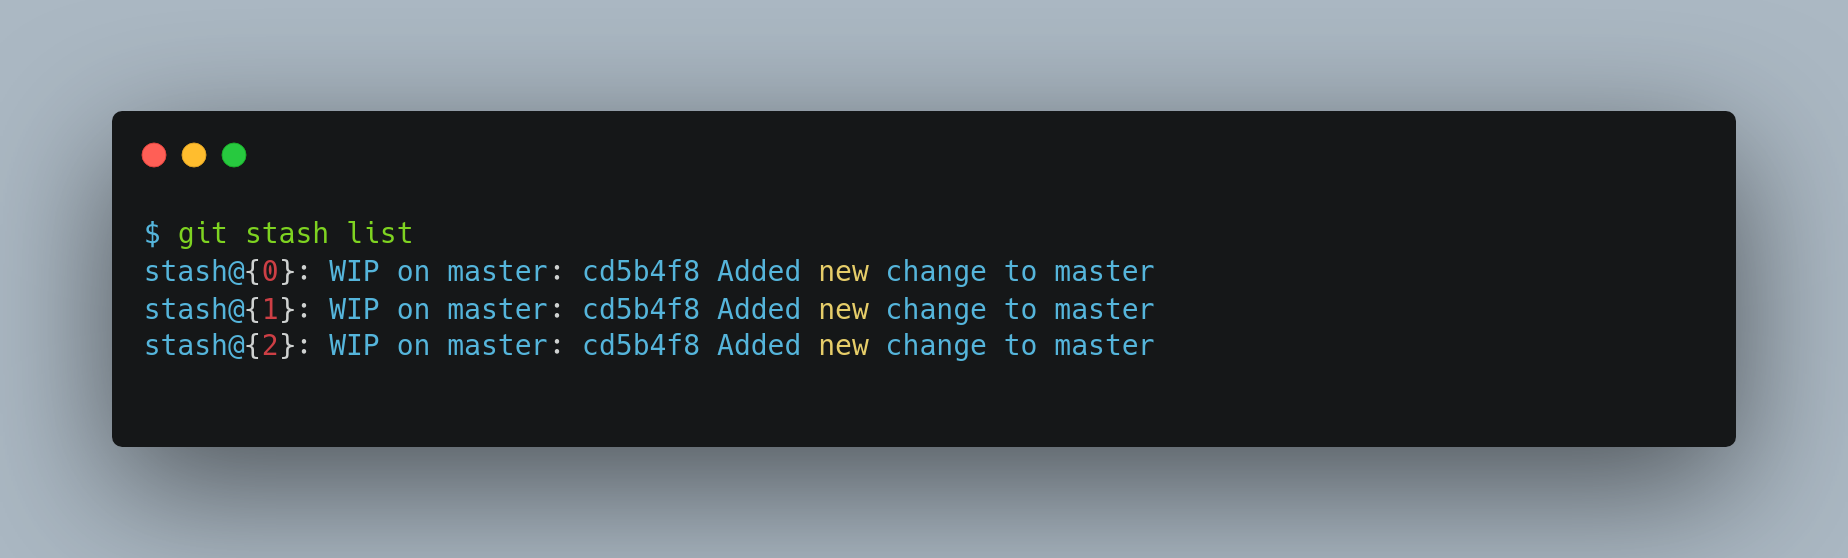
In this case you have access to three different stashed works. You can reapply the one you just stashed by using the command shown in the help output of the original stash command: git stash apply. If you want to apply one of the older stashes, you can specify it by naming it, like this: git stash apply stash@{2}. If you don’t specify a stash, Git assumes the most recent stash and tries to apply it.
The apply option only tries to apply the stashed work — you continue to have it on your stack. To remove it, you can run git stash drop with the name of the stash to remove. You can also run git stash pop to apply the stash and then immediately drop it from your stack.
Git clean
The git clean command is used to remove untracked files from your working directory. It’s a powerful tool — and potentially destructive — so use it with caution.
To remove all untracked files and directories run:
git clean -f -d
-f(--force) is required unless you've disabled the safety check (clean.requireForce=false).-dremoves untracked directories as well.
Before running the command for real, always preview what will be deleted:
git clean -d -n or git clean -d --dry-run
This shows what would be removed without actually deleting anything.
By default, git clean does not remove files ignored by .gitignore. To include those, add the -x flag
git clean -n -d -x
Again, use -n to preview the effects. Only replace it with -f when you're sure:
git clean -f -d -x
Always run git clean with -n first to avoid accidentally deleting important files
Git reset
Git as a system manages and manipulates three "trees" in its normal operation (by “tree” here, we mean “collection of files”, not specifically the data structure):
HEAD: Last commit snapshot, next parentIndex: Proposed next commit snapshotWorking dir: Sandbox
Git reset modes
The first thing reset will do is move what HEAD points to. This isn’t the same as changing HEAD itself (which is what checkout does); reset moves the branch that HEAD is pointing to. This means if HEAD is set to the master branch (i.e. you’re currently on the master branch), running git reset commit4 will start by making master point to commit4.

Git reset can be performed with one of three modes:
- soft
- mixed
- hard
The various changes made to HEAD, staging and working dirs depending on the various git reset modes are shown below:
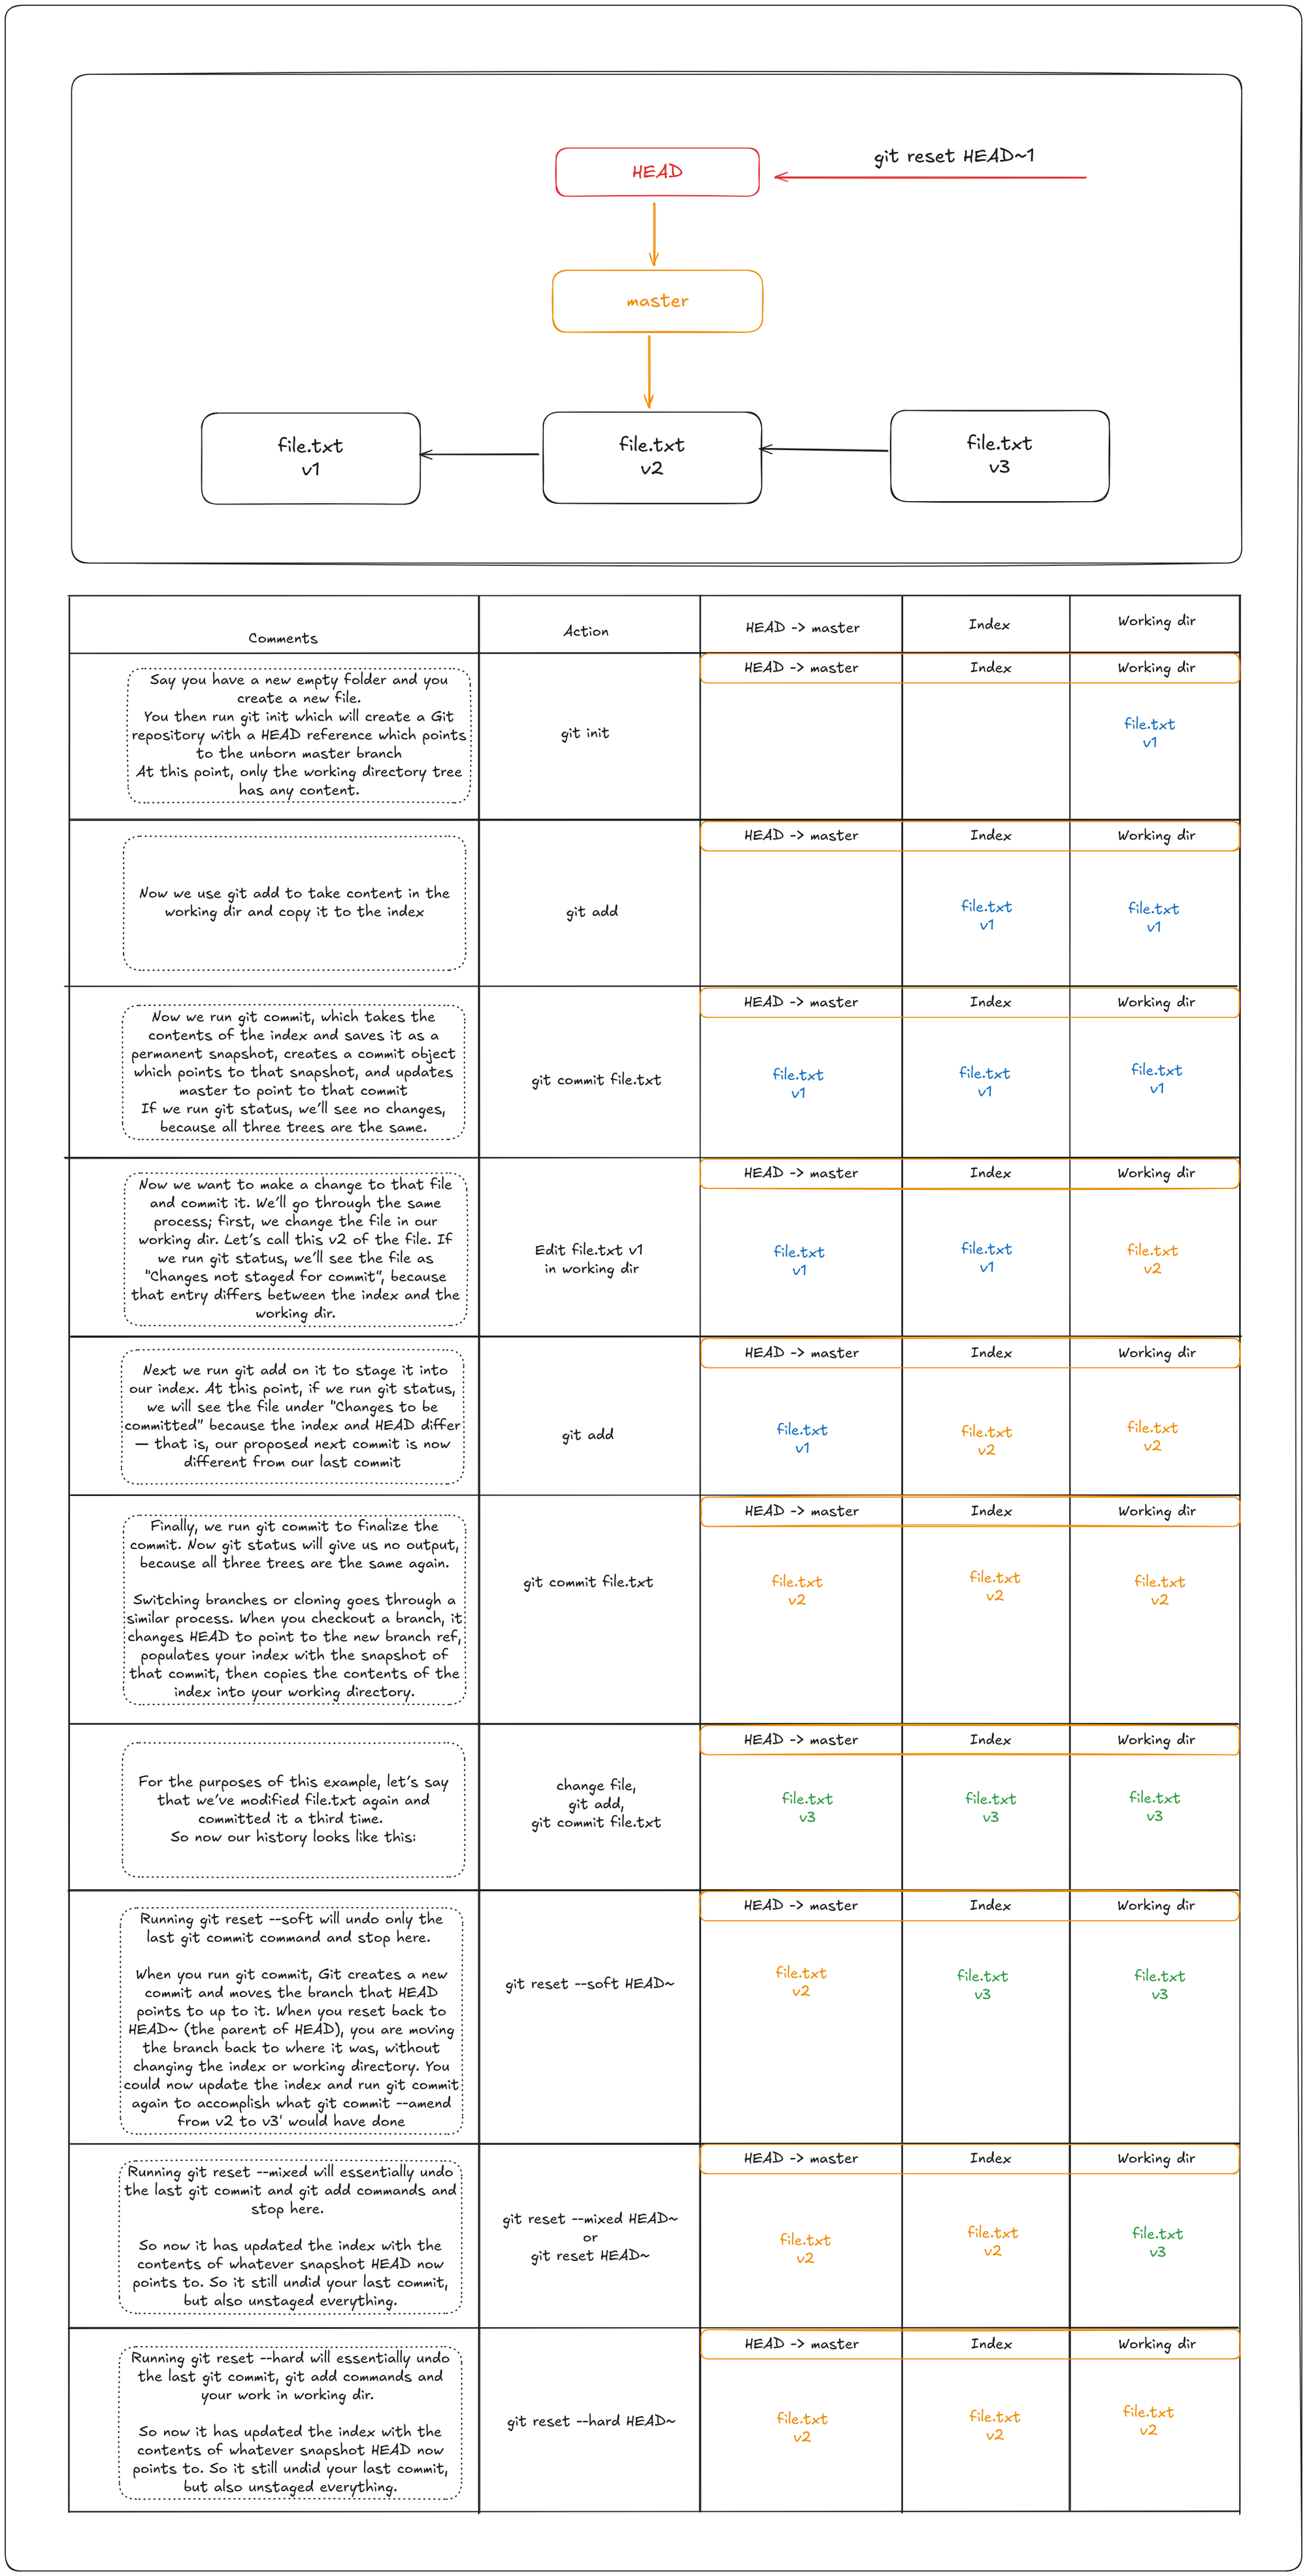
It’s important to note that flag --hard is the only way to make the reset command dangerous, and one of the very few cases where Git will actually destroy data. Any other invocation of reset can be pretty easily undone, but the --hard option cannot, since it forcibly overwrites files in the working directory. In this particular case, we still have the v3 version of our file in a commit in our Git DB, and we could get it back by looking at our reflog, but if we had not committed it, Git still would have overwritten the file and it would be unrecoverable.
The reset command overwrites these three trees in a specific order, stopping when you tell it to:
- Move the branch
HEADpoints to (stop here if--soft). - Make the index look like
HEAD(stop here if--mixed). - Make the working directory look like the index (stop here if
--hard).
Reset with a path
If you specify a path, reset will skip step 1, and limit the remainder of its actions to a specific file or set of files. This actually sort of makes sense — HEAD is just a pointer, and you can’t point to part of one commit and part of another. But the index and working directory can be partially updated, so reset proceeds with steps 2 and 3
So, assume we run git reset file.txt. This form (since you did not specify a commit SHA-1 or branch, and you didn’t specify --soft or --hard) is shorthand for git reset –– file.txt, which will
- Move the branch HEAD points to (skipped).
- Make the index look like HEAD (stop here).
So it essentially just copies file.txt from HEAD to the index. This has the practical effect of unstaging the file, the opposite of git add file.txt
We could just as easily not let Git assume we meant “pull the data from HEAD” by specifying a specific commit to pull that file version from. We would just run something like git reset a565e3 –– file.txt (v1 commit while HEAD is at v3).
This effectively does the same thing as if we had reverted the content of the file to v1 in the working directory, ran git add on it, then reverted working directory back to v3 again (without actually going through all those steps). If we run git commit now, it will record a change that reverts that file back to v1, while persisting the v3 change in working dir.
Squashing commits with reset
Sometimes your commit history includes messages like “oops,” “Work-In-Ptogress,” or “forgot this file.” To clean things up before sharing your work, you can squash those commits into a single, polished one. Remember squashing commits with git rebase is also equivalent, but it's simpler to use reset.

Git checkout vs git reset
Like reset, checkout manipulates the three trees, and it is a bit different depending on whether you give the command a file path or not.
Without Paths
Running git checkout [branch] is pretty similar to running git reset --hard [branch] in that it updates all three trees for you to look like [branch], but there are two important differences.
git checkoutis safer — it won’t overwrite files with local modifications unless it can do so cleanly. Git attempts a trivial merge for files that haven’t changed, preserving your work where possible.git reset --hard, on the other hand, is destructive. It unconditionally resets your working directory and index to match the target commit, discarding all uncommitted changes.- The second important difference is how checkout updates HEAD. Whereas reset will move the branch that HEAD points to, checkout will move HEAD itself to point to another branch.
For instance, say we have master and develop branches which point at different commits, and we’re currently on develop (so HEAD points to it). If we run git reset master, develop itself will now point to the same commit that master does. If we instead run git checkout master, develop does not move, HEAD itself does. HEAD will now point to master.
So, in both cases we’re moving HEAD to point to commit A, but how we do so is very different. reset will move the branch HEAD points to, checkout moves HEAD itself.
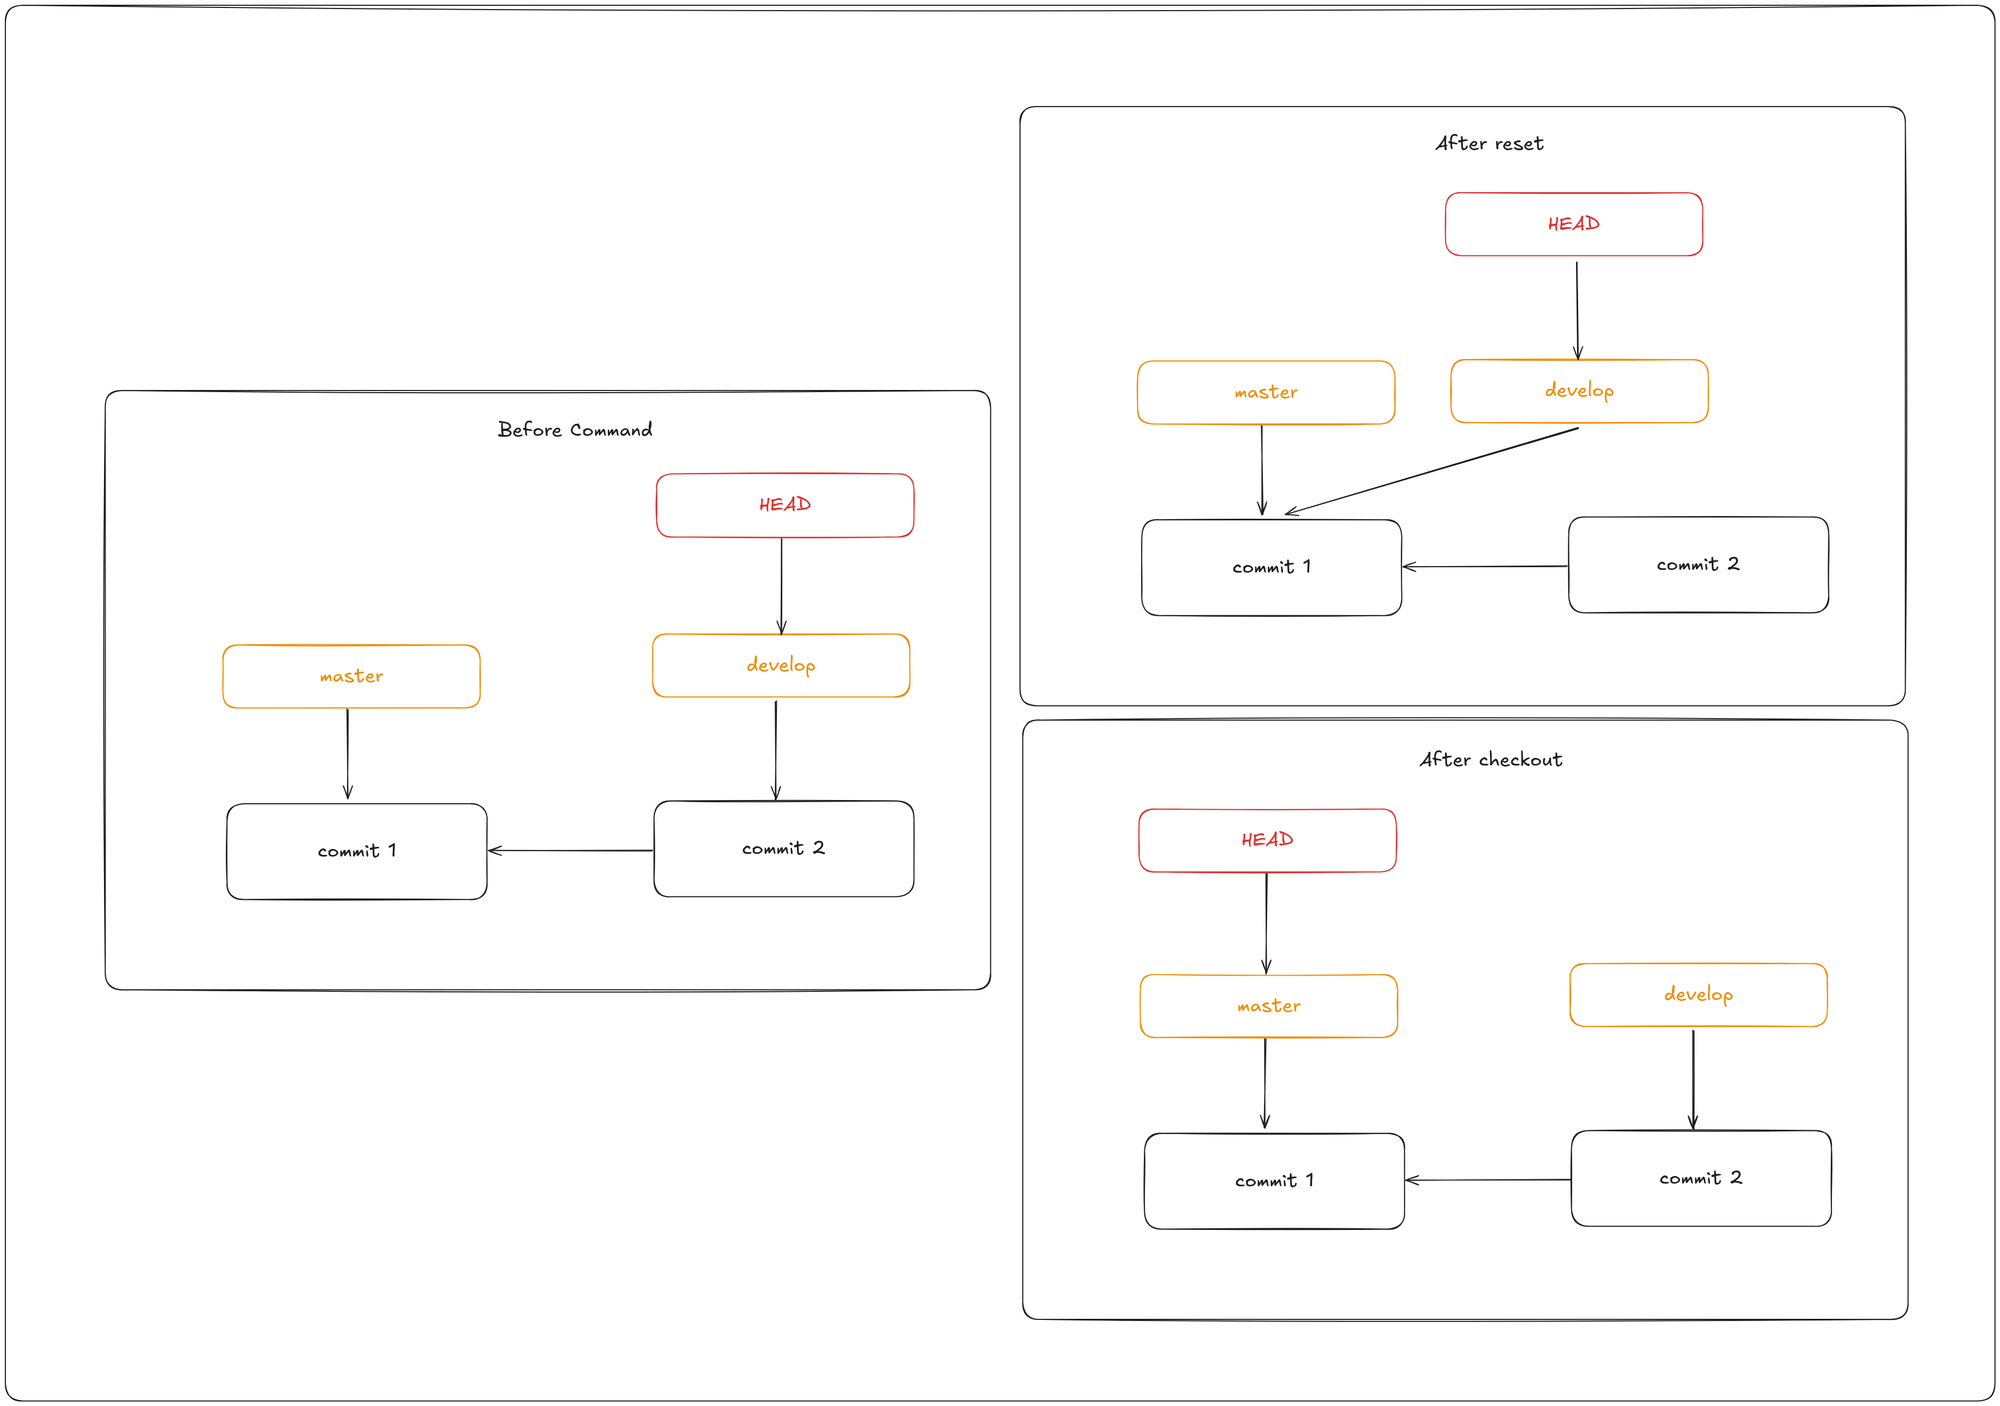
With Paths
The other way to run checkout is with a file path, which, like reset, does not move HEAD. It is just like git reset [branch] file in that it updates the index with that file at that commit, but it also overwrites the file in the working directory. It would be exactly like git reset --hard [branch] file (if reset would let you run that) — it’s not working-directory safe, and it does not move HEAD.
Git blame
If you track down a bug in your code and want to know when it was introduced, you can use git blame. It shows you what commit was the last to modify each line of any file.
The following example uses git blame to determine which commit and committer was responsible for lines in 1 to 3 in testfile1.txt. The -L option is used to restrict the output of the annotation to lines 1 through 3 of the file.
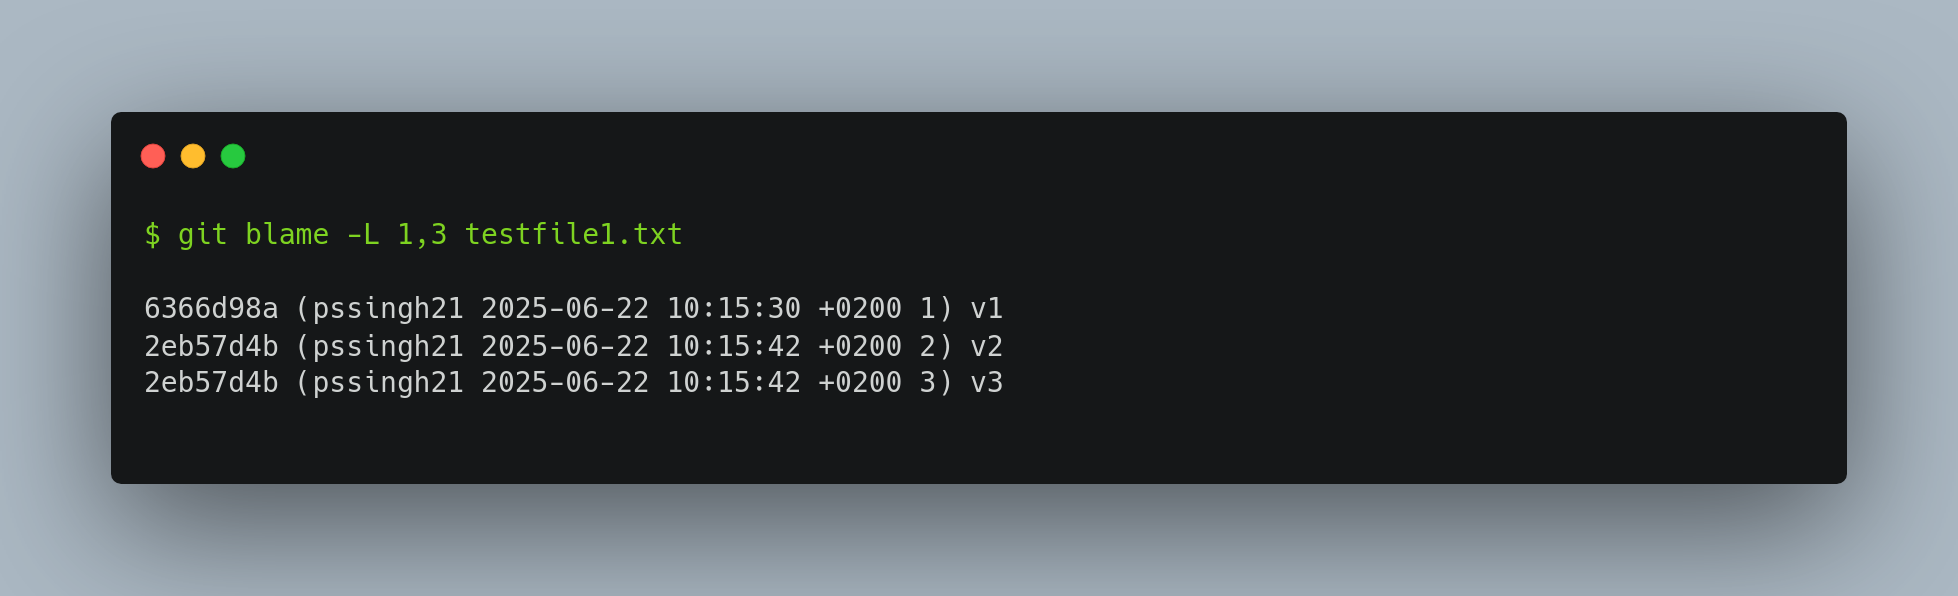
Notice that the first field is the partial SHA-1 of the commit that last modified that line. The next two fields are values extracted from that commit — the author name and the authored date of that commit — so you can easily see who modified that line and when.
Git bisect
When you aren’t sure which commit introduced a bug and there are dozens—or even hundreds—of commits between the last known good state and the broken one, git bisect can help. It performs a binary search in your history between your bad commit and last known good commit to pinpoint the commit that introduced the issue.
- Start the Bisect session:
git bisect start - Mark the Current (Bad) Commit:
git bisect bad - Mark a known good commit:
git bisect good <good_commit>
Git now checks out a commit halfway between the good and bad commits for you to check if the issue still persists. If it does, then it was introduced sometime before this middle commit; if it doesn’t, then the problem was introduced sometime after the middle commit.
If the issue is not present, you can do git bisect good to examine the mid commit of the second half. If the issue is persists, you can do git bisect bad to search in the first half.
At the end, you will reach the culprit commit and do git bisect bad . Now Git has all the information it needs to determine where the issue was introduced. It tells you the SHA-1 of the first bad commit and show some of the commit information and which files were modified in that commit so you can figure out what happened that may have introduced this bug.
When you’re finished, you should run git bisect reset to reset your HEAD to where you were before you started.
This is a powerful tool that can help you check hundreds of commits for an introduced bug in minutes. In fact, if you have a script that will exit 0 if the project is good or non-0 if the project is bad, you can fully automate git bisect. First, you again tell it the scope of the bisect by providing the known bad and good commits. You can do this by listing them with the bisect start command, listing the known bad commit first and the known good commit second.
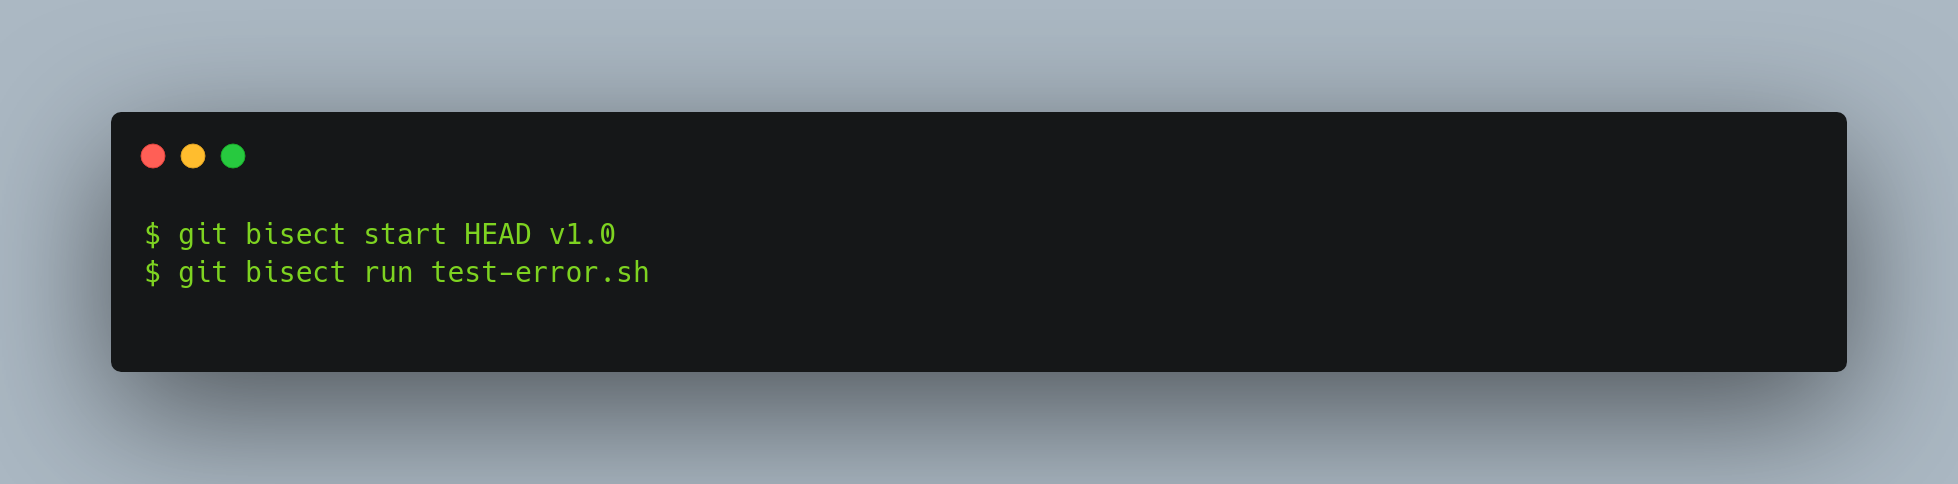
Doing so automatically runs test-error.sh on each checked-out commit until Git finds the first broken commit.
Git cherry pick
Cherry-picking in Git means choosing a commit from one branch and applying it to another. Using git cherry-pick doesn’t alter the existing history within a repository; instead, it adds to the history.
git cherry-pick <commitId>
This picks the commit and applies it to your branch
If you don't want it to commit it directly to your branch, you can pass the -n flag. This just adds it to the staging area. You can then edit and commit the changes.
Git maintenance
git maintenance start will enable automated background maintenance tasks to help optimize your Git repository's performance. Git commands that add repository data, such as git add or git fetch, are optimized for a responsive user experience, by performing pre-fetching, garbage collection, etc.
Git config FSmonitor
git config core.fsmonitor true monitors the filesystem by launching a daemon to monitor inode eventsand updates git cache in memory, making git status extremely fast for very large repositories.
Conclusion
Git might seem like magic at first—but once you look under the hood, it reveals itself as a powerful, logical, and surprisingly elegant system. In learning how to move beyond surface-level commands and into the heart of how Git stores, references, and rewrites history, you've taken a significant step toward mastering the tool. Whether you're tracking down a regression with bisect, rewriting history with precision using rebase, or managing your working state with stash and reset, you now hold the keys to confidently navigate and manipulate your project’s timeline. With this foundation, you're better equipped to write cleaner histories, debug more efficiently, and collaborate without fear.
In the end, Git isn’t just about going back in time—it’s about taking control of time itself in your codebase.
Happy Hacking!